Soft Pastel, Collage and Encaustic

This article has been written by Vicki Ross

After months of studying and researching encaustic techniques, collecting the supplies, and setting up a workstation in my studio, I was ready to ease into some serious play! Being an analytic person by nature, I always work from information to play, rather than play and learn-as-you-go. I made my first batch of encaustic medium (beeswax + damar resin) and ended up with 20 or so mini-muffin shaped cakes of medium. Won’t do that again in a mini-crock pot because it had three legs and was full- wax all over my counter. Miss Brain did everything right, down to micro-managing the measurements, but forgot a piece of newspaper on top of the counter. DUH! Did a few small 7″x7″ experimental pieces on watercolor paper mounted on foam core (materials on hand). A few got scraped off, and the used medium saved into a ball for later use…too precious to waste.

Encaustic and Pastel 12” x 9”

Encaustic, Pastel, Collage, and Gold Leaf

Now I felt like something larger…

Materials:

  • 12″x 9″ Luan panel
  • R&F encaustic gesso
  • Deli Paper (thank you mixed media artists)
  • soft pastels
  • gold leaf
  • encaustic medium
  • Razor Blade
  • Ranger Tacking Iron
  • Heat Gun

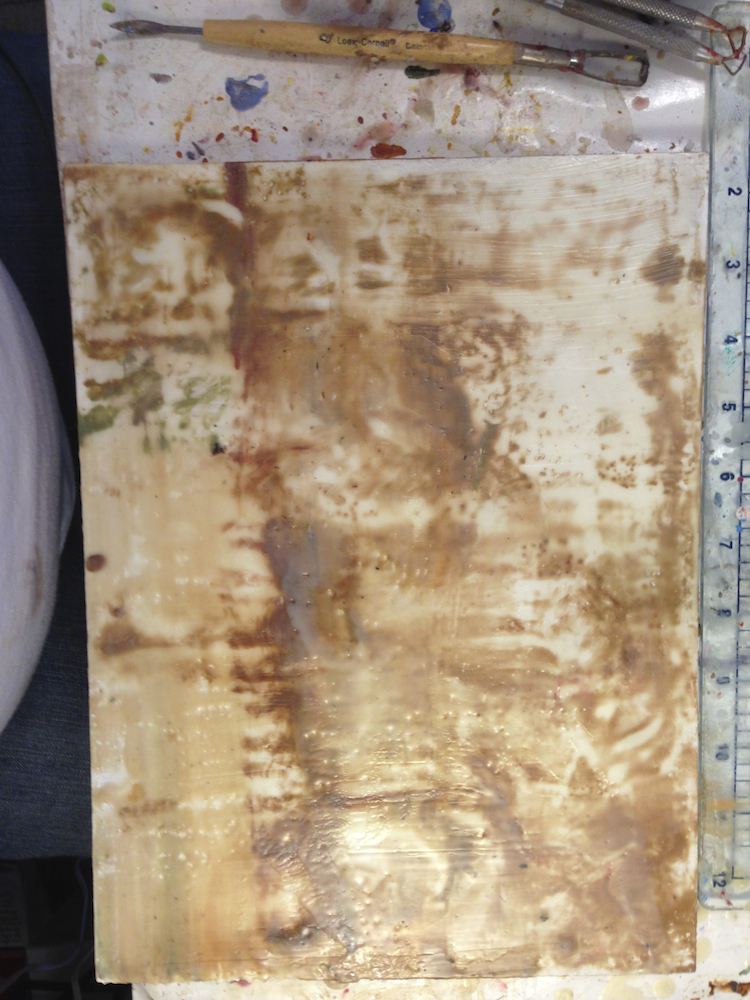
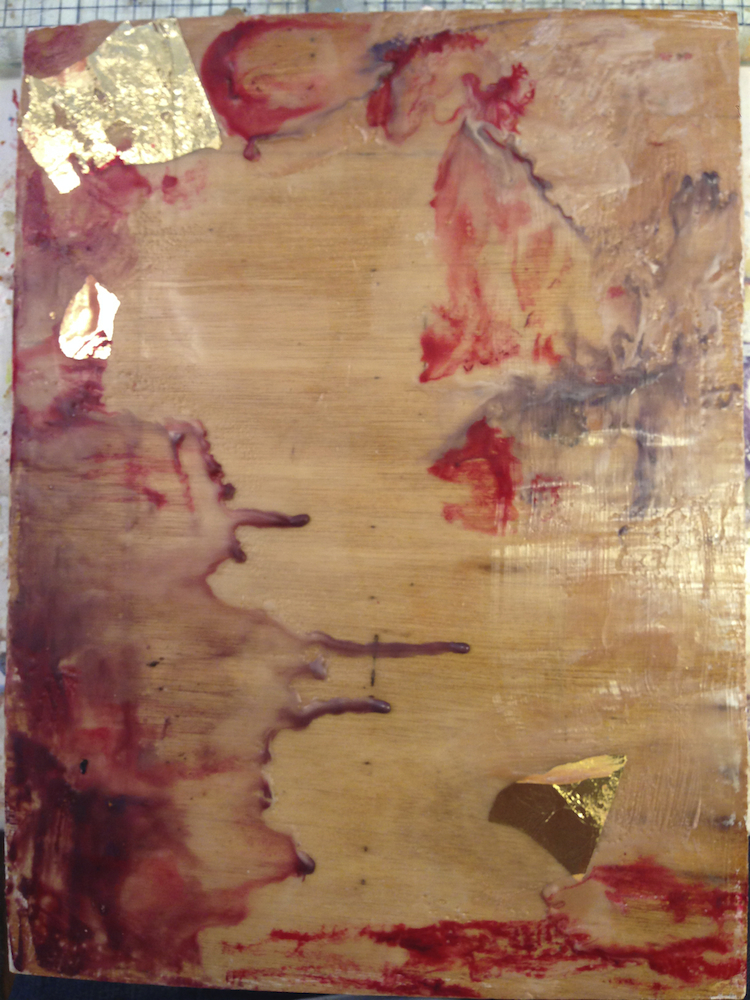
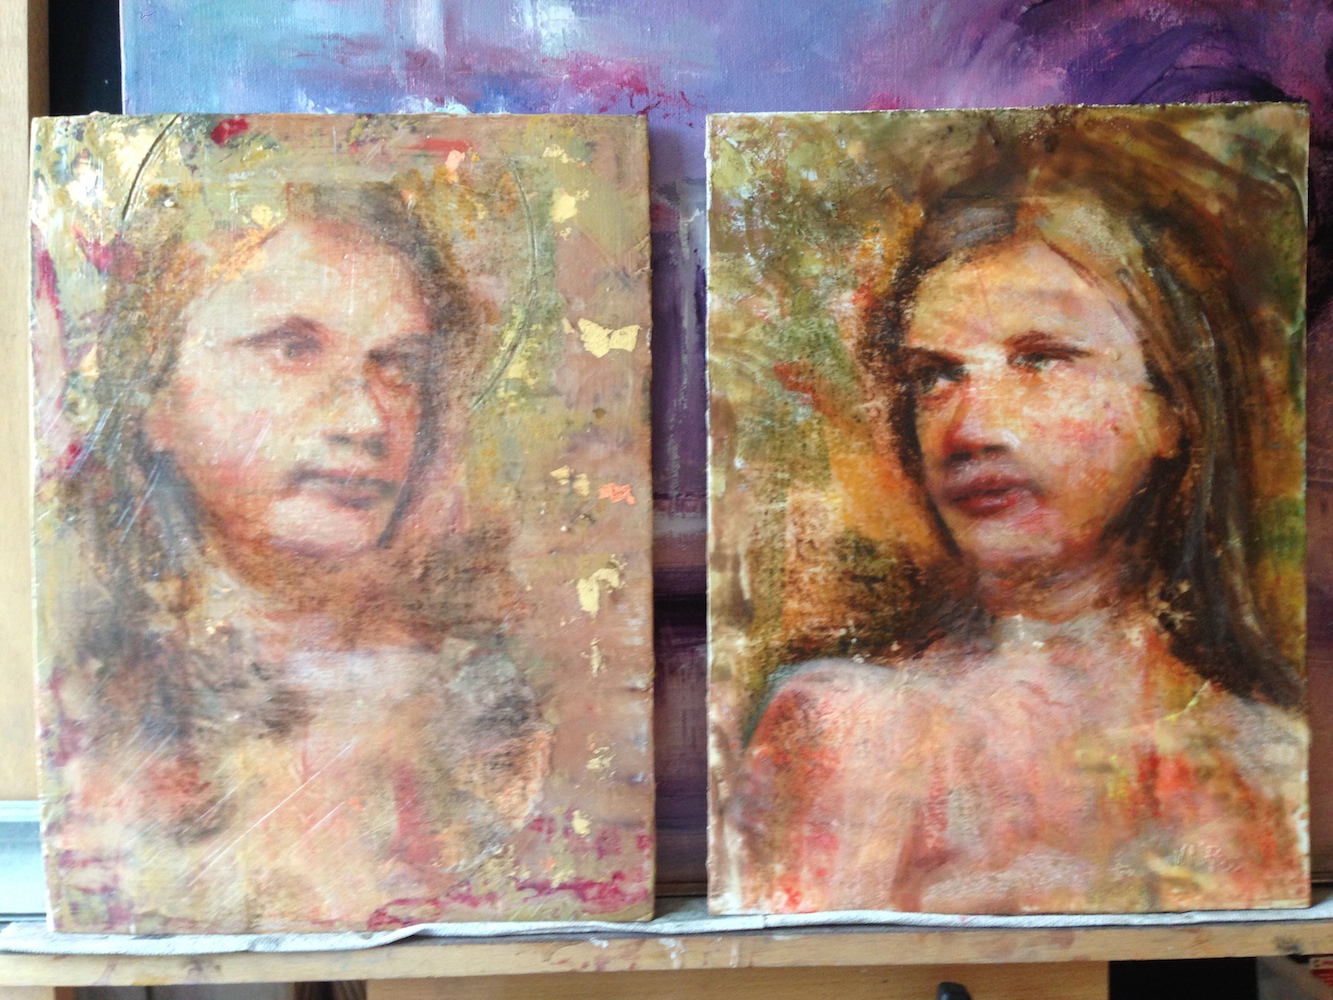
Prime the panel with two coats of clear medium, fusing each with heat gun. To get the surface as smooth as possible, alternate a Ranger tacking iron, scraping with a razor blade, and fusing with the heat gun. Next, I laid on a layer of tinted medium (melted with scrapings from the early pieces. To achieve an aged look, I  placed the panel on the heated surface of the griddle until the wax was moving.

Preparing the panel

Preparing the panel

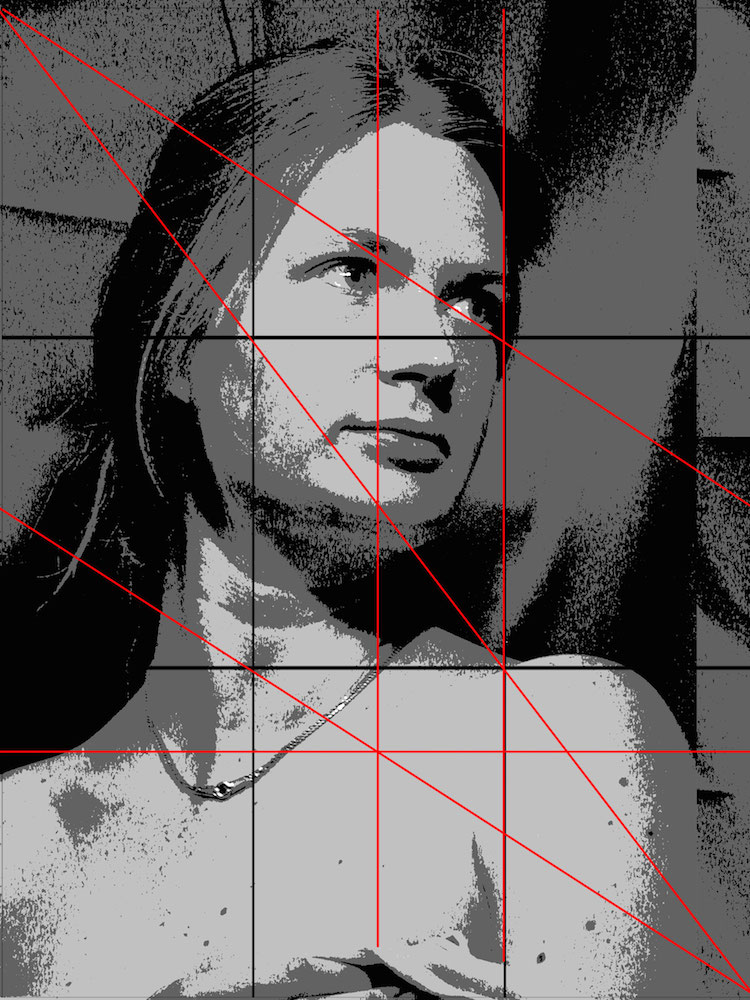
In photoshop, I planned the position of my portrait (reversed), and made the same composition lines onto a piece of deli paper. With soft pastels, I painted the portrait on the paper, continuously checking my drawing.

positioning of the portrait

Painting the portrait

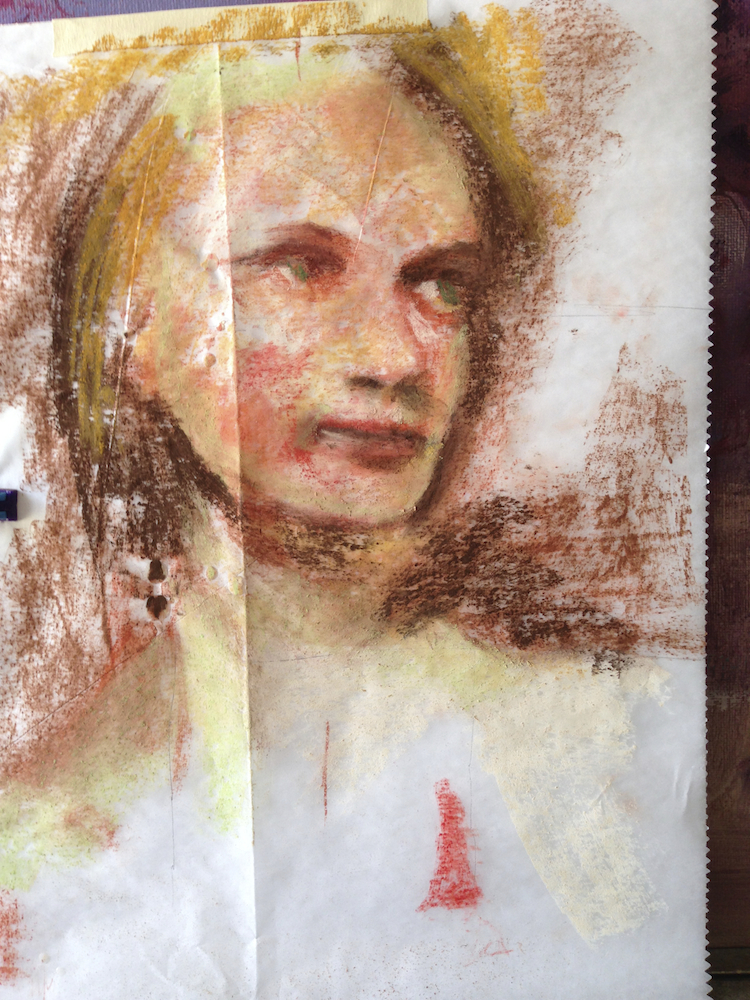
Gently heating the prepared panel with the heat gun, align and place the deli paper pastel side down, and burnish it carefully and thoroughly.

Polishing the portrait on panel one

Carefully remove the deli paper from the panel. If any non-burnished areas show, lay paper back over that spot and re-burnish. If the paper tears, begin peeling it from another direction.

Remove the deli paper from the panel

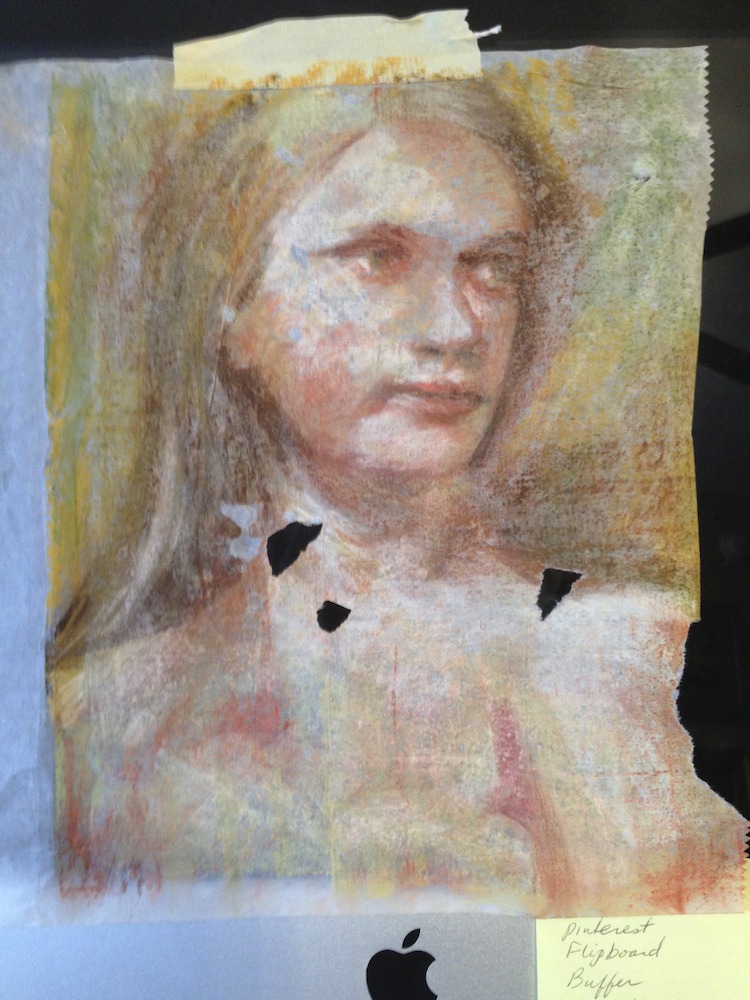
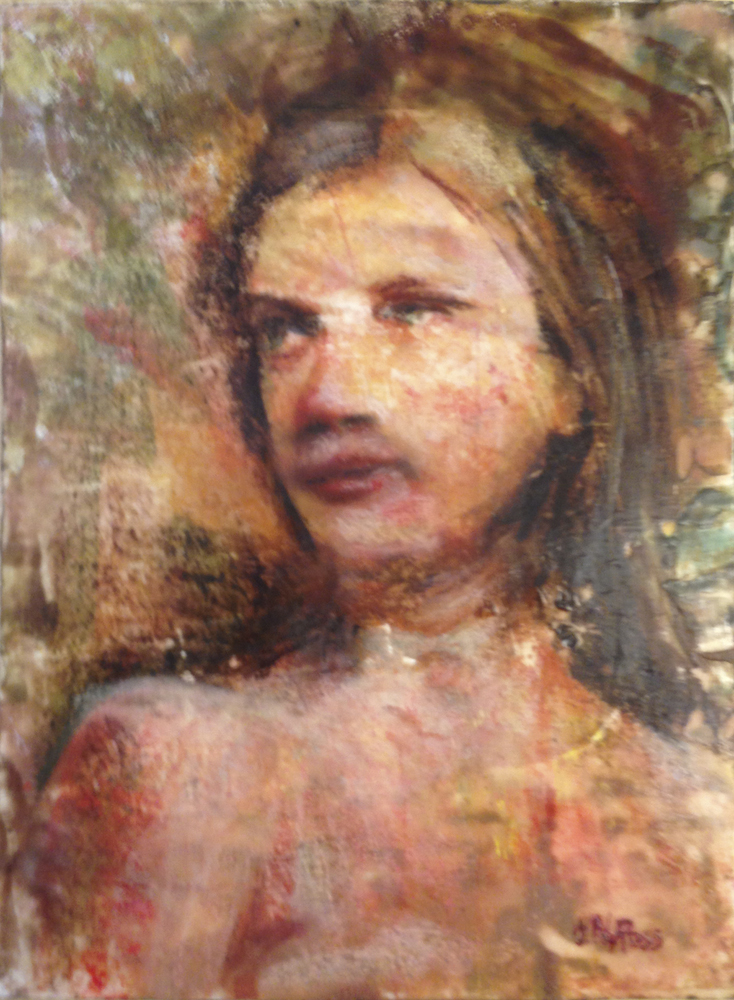
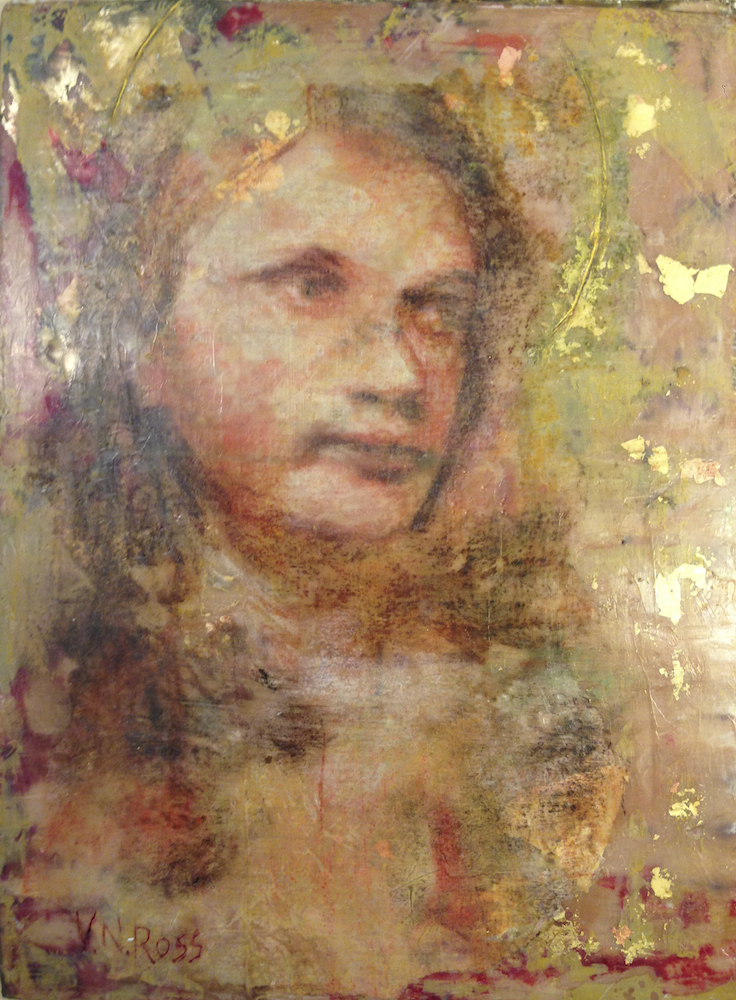
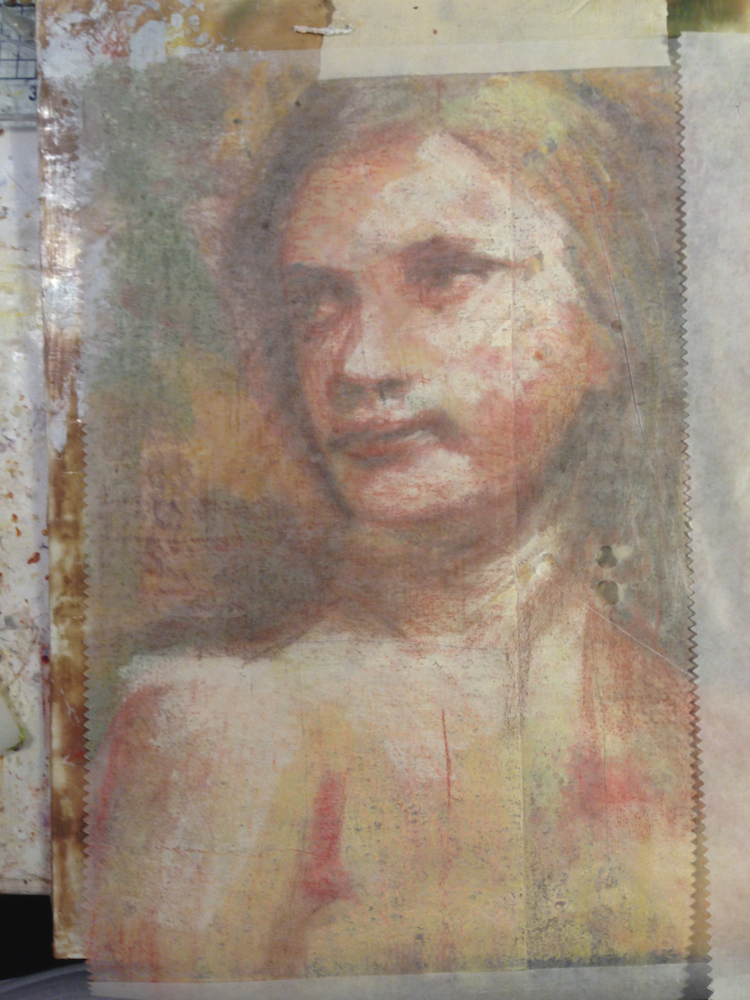
As with the first panel, gently warm the surface with the heat gun. Carefully position the deli paper with the ghost image pastel side up this time, creating a mirror image. With the heat gun again, warm the paper. The underlying layers of encaustic medium will encapsulate the paper, rendering it almost invisible. Carve a circular halo, add more touches of gold leaf, and voilå! Katherine and Katherine Reflected.

Katherine and Katherine reflected image

~*~*~*~*~*~*~*~*~*~*~*~*~*~*~*~*~*~*~*~*~*~*~*~*~

Vicki Ross is focused on sharing her journey to art and how life events can shape us through creativity www.Axully.com. Vicki has always been involved deeply in the creative arts, from professional soft crafts publications (knitting/crochet/needlework) to French Hand-sewing, stenciling to macramé, oil painting to encaustics. Whatever your leaning, she believes in the healing power of creating.

You can see more of Vicki’s work at VickiRossArt or via blog posts at Axully – Solid. Useful. Beautiful

~*~*~*~*~*~*~*~*~*~*~*~*~*~*~*~*~*~*~*~*~*~*~*~*~

.

.

Illuminated Letters for Mixed Media Artists

~ * ~

This article is written by Katja Blum

Illumination is the art of embellishing individual letters or symbols on a page of written text. The letter, usually the first letter of a page or particularly important passage is decorated with patterns and may contain intricate symbolic drawings or a miniature. The word “illuminate” means “to fill with light”, and the art derived its name from the technique of filling parts of the letter or background with gesso – not the acrylic primer, this stuff involves boiling rabbit carcasses – and covering the raised area with gold leaf.

Illumination has been around since 1500 BCE, when scribes began to illuminate Egyptian Books of the Dead. In the Middle Ages, artists created incredibly beautiful illuminations of sacred texts all over Europe and Asia. Famous examples are the Lindisfarne Gospel and the Book of Kells. As the printing industry progressed, illuminations became too labor-intensive and fell out of style. In the late 19th century, the illumination work of English artist William Morris led to a brief revival of the art form. Today, many calligraphers create commissioned illuminations, often as monograms for special occasions.

As a mixed media artist, focusing on the shape, form and symbolic value of a single letter can bring an extra dimension to your artwork. While it is very rewarding to create within the rules of traditional illumination (maybe minus the rabbit sizing), you can create fascinating effects if the letter is the centerpiece of the work, not just enhancing but completing or even replacing text – either carrying the whole piece or adding a layer of meaning to the work.

Illuminated letter collage “We Came In Peace” focusing on the letter M

For “We Came In Peace”, I started with free association about the moon. This is the part where the illuminated letter concept gets to be big fun. Do a brainstorm and run with your ideas. You definitely don’t have to be literal; perhaps you have personal associations with the letter or concept that will surprise both you and the beholder.

Illuminated letter shape “Coffee”

Two- and three-dimensional letter shapes are trending right now, and I’m a fan! Exploring different letter shapes as the basis of your work lets you play with space and contours and takes you far away from the ever-present rectangular boundaries of paper and canvas. “Coffee” is about my love for old-fashioned coffeehouses and pretty much any caffeinated concoction. The color palette in this piece sort of designed itself – and also goes great with our kitchen wallpaper.

Illuminated letter collage “Fates”

With “Fates”, I moved away from concrete images, concentrating on lines and textures instead. Again, the letter is not the first of any word I used, but refers to the overall idea instead. There is actual illumination, even though I replaced the raised gold leaf with mica powder.

Explore the possibilities of illuminated and embellished letters in mixed media artwork, combined with text, imagery or standing alone. Following your imagination ‘to the letter’, you will discover more creative potential of mankind’s most powerful invention – the alphabet.

~*~*~*~*~*~*~*~*~*~*~*~*~*~*~*~*~*~*~*~*~*~*~*~*~

Katja Blum is a writer and translator from Tulsa, OK. As an artist, she started with yarn, fabric and paper mache (rarely together), branching out into collage and other paper arts about ten years ago. Her latest obsession is making soft stuffies and art dolls – to the delight of her toddler. She also likes to find creative solutions for ugly or broken things around the house – to the delight of her husband.

You can see more of her work with fiber, paper and words at www.thewaywardsheep.com

~*~*~*~*~*~*~*~*~*~*~*~*~*~*~*~*~*~*~*~*~*~*~*~*~

.

.

Family History Collages

~ * ~

This article is written by Anjuli Johnson

When I was finishing my history degree, I worked on a project that quickly became one of my favorites. The main stipulation was that all of my research had to be based on what historians call “Primary Documents”. Primary documents are direct evidence of the topic being researched, and were created by witnesses or recorders of the events. Examples of primary documents include journal entries, birth certificates, and newspaper articles.

Collage using original letters of my father from 1974

I remember researching my project required hours in the library, searching through rolls of microfilm for hundreds of birth and death certificates and interpreting the information I found there. It sounds so tedious, but going through those letters and certificates and seeing the names of actual people, their handwriting, and the tiny portions of their lives that were recorded there- it was fascinating. I’m not sure what it is about old certificates and journal entries- it’s like they contain secrets that are just waiting to be discovered.

  Letters and memorabilia used in an encaustic collage with a family history theme.


When the journal entries and letters are from your own family, that feeling of fascination triples. A few years ago, my grandparents basement flooded and we had to bring out all kinds of boxes to keep things from being ruined. It was then that I discovered a cache of letters from my father to his family while he was a young missionary in Mexico in 1974-1975. What an amazing feeling, going through those letters, reading about my dad who at the time was even younger than I was. Seeing his handwriting, the little tidbits he had collected, the replies his parents sent him, pictures, etc. were just like a window to the past. As a historian, those documents represent the truth of who my dad is and was, as well as who I am, as his daughter. I want to immortalize that truth, to make sure that it doesn’t get buried at the bottom of a drawer or inside a box. How could I do that in a way that would be respectful, beautiful, and long-lasting?

mission ephemera in encaustic collage

stamps embedded in encaustic collage

I decided on a set of encaustic collages- one of my Father during his mission and one of me during mine, 30 years later.

Since I knew I was going to be using primary documents, I started by choosing what to include and made copies and scans of every piece. I debated using the originals in my art, but I finally decided that the true value of my collage is in the fact that these are actual pieces of my own history. These artifacts represent my past, and by extension, my present and my future. Using printed copies just didn’t seem right, yet I still needed to make sure that nothing would be lost by including the originals in my collage. Once I have each piece framed, the letters I chose to include will be typed in their entirety and adhered to the back, so that even though parts of the originals are covered in the collage by wax and other elements, the whole letter can be seen simply by looking at the back of the painting.

The collage I created about my father is much more vintage looking than mine- I think the nature of the elements I used for his, and the fact that they are 30 years older adds to that look, but I also used rust in between layers of wax. To use this technique, I soaked a portion of steel wool in a white vinegar and water solution, and shook the droplets directly onto the wax. Once they dried, I was able to add more layers of wax and elements to imbed the rust in the middle of the collage. Adding the drops of India ink to the left side of each collage as a final touch brought more continuity to the set, as well.

original letter added to an encaustic collage

Don’t be afraid to showcase your family history through your art.  I will admit, I was a little nervous to be using the original letters of mine and my dad’s but to be honest, they mean so much more in this form than they do stacked in a box.  Collect your family’s primary documents, make copies and scans- you can even use the copies in your art if you prefer- but do something with your family’s memories that will spark interest and ensure that those memories are remembered and cherished, never misplaced or forgotten.

~*~*~*~*~*~*~*~*~*~*~*~*~*~*~*~*~*~*~*~*~*~*~*~*~

Anjuli Johnson is a Mixed Media Artist from Raleigh, NC.  She began her art career as a scrapbooker, and it’s been an evolutionary process ever since.  She loves all things mixed media- paper, paint, pens, wire, gears, clay… the list goes on and on.  She is constantly trying to push through her fears to discover and develop her talents, meet new people, and learn from those around her.  To see more of Anjuli’s art and techniques, check out her website at www.thefarpavilion.com  and like her Facebook page www.facebook.com/TheFarPavilion

~*~*~*~*~*~*~*~*~*~*~*~*~*~*~*~*~*~*~*~*~*~*~*~*~

.

.

Jennifer’s Eiffel Tower

This article is written by Jennifer Truett

My name is Jennifer Truett (Jennifer Shorter on Facebook) I live in Seaside, California.  I am married, with one son who is 7 years old, two baby dogs and one big dog, a Chihuahua a Chiweenie and a  very sweet Pit Bull.  I love the outdoors but can enjoy staying inside with a good book just as much.  I am new to Mixed Media I just started this journey in April of this year.

Scrapbooking papers, canvas and an Eiffel tower decal were used to create this amazing piece

I created this piece for my Niece Emilee who just graduated High School.

I started by Mod Podging scrapbook paper to canvas.

Scrapbooking papers, canvas and an Eiffel tower decal were used to create this amazing piece.

I added wall art decal of the Eiffel Tower.

Scrapbooking papers, canvas and an Eiffel tower decal were used to create this amazing piece.

I layered it with more paper, painted a wood Fleur De Lis with some gems to add some bling and covered the tower with stained glass pieces.

Scrapbooking papers, canvas and an Eiffel tower decal were used to create this amazing piece.

With acrylic paint, gesso, stencils, ink, felt numbers, mod podge, and my imagination I created this Eiffel Tower piece.

Scrapbooking papers, canvas and an Eiffel tower decal were used to create this amazing piece

This was a fun piece to create and for being my Fourth Mixed Media piece I was pleasantly surprised or should I say super excited when I received a message from Michelle Brown about it from a picture I posted on the Creating Mixed Media Facebook page. I have already learned so much from reading the different posts and from Michelle’s book, “Creating Layers in Mixed Media Art.”  I want to thank Michelle and all of you for your inspiration and beautiful art as I continue my Mixed Media Art journey.

Thank YOU, Jennifer!

.

.