Michelle G Brown | Mixed Media Art

Encaustic Basics Part III – Adding Collage and Embedding Objects

This article is written by Elaine Brady Smith  

Welcome to Part III of Encaustic Basics Series on how to make it easy and economical to get started with encaustic painting. This article is about adding collage and embedding objects to your encaustic art. Adding collage with encaustic has always seemed like a natural practice to me. It is as though beeswax and paper were made for each other. Encaustic wax gives paper a luminous quality and sometimes makes it transparent, which is great for layering. Let’s get started!

Adding Collage

Collage is my all-time favorite medium and I love working with all types of paper. There are multiple ways to add collage paper to encaustic work and I will discuss two that work best for me. You can follow along as I build a collage piece in this article. I recommend you read the first two articles of the Encaustic Basics Series before you attempt the techniques in this article. You can find Part I and Part II to review them both.
Encaustic collage by Elaine Brady Smith

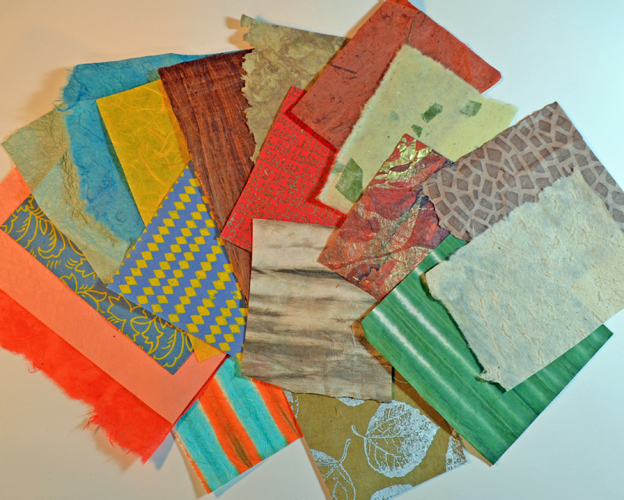
First let’s talk about the paper itself. Handmade papers such as Japanese mulberry or washi, Lokta, lace papers, your own handmade pulp papers, and other natural fiber handmade papers are perfect for encaustic collage. There are many sources to purchase handmade paper in art and stationery stores. Here are a few of my favorite online ordering sites:
Encaustic collage by Elaine Brady Smith

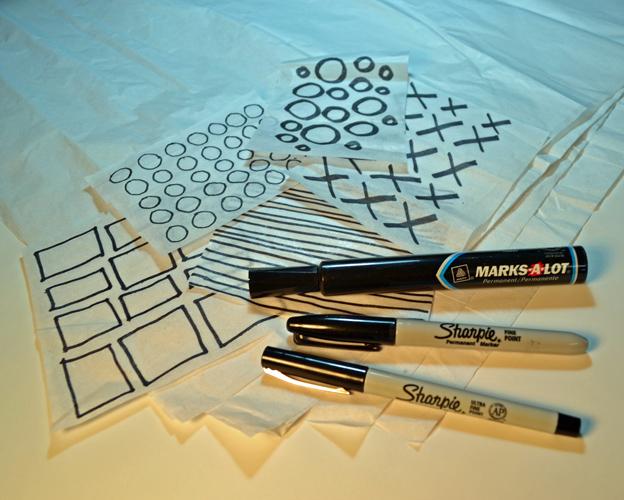
You are certainly not limited to handmade papers for encaustic collage. Tissue paper is a good and inexpensive alternative, whether it is white, colored, or printed. You can build up many transparent layers with tissue paper and incorporate your own marks by drawing or writing on it before you add it to your art. I’ve also known artists who print on tissue paper by running it through their printers on a carrier page, but I have not tried this yet. If you have, let me know how it works!
Encaustic collage by Elaine Brady Smith

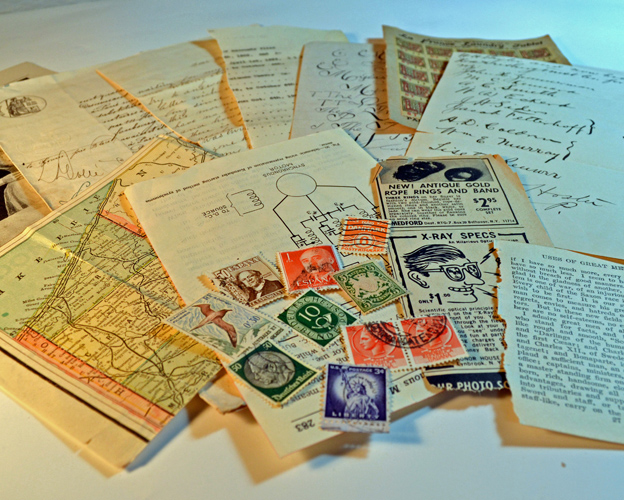
You may also have a stash of vintage papers such as old letters, postage stamps, book pages, or newspapers. I love using old handwritten letters in my art. One note of caution with vintage paper though, is that some older inks will run when dipped into encaustic wax. So it is best to test before you use it. Also wax will make most papers transparent, so whatever is printed on the back side will show through to the front side once it is waxed.

Another great item to use for encaustic collage is printed paper napkins. Just be sure to remove the white backing layers before using them in your art. It is best to just lay the napkin pieces down and fuse right on your surface, rather than a pre-wax method.

Any paper that you use should be absorbent and porous. Some glossy or coated papers, like magazine pages, waxed paper, cook’s parchment, and scrapbooking vellum might not be compatible with encaustic. It is a good idea to test papers with wax before adding to see how they react. One of the cool things about encaustic collage is that if you change your mind, you can always heat and remove a piece of collage from your art and replace it with something else. If you lift it carefully, the collage paper you remove is preserved, and you can reuse it again on another piece. To me this is a beautiful thing!

Methods for Adding Collage

Tacking Iron Method:

If you have a tacking iron and want to dedicate it to your encaustic work, it is a great tool to add and fuse collage papers in one step. A smaller version of the tacking iron is the Clover Iron, which works well for adding small pieces of collage paper. The tacking iron should have a temperature control, which should be set to about medium heat. Since the settings will vary on different irons, you should test the iron before using it on your art. Set it to just melt the wax, but not too hot that it will make the wax smoke.
Encaustic collage by Elaine Brady Smith

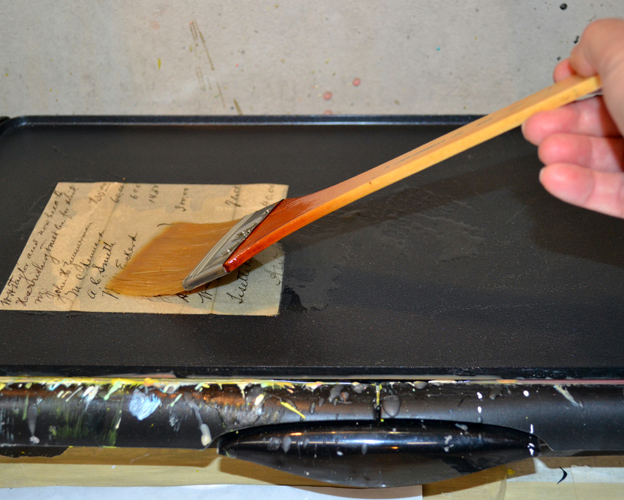
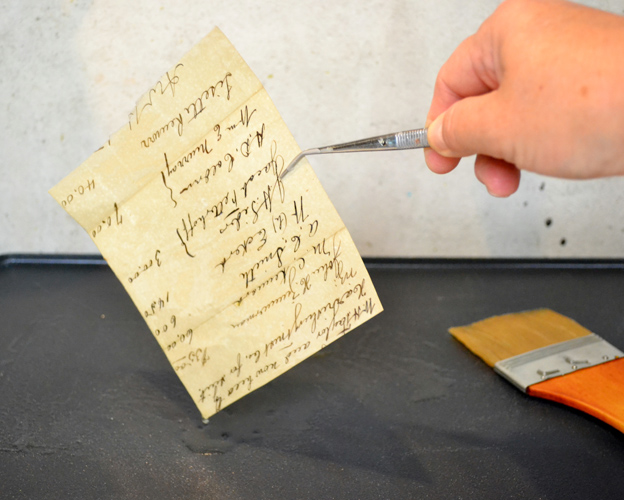
To pre-wax a piece of collage paper for the Tacking Iron Method, place the paper on your palette or griddle. Brush on a thin layer of clear encaustic medium.
Encaustic collage by Elaine Brady Smith

Pick the paper up with a pair of tweezers, and allow excess wax to drip off. It will begin to cool immediately and the wax will harden quickly.
Encaustic collage by Elaine Brady Smith

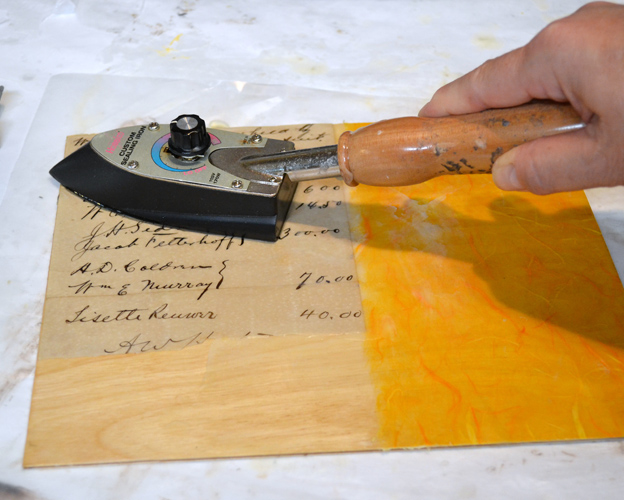
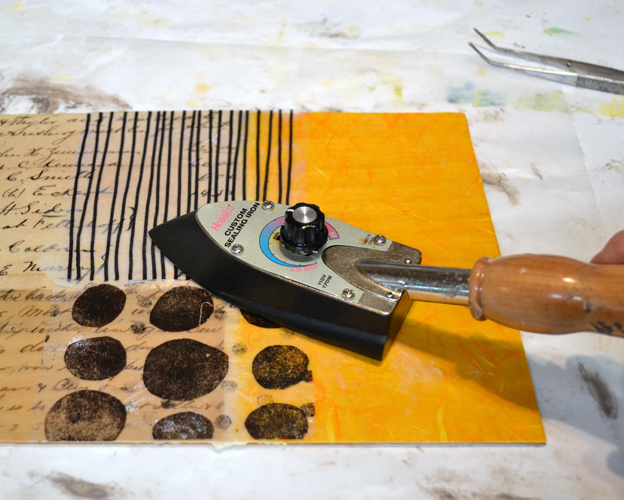
When the pre-waxed collage paper is cool, place it on the surface of your art. With a preheated tacking iron, gently iron the piece into place. Once the wax melts under the tacking iron, the collage piece will be fused. Remove the iron and allow the area to cool.
Encaustic collage by Elaine Brady Smith

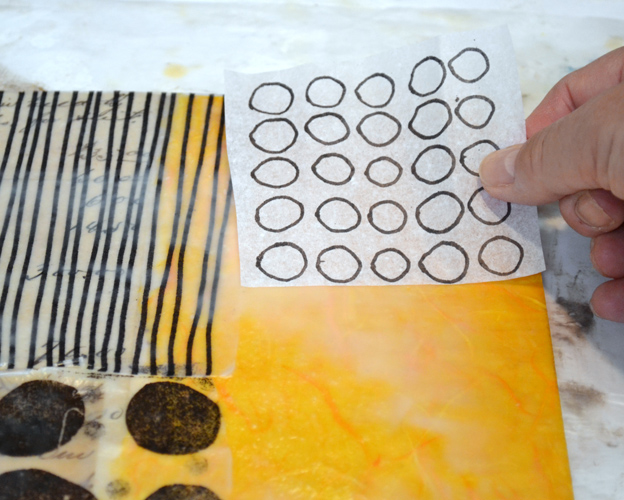
The process of using the tacking iron automatically fuses the wax layers, so there is no need to add any additional heat source. I have added several pieces of vintage handwritten letters and white tissue papers printed with Sharpie Markers.
Encaustic collage by Elaine Brady Smith

Some very thin papers, like tissue paper may not need to be pre-waxed if you already have a primer layer of wax on your art. Just lay the tissue onto your surface and use the tacking iron to fuse it into place. Once the wax cools, you can add more collage layers to your piece, overlapping them as you go.

Heat Gun/Metal Palette Knife Method:

I have a tendency to work with as few tools as possible, so I have put aside the tacking iron these days and started using the Heat Gun/Metal Palette Knife method for adding collage layers to my work. I like it so much more for the simple reasons that I am using less electricity; have fewer tools on my work table and I have more control over how the collage pieces are applied.
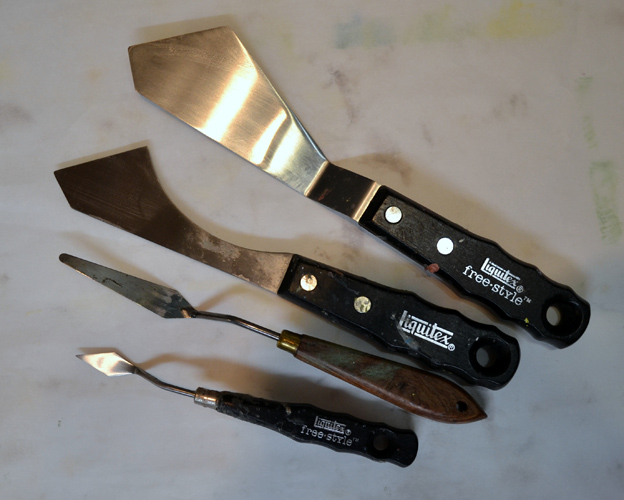
Encaustic collage by Elaine Brady Smith

Use metal palette or painting knives for this method. Shown is a selection of my favorite palette knives that I use for encaustic collage.
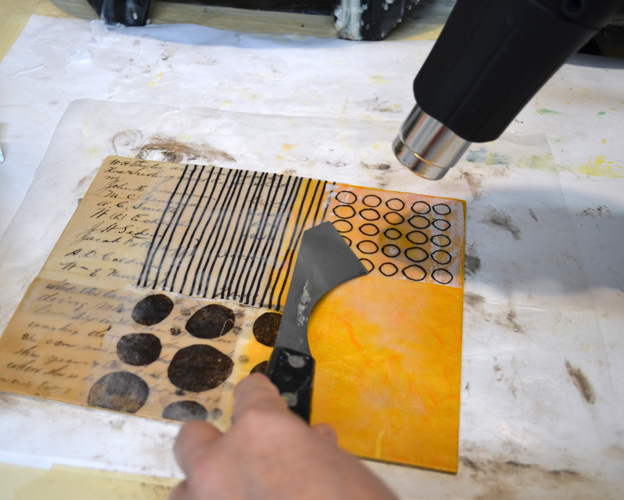
Encaustic collage by Elaine Brady Smith

Pre-wax your collage pieces in the same way as the Tacking Iron Method on your hot palette. Place them on your surface and with the palette knife in one hand; use it to hold the collage piece in place. With the heat gun in your dominant hand, fuse the collage piece into place.
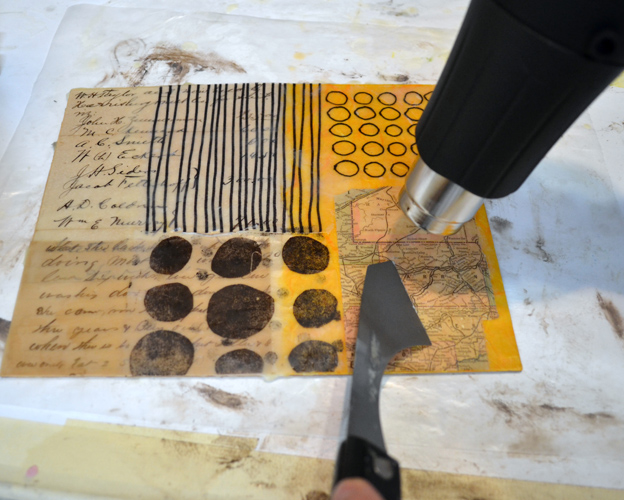
Encaustic collage by Elaine Brady Smith

As you are fusing, smooth out the collage piece with the palette knife. Note that this does take some practice, but is not so difficult that you cannot master it after a few tries.
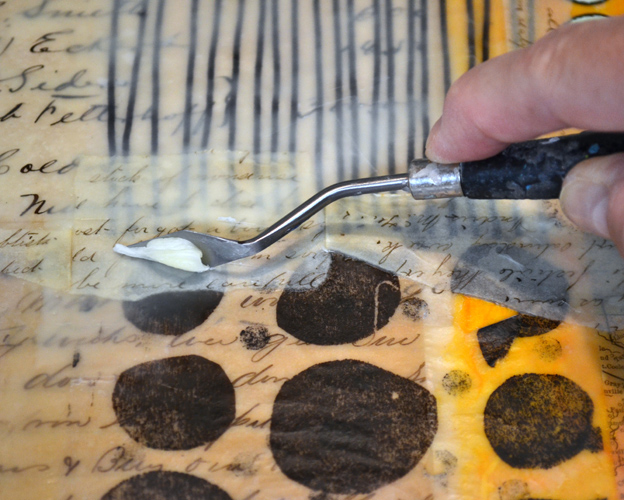
Encaustic collage by Elaine Brady Smith

Use a smaller palette knife to smooth the collage piece down, scrapping off excess wax, and easing out air bubbles before the wax cools. I like to use a combination of large and small palette knives for this technique.

Once you discover adding collage to encaustic art, you will love the endless possibilities for adding paper to your work. As another alternative, you can also add non-synthetic or natural fiber fabrics to encaustic art. Natural fabrics like cotton, muslin, and silk work well with encaustic wax. The possibilities for printing and mark making on fabric is as limitless as it is with paper, but I’ll save that topic for another article.

Embedding Objects
Encaustic collage by Elaine Brady Smith

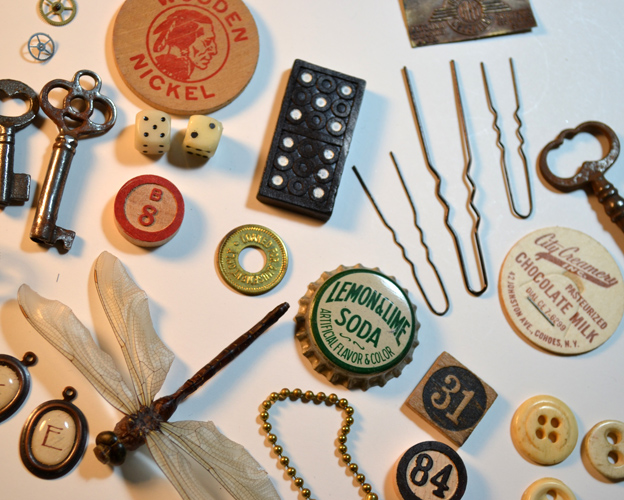
Encaustic wax is great for embedding three dimensional objects to your art. Some objects to add might be buttons, game pieces, jewelry pieces, and natural plant materials. Shown above is a variety of items I might want to embed in an encaustic piece. Encaustic wax offers great opportunities to include items in your work and preserves them literally for lifetimes.
Encaustic collage by Elaine Brady Smith

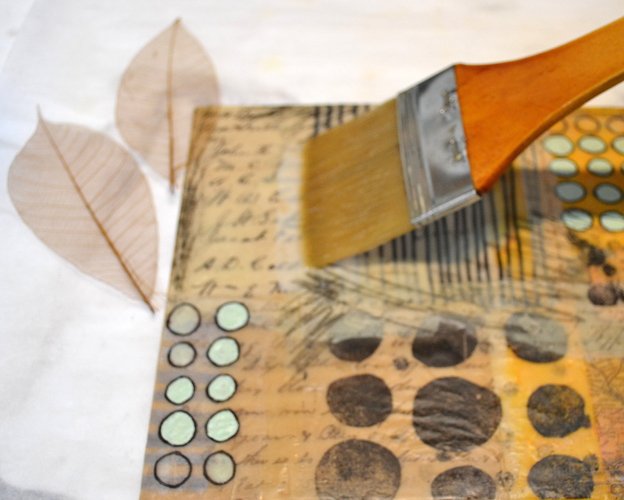
To add objects, brush a small puddle of encaustic medium to the area on your art where you’d like to place the object. Heat the puddle just before you add your object.

Dip your object into the encaustic medium and lay it on your hot palette to allow some of the excess wax to drip off. You can skip this step if your object cannot sustain the heat of the palette, or if you feel you do not need to pre-wax your object.
Encaustic collage by Elaine Brady Smith

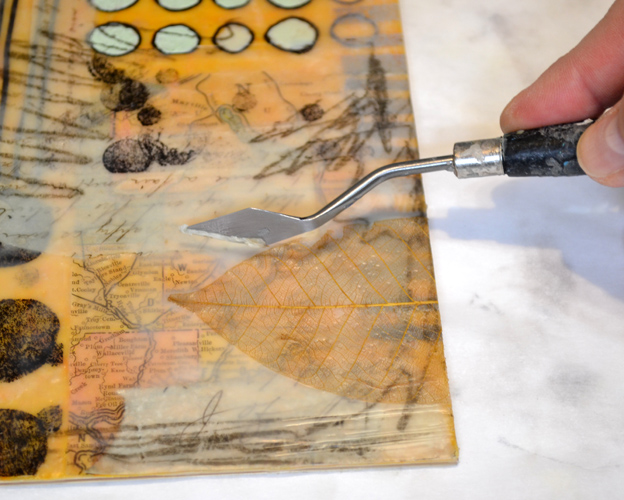
With a pair of tweezers, pick up the object and place it on the wax puddle on your surface. If your object is solid, give it a slight push into the warm wax to embed it in the surface. Fuse the area with a heat gun. If needed, with a small natural bristle brush, add more encaustic wax around the edges of the object to fill in any holes or gaps. I have added two skeleton leaves, which did not need pre-waxing, but I did add a thin layer of wax over top of each leaf before fusing. After the wax was cool, I scraped some wax off to reveal the lovely nature of the leaves.

The wax may sometimes appear cloudy when you are building layers to embed an object, but it should clear up as it cools. If it does not clear up to your liking or if you feel there is too much wax around your object, use a small palette knife to scrape away some of the wax and fuse again to smooth out any gouge marks.

You can still add encaustic paint or collage on top of objects if you’d like. I usually add objects as a final step, but it really depends on what your preferences are for your own work.
Encaustic collage by Elaine Brady Smith

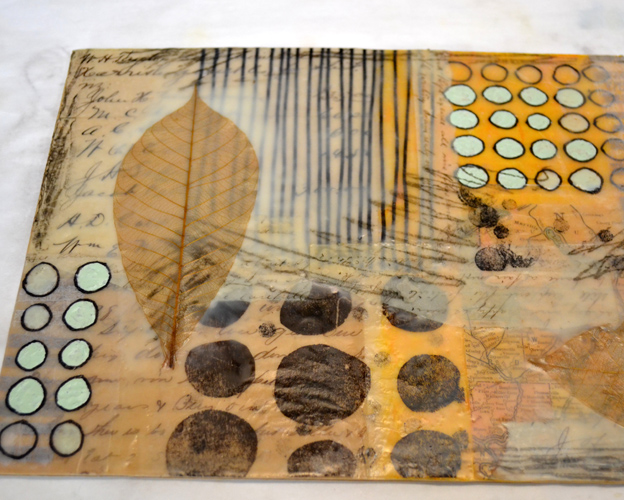
I continued to work my piece by adding some brighter colors with encaustic paint. I used Enkaustikos Hot Sticks Encaustic Wax Paint, Cadmium Yellow Medium on the right and Cobalt Blue Light, in the center of the black circles with a small brush. I also added some transfer lines around the perimeter of the piece with graphite paper. Once these additions were made, I lightly fused the whole piece.
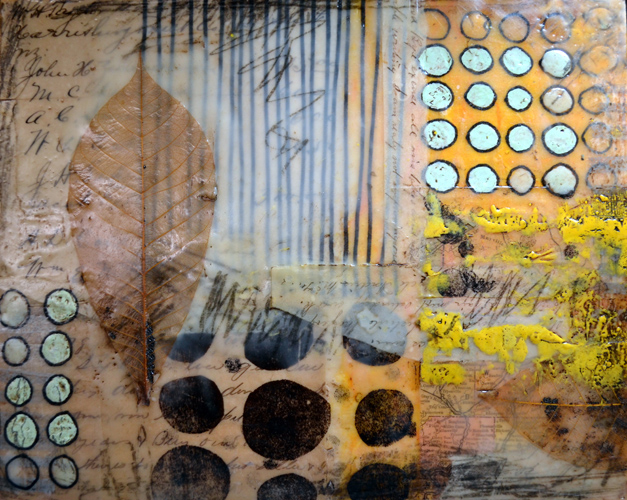
Encaustic collage by Elaine Brady Smith

I still felt like there was something else needed on this piece, and after studying it for a while, I decided to add 2 sets of black x’s (Sharpie on white tissue paper in top left and stamped x’s on white issue paper with permanent ink in center) to balance the dark areas. Below is my finished piece.
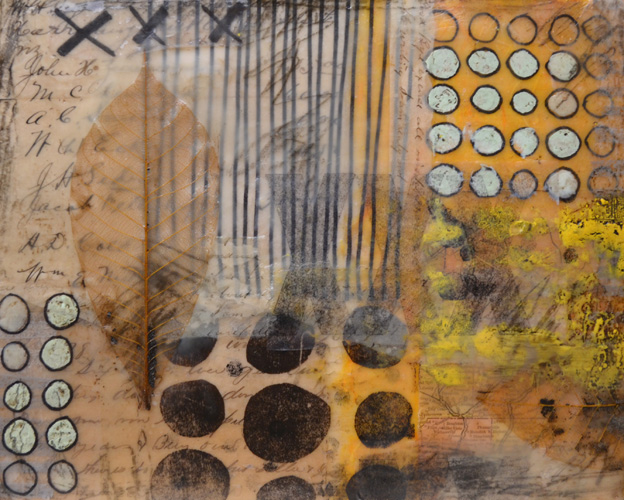
Encaustic Basics Part III-Adding Collage and Embedding Objects. Learn how to add collage and assemblage items to your encaustic art.

You should now have enough information to get you started in encaustic painting. I have found this medium to be inspiring and exciting. I believe that if you practice these techniques, you will become more creative in encaustic painting. I will be writing additional articles here in the coming months about some of my favorite encaustic techniques. You can also visit my website, where I will be sharing more information about encaustic and mixed media painting.

Thanks for your interest!

~*~*~*~*~*~*~*~*~*~*~*~*~*~*~*~*~*~*~*~*~*~*~*~*~

Elaine Brady Smith loves creating encaustic and mixed media art. Key ingredients in her work are vintage papers and hand printed collage papers made with repetitive marks, simplistic shapes, and transparent layers. She also enjoys other art mediums, such as art journaling, oil painting, and colored pencil drawing. Among her other interests are writing, teaching and spending time with her family. Find more on her website: elainebradysmith.com and on Facebook: Elaine Brady Smith Art

~*~*~*~*~*~*~*~*~*~*~*~*~*~*~*~*~*~*~*~*~*~*~*~*~
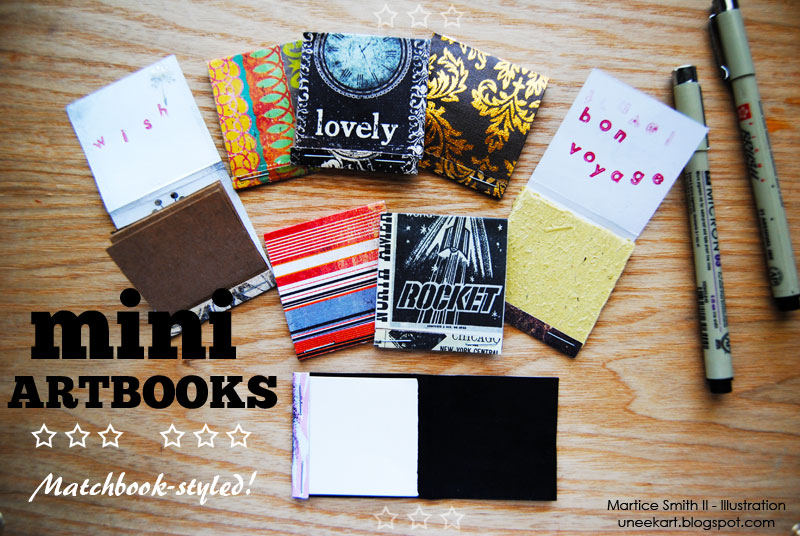
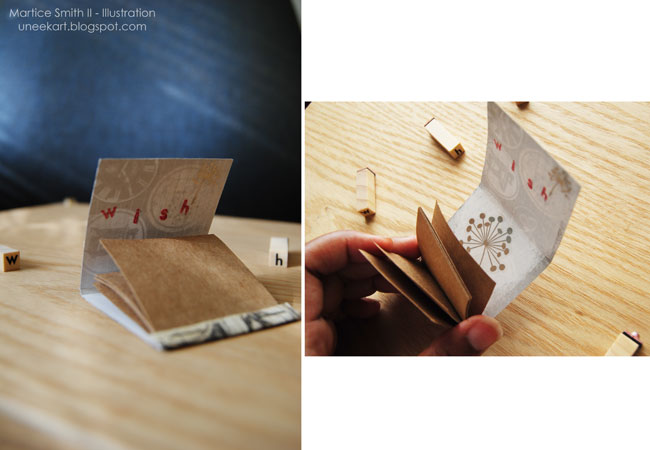
Mini ArtBooks: Matchbook-styled!

This article was written by Martice Smith II 

Create Mini ArtBooks: Matchbook-Styled!

No-sew, mini artbooks…matchbook-styled!

Martice Smith II shows us a fun twist on the classic matchbook style design. Follow along as we create beautiful, miniature artbooks with a variety of decorative cardstock, sketchbook papers and a stapler. At least half a dozen in less than 30 minutes!

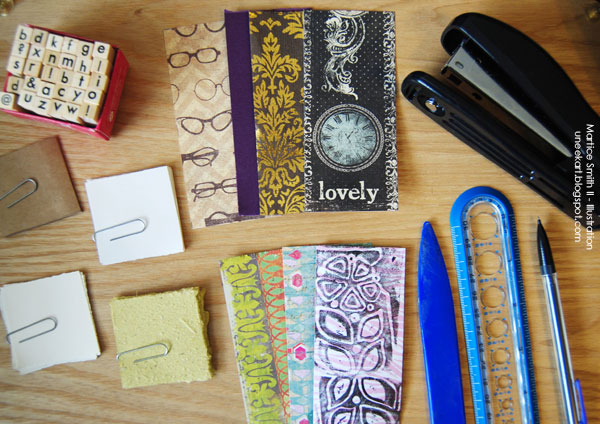
Gather supplies


Gather supplies and tools for Mini ArtBooks project

  • cardstock or decorative papers (for this project, I’m using paper from The Paper Studio®, Prima Marketing, Inc., and Crate Paper, Inc.)
  • blank sketchbook paper
  • ruler
  • pencil
  • bone folder
  • stapler
  • scissors (optional)
  • variety of stamps (optional) (I’m using the alphabet stamp set from Studio G and my own, handmade stamp)

Cut the cardstock and sketchbook papers, to size

Measurement for artbook cover (cardstock): 4.5 inches long by 2 inches wide

Measurement for blank sketchbook paper: 2 inches by 2 inches

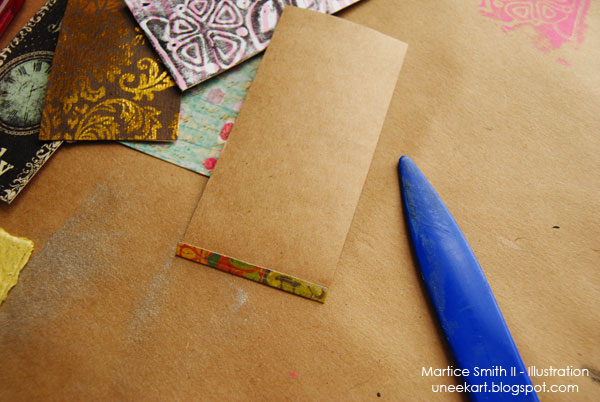
Fold up one edge


Fold up one edge of cardstock paper. Crease fold.

Decorative side facing down, fold up one of the edges about 1/2-inch.

Crease with bone folder.

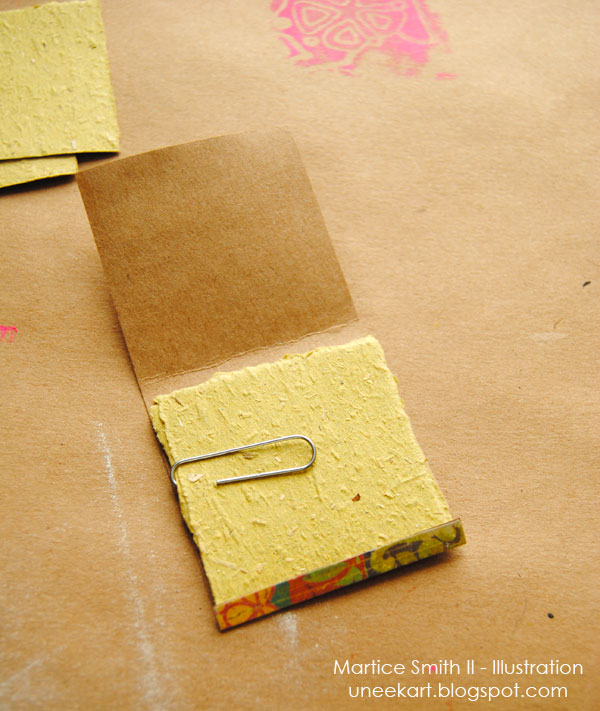
Add paper


Add sketchbook paper. Use paper clip to hold paper in place.

Gather the pieces of blank sketchbook paper and tuck them inside the fold. (Tip: to keep the papers nestled together, use a paper clip.)

I used a variety of paper types. For example, some of my mini artbooks contain handmade paper, charcoal and regular sketchbook papers. I was able to fit 6-7 sheets of paper in each matchbook-style mini artbook.

Lightweight paper works best for this project. If you decide to use heavier paper, you will need to add less paper; maybe 3-4 sheets instead of 7.

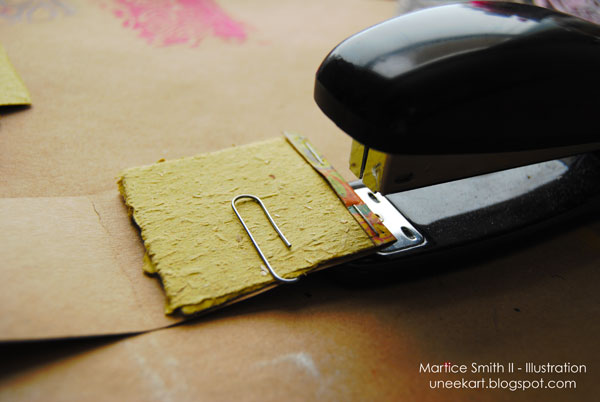
Staple the fold


Staple the folded edge

Staple the fold 1/4-inch up from the folded edge.

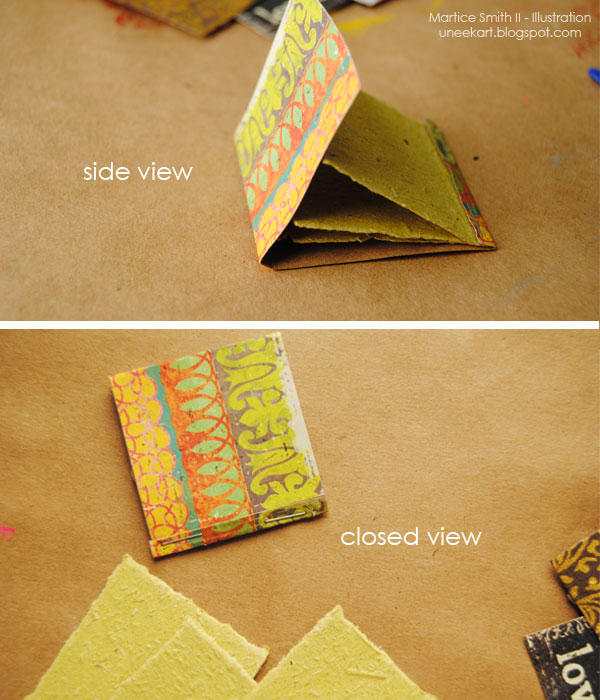
Fold the center


Fold opposite end of cardstock cover to finish the mini artbook.

Take the other end of the cover over the blank sketchbook paper and line it up with the bottom edge of the fold. Crease with bone folder.

Tuck this same edge under the 1/2-inch piece of stapled cardstock to form the matchbook-styled artbook.

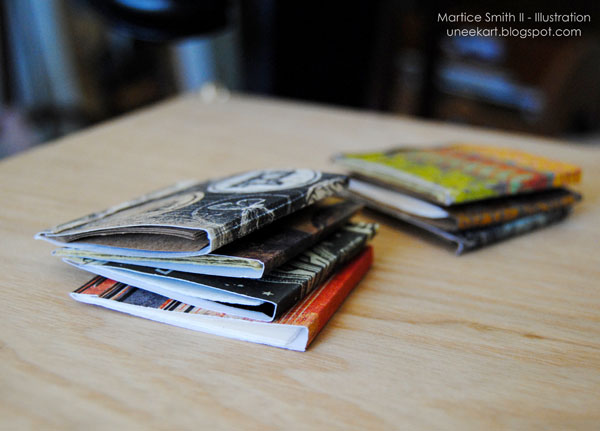
Since these are so easy and quick to make, why not make a dozen of ’em?! They look really nice in a big pile, ready to share with friends! Give them away as small gifts or make some out of collage papers and add them to your art journal when you’re on the go.

Stack of Mini ArtBooks with variety of cardstock covers

*Optional: use alphabet stamps to add a personal sentiment, rub-on stickers for contrast and distress inks to create a worn-out look. The possibilities for these mini artbooks are endless! Use your imagination to make them uniquely yours. Have fun!

Add embellishments to your Mini ArtBook for a more unique look

~*~*~*~*~*~*~*~*~*~*~*~*~*~*~*~*~*~*~*~*~*~*~*~*~
Author bio:

Mixed media artist and designer, Martice Smith IIMartice Smith II is creative director of Martice Smith II – Illustration & Design Studio, based in Kansas City, Missouri and owner of Uneek Art Boutique. She established herself as a freelance Illustrator and graphic designer after receiving her Bachelor of Arts Degree. Her stunning illustrations reveals her love for fashion, typography and wildlife- using a combination of analog and digital techniques.

Martice also contributes as an article writer for the Creating Mixed Media Art website.

You can see more of her work via her Facebook page or her blog. She invites you to join her monthly newsletter, Uneek Art Letter, for art biz tips, advice and free digital goodies!

~*~*~*~*~*~*~*~*~*~*~*~*~*~*~*~*~*~*~*~*~*~*~*~*~
.

.

Merging Arts: Mixed Media As Thought Bubble And Mind Pictures

~ * ~

This article is written by Leeanne Oschmanns

A strange title? Perhaps, but this is the way that Mixed Media Art found a place in my heart. For many years I dabbled with painting and drawing in singular mediums, usually acrylic or coloured pencil. Sometimes I played around with water colour too. There was always a problem for me though. I am a writer and most particularly, a poet. Poetry has always been my soul escape.

My way of shedding light on the things that seemed darkest or most beautiful. Those small things that make every day a unique event to grasp and run with. So a craving for harmony and balance in my creativity led me to a need to express my poetry in more than words. Merely drawing or painting a picture didn’t work. It was too stifling and usually limited the expressive elements to one aspect of the poem. It also tended to intrude on the imagination of the reader. The beauty of poetry is that it is many things and something different to each person. The same can be said of mixed media. A single piece can be interpreted in ways that are meaningful to the beholder and their unique experience.

The power of symbols and the beauty of texture and medium render a flexibility that is more difficult to achieve in styles of singular medium and subject. That is not to say that a mixed media piece can’t also be specific to a subject, because it can. A single image or many symbols, all have their place in this beautiful art form. Mixed media then,is versatile and diverse. It can be metaphor, craft and soul expression. Sometimes a thought so profound that it should not pass can be symbolised and articulated with visual richness and subtle suggestion.

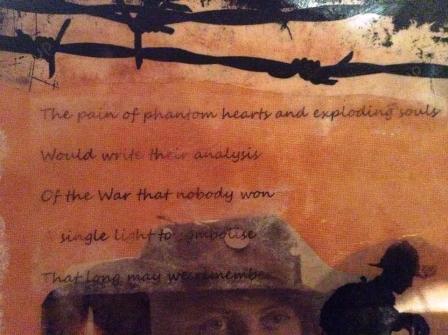
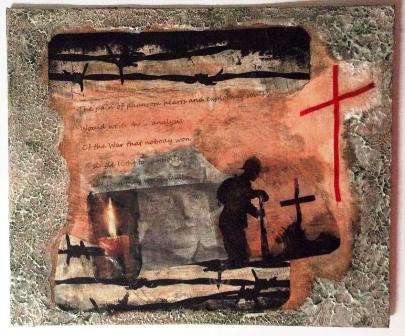
Recently in Britain, the public were encouraged to contemplate the 100th anniversary of The Great War by burning only a single light, preferably a candle, in the darkness. I felt moved to express my thoughts around this in a poem. From the poem, a series of images emerged in my mind, and I set about bringing together some specific symbols that represented my perspective on this very profound historical event which complemented the poem.

Creating “A Light To Remember”

The piece I wanted to create for this article was an expression of a poem I wrote in commemoration of the Anniversary of World War One. The central image of a woman from a local family (their great grandmother who served) is quite haunting, so that became my initial focal point. After finding a few appropriate pics, I made photocopies and  then created transfers of the soldier and the cross, and the candle as symbols of remembrance. For the transfers, I used the simple technique of burnishing the copy onto clear contact, soaking and then rubbing off the paper. This allowed me to merge the elements. I also made a transfer of some poignant lines from my poem,  A Light To Remember

Leeanne Oschmanns creates a mixed media piece

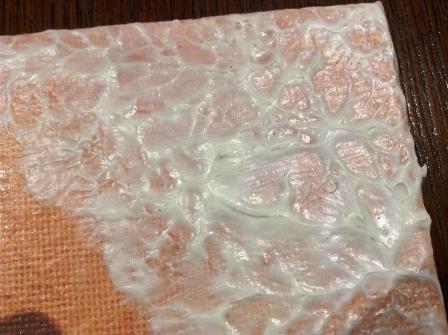
After covering the canvas board in a muted wash, I set about composition and placement. Due to this piece being a visual representation of a poem, I wanted to integrate and overlay the elements. Each element was a powerful symbol of war, as can be seen. Once I was happy with placement, I then used gel medium to stick them in place. In many ways, remembrance of our war dead and wounded has powerful spiritual and religious connotation. I chose to reinforce this with the symbolism of the cross for which I used ribbon of poppy red  (of the red poppy fields), and which was also echoed in the image of the soldier. I added texture to the piece with a border using relief paste which I stippled with a brush.

Leeanne Oschmanns creates a mixed media collage

This is beautiful to work with and is quite forgiving of reworking.  Once the border was done, I applied a clear glaze in readiness for an antiquing wash. The border framed the piece as though looking through a window in a dream. I decided to put a smoky night-time wash over it to give the impression of looking through the ‘mists of time’.

14Sep_LO_MergingArts-Pic3.1

~*~*~*~*~*~*~*~*~*~*~*~*~*~*~*~*~*~*~*~*~*~*~*~*~
About Leeanne – I write about life and ponder a lot. I see stories and poetry in many things. Personal growth and understanding are my passion, but people and animals complete my experience of what it is to be human. This world is beautiful. Only people make it ugly. I am a tamer of teenagers, freelance writer, and I make my art as an expression of my writing and the little montages of life that confront me on my journey

~*~*~*~*~*~*~*~*~*~*~*~*~*~*~*~*~*~*~*~*~*~*~*~*~
.

.

Crafting through Crisis with a Creativity-in-Case-of-Crisis Kit

~ * ~

This article is written by Ann Strecko Koeman

Artists are human and not immune to facing challenges and crisis in their lives that can range from health, financial, family, work and a myriad of other difficulties. Sometimes it is through these challenges that great works arise and there are times when a crisis just overwhelms and consumes every ounce of energy we have. How to survive and how to even thrive as an artist through all of life’s ups and downs takes persistence, perseverance and I believe preparedness.

crafting through a crisis

One idea is to have portable crafting or art making kits ready to go at a moments notice. We may already have emergency preparedness kits to survive 72 hours in the case of a natural disaster, or we may have an emergency kit with a spare tire in our cars in case of a roadside emergency, so why not have a Creativity-in-Case-of-Crisis Kit?

As a mother I used to haul around a diaper bag filled with everything I would need when I was out and about with my babies. As they grew I made them their own portable activity bags to keep them occupied. I learned that I too needed to have my own activity bag to keep me busy as I eventually had to be the one waiting around for my kids during their own obligations. Having to spend great amounts of times in Doctor’s waiting rooms, and hospitals with my children for their needs and then my own health problems made it so a lot of time was being lost. By having a small project bag to keep my thoughts preoccupied for sure made the time go by faster but also alleviated any stress I was feeling.

crafting through a crisis

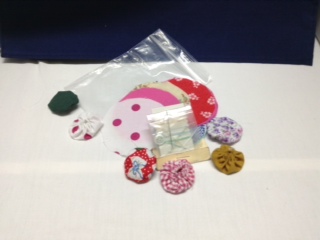
Some kit ideas I have and use are small sewing projects. For example, in a small baggie I have a dozen pre- cut fabric circles, and a small sewing kit which consists of some thread and needles. I use any waiting time to sew up some fabric yo-yo’s that I later use as embellishments in my projects. The kit is one of the smallest I carry around very easily in my purse.

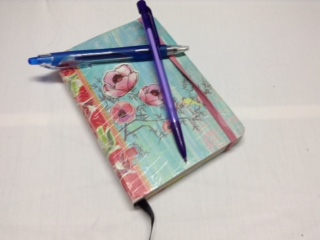
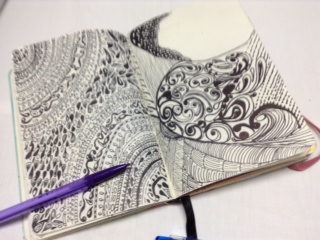
I always have pen and paper in my purse as well. I always need to jot something down anyways. But on days where I know I will have to wait a little longer I bring a very small sketch book and a couple of pens or pencils. I find this down time to be good for writing article ideas or simply making a quick sketch. One time I found myself making Zentangles out of the patterns I saw in the floor pattern in the Hospital waiting room.

Then I was inspired by the ceiling tiles as I lay on a gurney in an observation room and awaited for test results! Sometimes it is the conversations going on around me that give me inspiration for an interesting quote to use in my art journal when I get home, in the meantime I jot it down in my little journal.

crafting through a crisis

In my own experience I have found that in times of great stress that even though I felt that I had no energy or time to spend on a creative project it is exactly what I ended to do to get me through this challenge. By forcing myself to just even scribble on a piece of paper almost instantly switches gears in my brains and for a very brief moment the fact that I am thinking of something positive like sketching relieves a tiny bit of stress from my mind and body, and that is a good thing.

~*~*~*~*~*~*~*~*~*~*~*~*~*~*~*~*~*~*~*~*~*~*~*~*~
Ann is a Mixed Media Artist in Ottawa, Canada who enjoys many many types of crafts and art making. She spends way too much time in waiting rooms, but is grateful for small size sketch books and mechanical pencils.

~*~*~*~*~*~*~*~*~*~*~*~*~*~*~*~*~*~*~*~*~*~*~*~*~
.

.