Michelle G Brown | Mixed Media Art

Using Yarn for your Mixed Media Art Projects

~ * ~

This article was written by Katja Blum

I love yarn!

Imagine a hysterical, yet manly cackle in the background, as my husband marvels at this bold understatement, surveying the yarn-filled tubs and baskets and boxes that are taking over our apartment. I am endlessly fascinated with the colors and textures of yarn. A skein of silk, wool or bamboo yarn is a feast for the senses – even for your nose, if you happen to enjoy the faint whiff of vinegar bath on hand-dyed yarn. But yarn is not just pretty; it is a ball or hank of raw artistic potential. A ball of yarn could become anything – a sweater or hat, obviously, but also a piece of jewelry, a fuzzy pom-pom or a prayer flag woven saori-style. It could be wrapped around a canvas as a textural background or dipped in glue and molded around a balloon or bowl for a yarn sculpture. It can be painted, stitched, knotted, cut, braided … you get the idea.

If there is one thing I like more than using yarn, it would be making it. Spinning is my very favorite craft activity – I spin way more yarn than I could ever knit or weave up. It’s great fun to make the big, crazy, textured yarns that are commonly referred to as “art yarns”. Bobbles and beehives and beads, oh my!

Mixed Media Art Yarn

If you are a spinner, grab some fiber, decorations and a tutorial and start making art yarn. If spinning isn’t your thing, you can find beautiful art yarns from fiber artists at craft fairs and online. If you need just a few yards of a special embellished yarn for an art project, you can make it yourself. No spinning required.
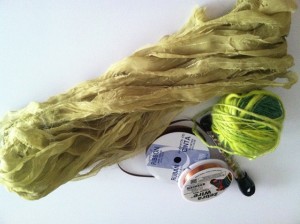
You’ll need:

  • Yarn
  • Craft wire, 28-30 g
  • Fabric strips, paper strips, ribbons, beads, sequins – any embellishments that can be strung or spiked on your thin craft wire
  • A sturdy clamp or vise

Mixed Media Art Yarn

The base for your art yarn is, well, yarn. Ingenious, I know. Any fiber content and thickness will work, but bear in mind that your finished yarn will be quite a bit bulkier than the base strand. You can, of course, combine different yarns for a marled look.

Prepare the wire:

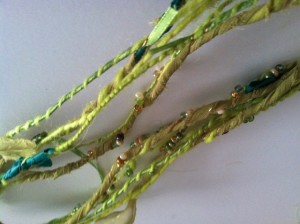
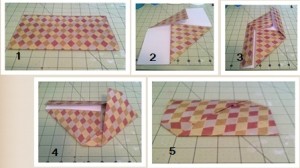
A length of craft 28g craft wire is going to be the “spine” of your yarn. Obviously, yarn is made by twisting fibers, so that they for a long string and hold together. Your no-spinning art yarn is held together by twisting the base yarn with thin wire, which will make it hold its shape and secure the embellishments. For one yard of finished yarn, you’ll need to string about ½ yard’s worth of embellishments, if you want them fairly closely together.

Mixed Media Art Yarn

Paper strips are best spiked on the wire in a harmonica fashion for a firm hold, but with fabric and ribbon, you can just poke the wire through one end and secure the loose length of material while twisting. You should leave the wire on the spool while threading your embellishments. They will be spaced out later, and it’s best not to run out of wire. If you do want to use wire scraps or different colors, you can twist the wire ends together and smooth them into the other materials.

Secure the ends of your base yarn and wire in a heavy clamp or vise. If you don’t have any, that’s fine – just knot and wrap the ends around something stationary. They have to stay in place as you twist. I once duct-taped the ends to the leg of my desk. It worked.

Twist away. Make sure to twist in the same direction throughout. Longer fabric strips tend to wrap around everything else, so take care to have the wire wrap around the outside of all materials. When a length of yarn is completed, move it up in the clamp or vise for a convenient working distance. Don’t crush beads and other embellishments when securing the yarn – ask me how I know this is an issue.

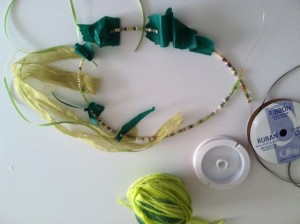
Make as much yarn as you need and embellish to your heart’s content. Obviously, the wire-reinforced yarn is going to be stiffer than regular yarn, but it is a wonderful addition to mixed-media collages, jewelry, sculptures and art dolls.

Mixed Media Art Yarn

~*~*~*~*~*~*~*~*~*~*~*~*~*~*~*~*~*~*~*~*~*~*~*~*~

Katja Blum is a writer and translator from Tulsa, OK. As an artist, she started with yarn, fabric and papier mache (rarely together), branching out into collage and other paper arts about ten years ago. Her latest obsession is making soft stuffies and art dolls – to the delight of her toddler. She also likes to find creative solutions for ugly or broken things around the house – to the delight of her husband.

~*~*~*~*~*~*~*~*~*~*~*~*~*~*~*~*~*~*~*~*~*~*~*~*~
.

.

Making Gift Card Wrappers

~ * ~

This article is written by Katja Blum 

It took me a while to like gift cards. In my family, gift cards, certificates and all kinds of “pick your own” gift promises were seen as an afterthought, proof that the giver didn’t remember until the last minute or put much thought into your gift. I don’t think that’s true. In my mind, a gift cards says “I think you deserve a treat, please pick exactly what would make you smile right now”. Whereas very sensible and frugal people might use a check or cash to do sensible and frugal things, a gift card is fun. It doesn’t look like “real” money, and it’s perfectly okay to spend it on something entirely frivolous.

Hurray for gift cards – but let’s be honest: Sometimes we do buy them at the last moment. So here are a few ideas for some mixed media flavored presentation ideas for holiday gift cards.

General tip: You shouldn’t glue, staple or otherwise directly attach a gift card to anything, because you might damage the strip on the back. Many cards come with a small envelope anyway.

If you have a day

If you still have a day, anything is possible! How about making a collage or mixed media painting and using the envelope as part of the background? Just affix it to whatever paper or canvas you are using and paint, stencil and decorate right over it. Just make sure you have the flap facing out, so the card can be inserted and removed without ripping the envelope off the painting. And don’t glue the flap shut with gel medium. Or make your own simple card pocket by gluing a piece of paper, card or fabric to the piece on three sides, leaving the top open. While painting, you can slip a piece of freezer paper into the pocket to avoid pasting it shut.

If you have a few hours

I like felt ornaments. They are easy to make – and felt can be decorated with anything. The coffee shop card I’m giving this Christmas is going in a little mug ornament, which I plan to slip on the recipient’s tree, so she can find it later.

Gift Card Wrappers

  1. Cut out the mug shape and oval “coffee”. Use the shape as a template to cut out the mug again, but without the top. This will be the pocket for the gift card. You can do this with any shape. If you want to make a snowman, for instance, just cut out the bottom snow balls. Or you could cut out your ornament and put a rectangular pocket on the back – but I like the card peeking out in the front.
  2. If your ornament is a bit on the big or your felt is on the thin side, you can make it less floppy by gluing a piece of cardstock to the base ornament.
  3. Sew the coffee to the bigger mug shape, also attaching a ribbon loop for hanging, and decorate the front pocket – beads, embroidery, paint, glitter glue … The back of the pocket won’t be visible later, so it doesn’t have to be super neat.
  4. Sew the front pocket to the mug base. If, like me, you are not very good at sewing, thin thread in a similar color and a regular sewing needle works best, as your stitches will not be very visible.
  5. Place the card in the pocket. Give away.

If you have an hour or less

The second item on my art to-do list for 2015 is “Learn origami”. I’m fascinated by the possibilities, especially in combination with fabric. If you are really pressed for time, a simple origami envelope can be folded in minutes. Almost any kind of rectangular paper works for the envelope here – and you can, of course, decorate it as much as time allows. Using a piece of fabric gives an unexpected twist – lightweight to medium fabrics work best, my favorite is quilting cotton.

The fabric needs to be stiffened to hold the creases better. You can spray it with a thin coat of varnish or laundry starch. The one thing I always have in the house is white glue, so I dunked the fabric rectangle in a solution of two parts water and one part white glue. Smooth the fabric out on a sheet of freezer paper or plastic. It will peel off when dry. The fabric is going to be stiff, but can still be decorated with needle and thread, if desired.

I used paper to demonstrate the folding steps – a rectangle of about 8″ x 11.5″ makes an envelope big enough for most cards.

Gift Card Wrappers

Folding instructions:

  1. Fold the paper in half, make a sharp crease and unfold.
  2. Fold the top right and bottom left corners down to the center crease.
  3. Fold the top left and bottom right sides inward so that they meet the vertical triangle edges.
  4. Turn the paper 90° and fold the right side down to meet the bottom edge. Tuck the edge into the flap at the bottom.
  5. Fold the left side to the top edge and tuck it into the flap as well.

Slide the gift card into the slit in the center. The envelope has two layers of folds. Slip the card into the bottom layer, because the short sides are open in the layer above.

Gift Card Wrappers

Enjoy giving a gift card to someone special this holiday season!

(Oh, and just in case this article is giving my family some festive ideas – remember the mantra, guys: books, crafts, coffee!)

~*~*~*~*~*~*~*~*~*~*~*~*~*~*~*~*~*~*~*~*~*~*~*~*~

Katja Blum is a writer and translator from Tulsa, OK. As an artist, she started with yarn, fabric and papier mache (rarely together), branching out into collage and other paper arts about ten years ago. Her latest obsession is making soft stuffies and art dolls – to the delight of her toddler. She also likes to find creative solutions for ugly or broken things around the house – to the delight of her husband.

You can see more of her work with fiber, paper and words at www.thewaywardsheep.com

~*~*~*~*~*~*~*~*~*~*~*~*~*~*~*~*~*~*~*~*~*~*~*~*~

.

.

How to use Pan Pastels to make Aged Background

~ * ~

This article is written by Tamara Dinius

Here we’ve taken canvas panels or water-colour paper to create this cute wall hanging.

Pan Pastels for aged background

This video will demonstrate the use of Pan Pastels and rubber stamps to create an aged background for use in your mixed media artwork.


Here is a snap shot of the background with the first few layers

Pan Pastels for aged background

And here we’ve added the stamping:

Pan Pastels for aged background

~*~*~*~*~*~*~*~*~*~*~*~*~*~*~*~*~*~*~*~*~*~*~*~*~

Tamara Dinius lives in the Pacific Northwest with her husband and chocolate lab. She has two grown daughters who make her life meaningful. They support her, ground her, embrace her, and are amazing people in their own right. Her love for mixed media has taken over most aspects of her creative journey. She believes mixed media allows for a broad range of styles and anyone can find success in this form of artistic expression.

You can find more of Tamara’s work, and on her website countrycraftersusa.comEtsy shop,  or via her Facebook

~*~*~*~*~*~*~*~*~*~*~*~*~*~*~*~*~*~*~*~*~*~*~*~*~

.

.

Using Irresistible Pico Embellisher for your Mixed Media Art Projects

~ * ~

This article was written by Melanie Statnick

Irresistible Pico Embellisher

I really enjoy working with a new product. When I saw the Imagine Craft irresistible Pico embellisher I wasn’t sure what to expect with its precise tip applicator and the needle that inserts into it. It was foreign and I wanted to try it.

Irresistible Pico Embellisher

As a visual artist I could see numerous ways to add this texture into art pieces. I love to add details into my art and the Pico embellisher tip is perfect for this. On a piece of Bristol paper I drew up a doodle and gave it a go.

Irresistible Pico Embellisher

Irresistible Pico Embellisher

There is allowance for control with the tip the embellisher has, making lines and dots thick or thin depending on the pressure of how you squeeze. I did notice that the embellisher will suck some air creating bubbles on the next release.

Irresistible Pico Embellisher

Irresistible Pico Embellisher

I dabbed the bubble with a napkin and it broke leaving a ring. Another time I wiped it away and it left a mess. Please take care cleaning up any bubbles that may happen. This could have been something that happens with a first time user. I also wanted to try the embellisher freehand. I think it gives the drawing a needle point look.

Irresistible Pico Embellisher

Irresistible Pico Embellisher

Overall I think the irresistible Pico embellisher by imagine craft is an excellent tool for texture and more. With the verity of colors who know what your imagination will create.

~*~*~*~*~*~*~*~*~*~*~*~*~*~*~*~*~*~*~*~*~*~*~*~*~

Author bio: Melanie Statnick is a published artist/writer out of North Carolina. Melanie creates art daily from her private studio. Her style is happy and whimsy. Statnick’s artwork can be found in art galleries and shops extensively in NC with international private collections. Learn more about Melanie view her website at: www.melaniestatnickart.com

~*~*~*~*~*~*~*~*~*~*~*~*~*~*~*~*~*~*~*~*~*~*~*~*~

Disclosure: These products have been provided by Imagine Crafts  for the purpose of review. All opinions are that of the MixedMediaArt team.

.

.