Michelle G Brown | Mixed Media Art

How to Invert Colors in your Mixed Media Art Projects

This article is written by Jon Webb

This artwork features my dog Wally who passed away several years ago. I call this artwork, “Celestial Surfer“.
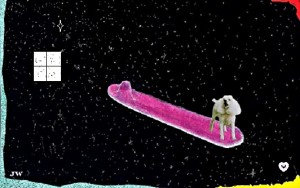
Inverted Colors in Mixed Media Art

I created this by using:

  • black marker to make star-like dots on
  • water color paper
  • glue
  • photo cutout of my dog
  • cardstock
  • water color crayon

This is how I created it:

  • draw the surfboard and painted it with a water color crayon.
  • After the paint dried, I glued to the surfboard.
  • Then it was all scanned into the computer – I used the inverse colors feature from the jpeg menu to create the night sky effect (I actually had to use a photo of the dog with the colors inversed when I glued it onto the surfboard). When I inversed the colors in the computer, the photo of the dog also changed back to normal.
  • I created the window from the jpeg menu and, once again, inversed the colors to make it opposite of the surrounding background. The trim around the edges was created from cardstock and from the jpeg menu.

I usually experiment on different things to discover new ideas. Creativity as well assists me in all my artworks. Don’t be afraid to explore new things. Art is fun and you can always use art to express your feelings, thoughts and who you are.

I started a blog last month which features the rest of my artwork. Here is the link to it: jonfwebb.blogspot.com. You are welcome to visit it anytime. I hope you’ll like my artworks. I hope you get a good laugh out of it if anything else. Thank you, once again.


~*~*~*~*~*~*~*~*~*~*~*~*~*~*~*~*~*~*~*~*~*~*~*~*~

Hi! my name is Jon Webb. I am a mild-mannered grocery store employee, who lives in a world of weird, ridiculous, and sometimes serious art which is represented here. Although my artwork is warped and twisted much of the time, it is G-rated and not meant to insult anybody, though I do reserve the privilege to poke fun at myself. I now live in the Dallas/Fort Worth Metroplex after spending most of my life in the western U.S. I am also a jack-of-a-few trades who mastered none of them. My greatest joy in life was the 25 years that I spent with my dear wife, Renee, who passed away in 2010.

I now invite you to visit my bizarre and sometimes serious world, and I hope you enjoy the experience. Come back as many times as you wish. To get the picture of what I am doing here, I recommend that you start at the beginning and work up to the current date. Remember, art saves!

~*~*~*~*~*~*~*~*~*~*~*~*~*~*~*~*~*~*~*~*~*~*~*~*~

.

.
How to make a Small Gift Bag

This article is written by Sandra Parés 

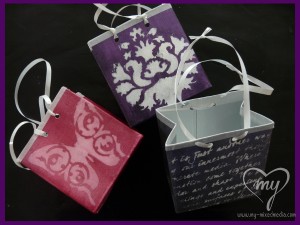
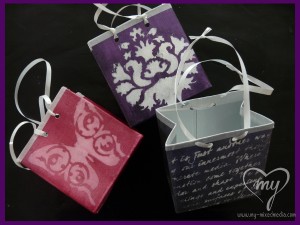
Today I am going to show you an easy way to make a small gift bag, an ideal bag to cover a gift for someone special on the Christmas day.

Small Gift Bag

Here are the materials:

  1. 1 recycled tetra brik that we will have cleaned before
  2. Scissors
  3. Black gesso
  4. Sponge
  5. Acrylic paint: Acrylic Glaze Silks, in my case I will use the violet colour of Irresistible Iridescence
  6. 1 Brush
  7. An adhesive tape, like washi tape or colored tape. I will use a white adhesive tape
  8. A regular white acrylic paint
  9. 1 template
  10. Crop-a-dile or some tool to make holes.
  11. Ribbon to make the handles.

Small Gift Bag

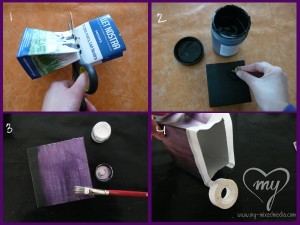
Step 1 – We start cutting the tetra brik. We cut the tetra brik in a half and we get a small bag. We can make it larger or smaller according our personal idea.

Step 2 – Then, with a sponge, we will cover the whole outer surface of the tetra brik with black gesso. If you want, you can also cover it with white gesso, depends on the type of paint you will use after and the result you want to obtain. In my case, as I will use the Silks Acrylic Glaze Irresistible Iridescence to colour the bag, I prefer the black gesso. The Irresistible Iridescence paint works good on dark backgrounds and gives a beautiful bright.

Step 3 – Once gesso is dry, we can paint the whole surface of gesso with the acrylic paint. The colour I choose is a metallic violet with a very nice metallic shine.

Step 4 – When the paint is dry, we can polish the edges of the tetra brik with the adhesive tape.

Small Gift Bag

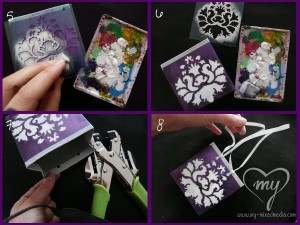
Steps 5 & 6 – Then we take a template to add a picture on the bag. In this step we will stencil the template with a sponge onto one side or both. If we stencil onto both sides, we have to wait to have the first side dry before to stencil onto the other side.

Step 7 – And we only need to make some holes with the crop-a-dile to get a place where we can put a ribbon to make the handles

Step 8 – add ribbon to make handles

With this simple way we will have a beautiful small bag for a gift for this Christmas!

Small Gift Bag

~*~*~*~*~*~*~*~*~*~*~*~*~*~*~*~*~*~*~*~*~*~*~*~*~

Sandra Parés loves working with mixed media. The colors and textures leave her amazed and she enjoys creating and getting their hands dirty with paint and gesso. She lives near Barcelona and works in her art workshop. On her site My mixed media you can find a mixed media online store, art and craft products, mixed media workshops in Spanish, tutorials, ideas and mixed media techniques.

~*~*~*~*~*~*~*~*~*~*~*~*~*~*~*~*~*~*~*~*~*~*~*~*~

.

.
Instructions on How to Make Handmade Greeting Cards

~ * ~

This article is written by Melanie Statnick 

Handmade Greeting Cards

Greeting cards are so fun and quick to make. My mum and I would send cards to each other all the time. I really want to get in the habit of snail mail again.  I love to send gifts, happy mail, post cards and handmade cards.

Handmade Greeting Cards

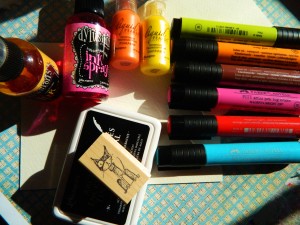
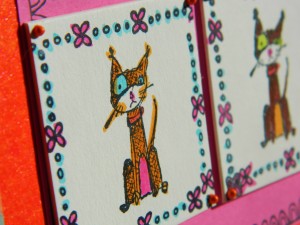
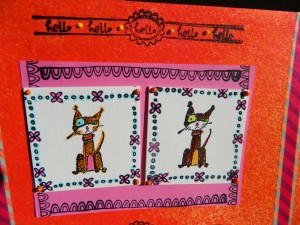
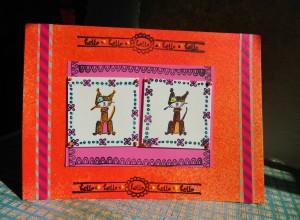
I hand folded 140lbs cold press watercolor paper into a card shape. Opened to lay card flat and spray with orange and pink Dylusions ink spray. These are my favorites. Air dry or dry with heat gun.  Cut pink card stock paper to smaller size to center in the front of the card and glue. Stamp all four sides of card stock. Stamp image of 2” art squares. Glue squares to cardstock.

Handmade Greeting Cards

Stamp your greeting on top and bottom of watercolor card. Using Pitt Pen Big Brush Markers color in the stamped images. Add Stickles in your favorite colors and washi tape to the edge.

Handmade Greeting Cards

*stamp can be found at Rubbermoon.com

~*~*~*~*~*~*~*~*~*~*~*~*~*~*~*~*~*~*~*~*~*~*~*~*~

Author bio: Melanie Statnick is a published artist/writer out of North Carolina. Melanie creates art daily from her private studio. Her style is happy and whimsy. Statnick’s artwork can be found in art galleries and shops extensively in NC with international private collections.

~*~*~*~*~*~*~*~*~*~*~*~*~*~*~*~*~*~*~*~*~*~*~*~*~

.

.
Ideas on How to Make Personalized Gift Tags

This article was written by Martice Smith II

Creating Personalized Gift Tags

Who says small details don’t matter?! Not us mixed-media artists! As a mixed-media collage artist, I love building upon several layers of paint, doodles and various mark-making techniques to set my work apart from the rest.

If you’re looking to develop your own approach, try these ideas to create your own, personalized gift tags. There’s no need to spend a fortune on commercially made products when you can add a unique touch of your own- using what you already have. Just the extra spark needed for a one-of-a-kind gift!

Here are a few supplies to help get you started:

  • Gelli plate
  • acrylic paints
  • paintbrush
  • brayer
  • white ink pen (for doodling)
  • cardstock / kraft paper
  • stencils (I used Tags & Labels stencil from DecoArt)
  • metal eyelets
  • embroidery floss / twine

Personalized Gift Tags – on the Gelli Plate

1. Create the gelli prints, use prints from your stash, or paint directly onto paper.

Using acrylic paints, use a brayer and roll an even, smooth layer to the Gelli plate. You can also use a round tip paintbrush and paint directly on top of the Gelli plate. Make sure to paint loose brushstrokes, going in various directions. This will give you visual interest.

2. Next, lay down a sheet of cardstock (or your choice of paper) and pull a print.

Creating Personalized Gift Tags

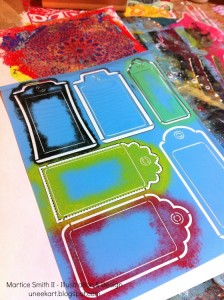
3. Use stencils.

Create a large tag template to use or trace through and cut out the Tags & Labels stencil from DecoArt.

Creating Personalized Gift Tags

Creating Personalized Gift Tags

4. Preserve your work!

It’s important to seal the paintings on your tags, especially if there’s any water soluble media. I like to use a spray varnish first. (Remember to do this in a well-ventilated area, to avoid any irritation.)

For one of my tags, I’ve brushed on a thin layer of Crackle Glaze to give a cracked, eggshell appearance.

After drying for several minutes, I brushed on a layer of Triple Thick Gloss Glaze to keep my colors intensely vibrant and shiny. (Both products are from DecoArt.) 

5. Add the finishing touches. 

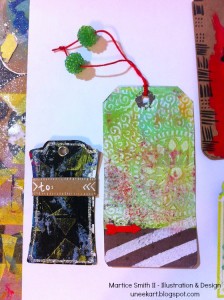
Eyelets, embroidery floss and twine makes these tags look more polished and really sets the tone for the special gift inside. I love things that twinkle, so I used Sheer Shimmer Spritz in Sparkle (from Imagine Crafts) for some drama.

Add other embellishments to underscore the theme of your tags and you’re done!

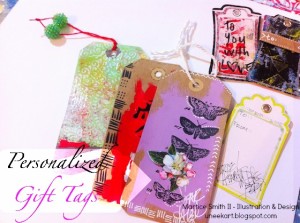
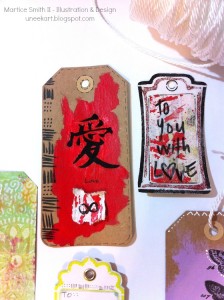
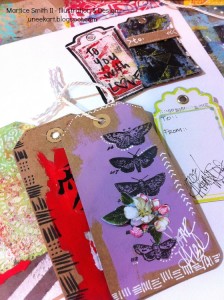
Check out these one-of-a-kind gift tags!

Creating Personalized Gift Tags

Creating Personalized Gift Tags

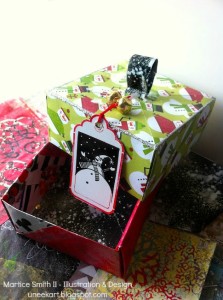
I’ve used a combination of different elements and techniques, such as:

Acrylic paints and rub-on stickers on Kraft paper, DecoArt’s chalky finish paint (Remembrance), gelli paper scraps on foam dots, threading glass beads, faux stitching, and a cute snowman stamp from RubberMoon

Other ideas to try:

▪   Think about how the tag ‘feels’ in your hands. You may want your tags to have a smooth, velvety feel to them. If so, try Dura Clear – Soft Touch Varnish (from DecoArt). This stuff is really impressive!

▪   Incorporate symbols and doodles.

There’s nothing like the repetition of shapes to add dimension and rhythm to your tags. I’ll be sharing more doodling and intuitive painting techniques in my online, art course ‘Cultivate Your Symbology.

Check out sneak peeks of the lesson I’ll be teaching in the ‘My Color is Beautiful Art’ workshop HERE and HERE

Do you include gift tags on your presents? If so, do you prefer making them yourself or spending a little extra money for the pre-made ones? 

Happy creating!
.

.