Michelle G Brown | Mixed Media Art

Creating a Mini Mixed Media Canvas

~*~

Kina, from The Stamp Room, has made this cute little mixed media collage on a 4″ x 4″ canvas. She shares her process with us.

This little 4×4 canvas was gessoed, I then took my new Hexagon 6×6 stencil from the Crafters Workshop and a little embossing paste.

While this was all drying, my Prickley Pear Rubber Stamp large Hibiscus die came out. I punched out 4 flowers in metal, used Copic RV93 and RV95 to color them, and made the large flower by cutting and gluing it.

Next I stamped with Archival ink, I used both of the PPRS Hibiscus Clear Stamp sets. I also used the smaller Hibiscus die and cut out 3 paper flowers using BoBunny’s “C’est La Vie” paper pad.

Time to paint!! I used my new Art Anthology Inc. Colorations Vineyard Spray as well as Distress Victorian Velvet and Bundled Sage. Glued down paper, again from BoBunny’s  C’est La Vie paper collection, and a strip of folded washi tape from Prima’s Sunrise Sunset collection.

My big metal flower and one of the little ones got tiny orchid colored glassbeads glued to the edges and I added a white “pearl” to the middle of each flower, glued the big flower in place and stamped my Sentiment from the PPRS Hibiscus Set 2 in Archival ink.
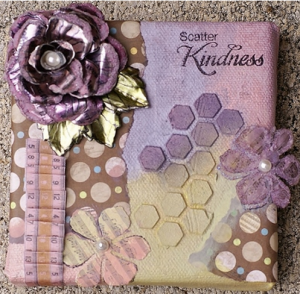
Mini Mixed Media Canvas by Kina

I sure hope you enjoy it as much as I enjoyed making it!

~*~*~*~*~*~*~*~*~*~*~*~*~*~*~*~*~*~*~*~*~*~*~*~*~

Kina can be found, hanging out in her Stamp Room in Florida, USA.

~*~*~*~*~*~*~*~*~*~*~*~*~*~*~*~*~*~*~*~*~*~*~*~*~

.

.

Using Mod Podge in Making Trading Cards

~ * ~

This article is written by Kim Bailey

In May of last year I joined a 365 Day Challenge and for this challenge I decided to go on an art journaling journey. During my journey, I explored new ways of expressing my creativity. One of the ways I did this was making Mixed Media Art Trading Cards; bite sized pieces of art that you can trade or just keep for yourself. Below is what you will need to make your own.

Materials:

Card stock or junk mail post cards, magazine clippings, acrylic paints, markers, embellishments, (and your other favorite crafty/artsy materials), glue, foam brush and of course Mod Podge.

  1. Cut (2) 2 in. x 3 ½ in. pieces from your card stock or junk mail post cards.
  2. Now it’s your time to be creative. Using the magazine clippings, acrylic paints, markers and embellishments create pieces of art on these 2 tiny canvases.
  3. Once you have created your 2 pieces of art, glue them together. You’re finished product should be one decorated card. (The card should actually be the size of a standard business card).
  4. The last step is to Mod Podge your card. To make this step easier and less messy, use your foam brush to apply the Mod Podge. I suggest doing one side at a time so that it dries evenly.

Trading Cards made from Mod Podge

Trading Cards made from Mod Podge

Trading Cards made from Mod Podge

Not only can you use this idea for trading cards, but if you’re really ambitious it’s also a great way to put a spin on your business cards for special events.

Happy Mod Podging!

~*~*~*~*~*~*~*~*~*~*~*~*~*~*~*~*~*~*~*~*~*~*~*~*~

Hello Mixed Media Art Addicts! My name is Kim and I live and create in New York. As a lover of all things crafty and creative I decided to start a blog about 2 years ago to document my obsession. My blog was called The Creative Addiction Blog – it’s not around anymore (sorry!). Currently, I work as a Creative Art Photography Support Assistant within a retail store.  My job helps to fuel not only my creativity, but also my love for photography.

~*~*~*~*~*~*~*~*~*~*~*~*~*~*~*~*~*~*~*~*~*~*~*~*~
.

.

Jenny Panda’s Painting

This article is written by Jenny Panda

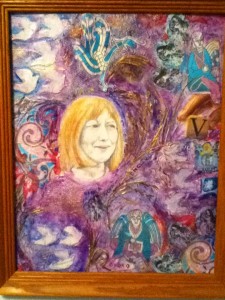
Last year I made a collage/mixed media picture based on my sister Val’s life. She was born in India, moved to England and  I tried to combine all kinds of fleeting glances of memories from her life into the picture.

Painting

I used matte media to build up certain parts of the pic: doves and textures of various things. I drew her portrait and used a photocopy of that which I embellished with gold for her hair and various parts of the rest of the pic.

I used photocopies of an Indian dancer painting I had done to add patterns here and there, also some Celtic pics as we have theological and Celtic roots.

There were many varied memories to incorporate into the composition.

I was so glad to have made the pic as she recently died and now I have this with which to remember her.

~*~*~*~*~*~*~*~*~*~*~*~*~*~*~*~*~*~*~*~*~*~*~*~*~

Jenny was born in India, during British Raj, educated in England, then moved to Canada in 1970. She has taught in England and Canada for 34 years with an emphasis on creativity; art, drama, music, children’s literature and computer exploration.

Jenny is now an Executive Member of Fine Arts Society of Milton

You can see more of Jenny’s work on her blog Jenny Panda

~*~*~*~*~*~*~*~*~*~*~*~*~*~*~*~*~*~*~*~*~*~*~*~*~
.

.
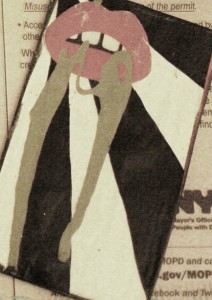
Homemade Stamps by Francesca Albini

This article is written by Francesca Albini

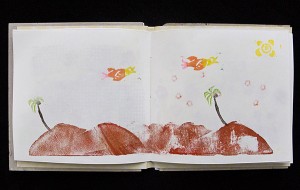
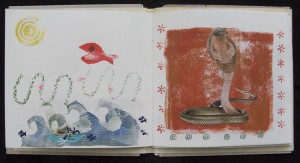
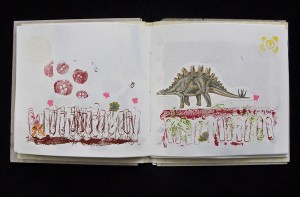
I wanted to do a little booklet of imaginary landscapes and thought it would be fun to use only stamps and stickers. I have a large collection of stickers that I find in children’s books and magazines, or that I buy when I travel. Most of the stamps I used in my booklet are homemade. All you need is some lino carving knives, scissors, a brayer, some kind of plastic sheet to spread acrylic paint onto and… a trip to the pound (or dollar) store. There you will find lots of things that can be used to make stamps – flip-flops, erasers, foam sheets, gardening mats, etc. You can find novelty erasers in the shape of fish, frogs, triangles, that can be quite cute. Also don’t forget the small erasers at the back of pencils, they make lovely dots. After a while you’ll develop an eye for what items make interesting patterns.

Homemade Stamps

Normal white erasers are ideal for carving simple designs, like my palm trees, the bird and the sun. I draw the (mirror) image with a marker on the eraser and then carve out very carefully all the bits that I don’t want printed. I ink the stamp and do a print, if it needs tweaking I carve some more and test it again. I use both sides of the eraser, so I get two stamps out of one eraser. Tips, sides and corners of erasers can also be used to print lines and rectangles.

Homemade Stamps

I cut the fish and the waves from a foam sheet that came from a children’s card making kit. I cut the foam gardening mat into blocks, and with a double sided sticky tape I attached a thick windy string on one, some paper clips on another and buttons on a third.

Homemade Stamps

To ink my stamps, I use ink pads, stamping brush markers and acrylic paint. When using acrylic you have to wash your stamps straight away, before the paint dries. Sometimes it helps to put a foam sheet under the page where you want to stamp, so that you get a better print (with the buttons stamp, for instance.)

I like the idea of a theme, like landscapes. I guess one could also make portraits out of stamps, compositing hair, eyes, hats. The possibilities are endless.

Happy stamping!

~*~*~*~*~*~*~*~*~*~*~*~*~*~*~*~*~*~*~*~*~*~*~*~*~

Francesca is a visual artist using pretty much everything she finds around her to record and relive feelings and memories of places and emotions. She collages, paints, draws, photographs. Francesca loves mixing modern technology, such as mobile phone apps, with the simplest of tools such as glitter glue, crayons and other children’s art supplies. Read her blog at Frans Journal Blogspot.

~*~*~*~*~*~*~*~*~*~*~*~*~*~*~*~*~*~*~*~*~*~*~*~*~

.

.