Usable Art: Mixed Media Papier Mâché Containers

~ * ~

This article is written by Katja Blum

Papier mâché (French for “chewed paper) is a sculptural technique that most people know from elementary school, Mardi Gras floats and big rocks falling on Captain Kirk. But did you know that papier mâché was used for making coffins in Ancient Egypt, for armor, medieval church and castle interiors, boats and even aircraft fuel tanks during World War II?

Paper – as pulp, meaning shredded, soaked paper bits, or strips – combined with various bonding agents like paste, glue, oil or lacquer can be used to build amazingly sturdy, even waterproof, structures and made to resemble pretty much any other material. Many artists today use fine paper clay for dolls or other kinds of sculptures, but I would like to invite you to channel to inner third-grader and glue paper strips to a balloon. It’s fun, satisfying, not to mention a great way to recycle – and you can make objects that are not just interesting substrates for a wide range of mixed media techniques, but also perfectly usable containers to bring more of your art into your everyday life.

Materials for making papier mâché containers

I’m willing to bet that you have everything you need to make a papier mâché bowl in your house right now.
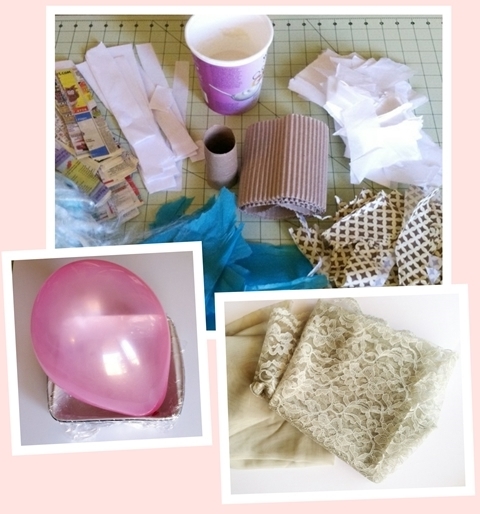
You need:

  • Air-filled balloon and/or a household container lined with plastic wrap
  • •Paper, torn into strips and pieces – tissue paper, newsprint, junk mail, gift wrap, scrap paper, cardboard (for making bases, handles etc.). If it’s paper, you can use it.
  • •Fiber, fabric, threads and other light, “glueable” things
  • •Flour or wallpaper paste
  • •Masking tape for adhering bases, handles etc.

I use a very simple flour paste recipe:

Whisk one part flour into one part water, until the liquid is smooth and of a consistency somewhere between heavy cream and Sauce Hollandaise. Add a squeeze of white glue for extra strength, if you like.

When working mainly with tissue paper, make the paste a little runnier, because applying heavy paste tends to rip thin paper.

Balloon bowl

Steps for making a bowl on an inflated balloon

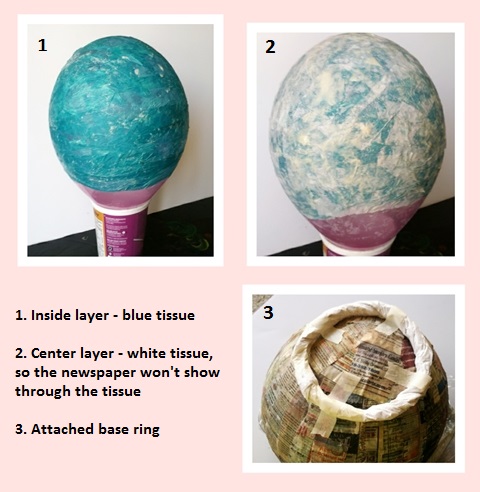
Take a piece of paper, apply the paste with your fingertips and smooth the wet strip onto the balloon. When working on top of a form, you are creating the layer that will show on the inside of your bowl first. If you want to use decorative paper for the inside layer, remember to paste it on with the “good” side down.

Build up layers of paper strips and pieces. You don’t have to let one layer dry before putting on the next. When working with paper strips, try to cross-hatch the layers – one layer of vertical strips, one of horizontal strips. If you get bubbles and creases, wait a few moments for the paste to soak through the paper and smooth them down with your fingers or with the back of a spoon. (Pro tip: Don’t use a pointy bone folder on a balloon project. Bad things can happen.)

When you have almost reached the desired thickness, think about the base for your balloon bowl. You can get as creative as you like, but one easy method is a base ring. Twist a long piece of paper (a newspaper page works well) into a tight paper rope, form a ring and tape the ends together with masking tape. Position the ring on the balloon bowl – doesn’t have to be in the center, my bowl is supposed to stand a little tilted. Cover the ring while building your next couple of layers.

You can also use this technique to make handles and rims. A rim around your bowl is very useful if you don’t want the bowl to be thick – for instance if you want to decorate it with stitching and need to get a needle through the paper layers later. A rim will give the bowl a lot of stability without adding thickness.

Once your balloon bowl pleases you, let it dry thoroughly. If you dry your papier mâché objects outside, try to avoid direct sunlight, especially for thinner items. Drying too quickly in intense heat can warp the object. Same goes for oven drying.
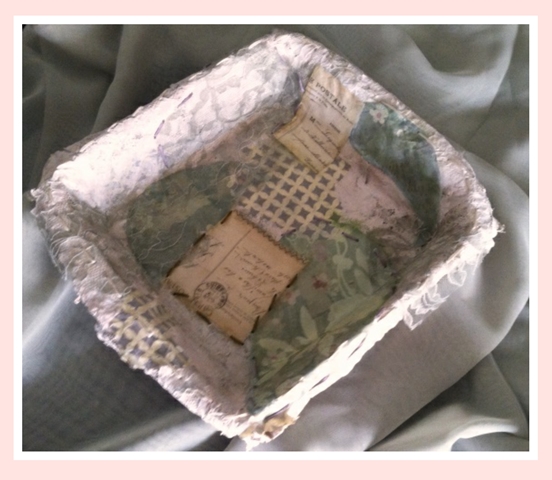
Container bowl

Steps for making a papier mâché bowl inside a household container

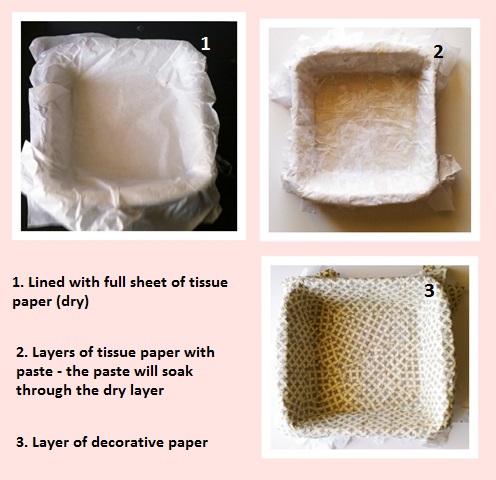
If you want to create a papier mâché container shaped like one you already own, cover the inside of that container with plastic wrap and use it as a form. Make sure that the form’s opening is not narrower than the rest of it; otherwise you’ll have a hard time extracting the paper object. It’s safer to work on the inside of containers you don’t want to cover permanently with papier mâché (which, by the way, is a great way to turn plastic bottles into pretty vases). The paper tends to shrink while drying, and you don’t want to have to tear off your art object to get your casserole dish back.

Remember that you are working the outside first this time. Again, layer decorative papers into the bowl “good” side down.

Proceed as described for the balloon bowl. In my example, I’ve lined the bowl with a full sheet of tissue paper without paste. It gives the outside of the bowl an interesting texture and makes a sturdy start for a bowl with thin walls. Press in the next, wet layer – the paste will soak through and hold the tissue in place.

When working in a bowl, you won’t need a base to make your object stand, but you can certainly add one later, as well as handles etc. Let the papers hang over the edge of your form for now. You can always make a neat edge later after drying. Or not.

I used pieces of polyester lace for this project. Fabric, yarn and fiber can be used just like paper here – just paste them on.

Finishing

Once the objects are dried all the way through, lift your papier mâché bowl out of the form and pop the balloon. Cut the containers into any shape that pleases you.

If you didn’t build a layer of decorative paper, acrylic gesso gives you an even, neutral surface to work with. I like my objects to look like papier mâché, so I tend to leave them pretty rough and torn-looking, but the hardened papier mâché (with or without gesso) can be sanded smooth, if you prefer a sleeker look.

Decorated balloon bowl

Decorated bowl made in a form

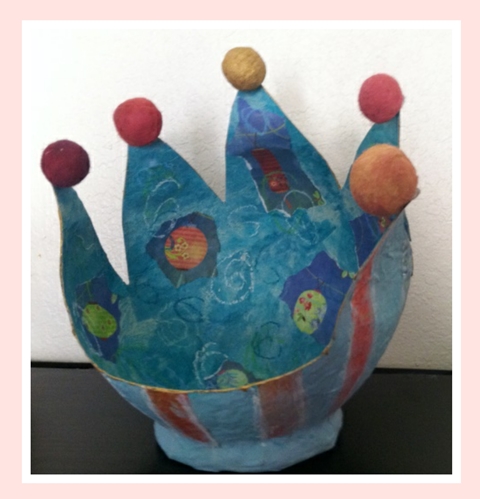
Decorate the papier mâché bowls. You can always add more paper or cardboard elements. Painting, stamping and stenciling all work well on these objects. Thinner containers can be stitched or beaded. Painted felt balls find a use here. Spray varnish is a good protective finish.

Enjoy your useable papier mâché art and experiment with the infinite possibilities of this ancient technique.

~*~*~*~*~*~*~*~*~*~*~*~*~*~*~*~*~*~*~*~*~*~*~*~*~

Katja Blum is a writer and translator from Tulsa, OK. As an artist, she started with yarn, fabric and papier mâché (rarely together), branching out into collage and other paper arts about ten years ago. Her latest obsession is making soft stuffies and art dolls – to the delight of her toddler. She also likes to find creative solutions for ugly or broken things around the house – to the delight of her husband.

You can see more of her work with fiber, paper and words at www.thewaywardsheep.com

~*~*~*~*~*~*~*~*~*~*~*~*~*~*~*~*~*~*~*~*~*~*~*~*~

.

.

DIY Business Cards

This article was written by Jean Mullins

Supplies required

Computer and printer

Laminator (optional)

Coloured Card stock A4 size. This will give you approx. 10 cards depending   on the size.

Water colour paper or thin card A4 size or larger, not printer paper as this is too thin.

Glue, acrylic paint or inks, stencils, stamps etc.

Creating back of cards

Step 1.

Paint, stencil, and stamp the paper or thin cardboard.  I used Jo Sonjas paints, simply because I have a lot, I love Cad red light, Norwegian orange, French blue, white, touch of yellow, and violet, I used stencils, then stamps.

I made 2 separate backing papers so some cards have the orangey back and some the violet shades.

Create unique business cards

TIP>If your painted paper is lumpy and bumpy, for example if you use texture paste, buttons or similar, it will be harder to laminate, creates wrinkles, air pockets etc.

Step 2.

While your painted paper is drying, create your business card.

I used an Avery template, 10 cards to the page.Type the wording you want on your cards, name address, webpage, what you do etc.Save,and then print them out on the card stock, use a colour that will blend with the paper you have just painted. Cut each card out.

Step 3.

When the painted paper is dry, use a cut out card as a template on the back of the paper draw around it, this will give you the right size to cut for each card. Cut them out.

Create unique business cards

Step 4.

Now you require one of each, using a glue stick, dab a bit of glue on each card as you stick the front to the back take care to have them back to back. Trim if required.

TIP. Use just a dab of glue and press the 2 pieces together firmly.

Step 5.

The fun bit Laminating.

Get your laminator ready, turn it on to warm up.

Lay a laminating pouch on a flat surface, open it, then dab the glue stick on each card as you position it on the laminating sheet. Leave a little space between so that they each seal. (Approx. 10/11 per sheet). When the laminator is ready carefully lift and feed through.

Now cut and separate each of your beautiful, unique business cards and say wow. Trim excess laminate off each card.

For those of you who don’t have access to a laminator, office supplies or similar place will laminate them for you.

Alternatively after glueing the 2 pieces together, use a brad in opposite corners or eyelet in one corner then tie with string cord etc.

~*~*~*~*~*~*~*~*~*~*~*~*~*~*~*~*~*~*~*~*~*~*~*~*~

Jean Mullins (Stevenson) lives at Caboolture Queensland with 2 little dogs.

Mother and grandmother, Jean is passionate about teaching and passing her knowledge on to everyone she can. Author, pattern designer, magazine contributor for many years, Jean loves to create and play with paint, as well as tutor at U3A.

You can see more of my work at:

www.nannasworkroom-stitcheriesandsuch.blogspot.com

www.jeaniesartyplace.blogspot.com

~*~*~*~*~*~*~*~*~*~*~*~*~*~*~*~*~*~*~*~*~*~*~*~*~

.

.

Cheeky Photo Frames

~ * ~

This article was written by Cecilia Sanchez

I have made a friendly and funny photo frame, thinking of putting pictures of my naughty children.  It’s pretty simple. They like to play with bottle caps, and so I wanted to include them in the frame.

Make your own photo frames

List of materials:

A wooden frame 
Bottle caps 
marbles 
metal washers 
glue 
stencil (Stencil girl products)
gesso 
acrylic paint 
paper towels 
mod podge 
crakle paint 
Zig Painty FX

First, glue the metal elements or whatever we want. 
Then, cover with a coat of gesso.

I used a stencil of electronic circuits with gesso to give more texture.

Mixed media photo frames

I like to use the paper towels used, and stained with paint.

I have fixed with Mod Podge.

A layer of acrylic paint.

I remove some paint with a baby wipe.

Mixed media photo frames

Finally, a layer of Distress Crackle paint, gives an interesting effect.

Mixed media photo frames

~*~*~*~*~*~*~*~*~*~*~*~*~*~*~*~*~*~*~*~*~*~*~*~*~

My name is Cecilia Sanchez (CeciScrap) and I live in Málaga, Spain. I am married and we have three gorgeous sons. They inspire me every day with their crazy ideas.

Since my childhood I liked the photography, drawing, collage and make photo albums with cuts and travel souvenirs. I also love crafts in general. In 2006, a few months after birth my twins, I discovered scrapbooking, digital first and then the traditional. I love to do 30X30 pages, cards and mini albums, and for a while now I am fascinated with the Art Journal and Mixed Media, and I do not imagine scrapbooking without getting my hands dirty.
I am inspired by everyday things, feelings … The art journal is a real diary for me, because sometimes I need to express feelings with colors and shapes.

I love learning and discovering new techniques and materials.
I am part of the European design team of KURETAKE, and I am also designer for a monthly blog challenge Sweet Card Club. I contribute with some blogs and digital magazines and organized Scrapbooking workshops in Malaga.

You can see more of me at:

http://ceciscrap.blogspot.com.es/

http://www.facebook.com/ceciscrap

~*~*~*~*~*~*~*~*~*~*~*~*~*~*~*~*~*~*~*~*~*~*~*~*~

.

.

Ribbon Wrapped Journal

~ * ~

This article is written by Nicole.                                 

I like making crafts and keeping busy. Here is one of the projects I like to make to give as a personalised gift, or to use as a Teachers Gift at the end of the year.

mixed media project ideas for art journal

I used 5″ x7″ leather journal that I bought at Wal-Mart in a 3-pack.  They were only about 70 pages so I used a thin ribbon, but a wider ribbon would work just as well.  I got most of my supplies at Wal-Mart except the black star buttons and the “mom” letters; those I got at Hobby Lobby.

Items needed:

Journal of your choice

Ribbon of your choice

Metal D ring

Scissors

Fabric pen or marker

Hot glue gun and hot glue

Velcro strips

Needle and thread

Buttons and other embellishments

Start by wrapping the ribbon about 1.5 times around your journal and cut it off the spool.  This is to ensure that the Velcro closure will be in the back and the D ring will be in the front.

Sew a seam on both ends of the ribbon, being careful if your ribbon has an obvious front and back.  You could also hot glue the seam, but I like the look of a sewed seam.

Sew the D ring on to one end of the ribbon. Then, wrap the ribbon around the journal and thread the ribbon through the ring to determine the placement of the Velcro strip; I placed one end of my closure about 1/2 inch inside the seam of the ribbon to give a pull tab.  Make sure the ribbon is not twisted and the D ring is straight and on the front of the journal.  Mark the placement for the Velcro strips with a fabric pen or marker; remember you will have to make one mark for each side of the Velcro.  While the ribbon is still wrapped around the journal go ahead and mark the place for your embellishments.  I was unsure at first when I started these so I waited until later, which is fine as well.

Remove ribbon and attach the Velcro strip according to package instructions.  I used some that had adhesive on the back, but because my ribbon was satin, it didn’t stick and I ended up having to sew it.  After that you can then add your embellishments.  Use your imagination and be as creative as you want.  Sine I made mine for gifts I used buttons and jewels to represent their personalities.

mixed media project ideas for art journal

When your embellishments are attached to the ribbon, wrap it around the journal again, this time gluing it to the spine (and along the back if you’d like) of the journal.  At the time I made these I did not have a hot glue gun (I’m just starting out in crafting) so the ribbon just slid right off.  I personally think they would have been better if they had been glued down.

Guess what?  You are now finished and ready to enjoy your super adorable and one of a kind journal.

I hope my instructions are easy to follow and that you enjoy your journals.  I would love to see what you create so feel free to send me a pic of them at luckyhandsproducts@gmail.com.

~*~*~*~*~*~*~*~*~*~*~*~*~*~*~*~*~*~*~*~*~*~*~*~*~

Nicole is happily married with 2 adorable kids. She loves to write, using her degree in creative writing. Nicole also enjoy reading, crafting, photography, and cooking (especially chocolate) and loves to stay busy.

journal and mixed media project ideas

mixed media journal project ideas

.

.