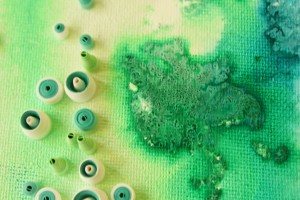
Have You Tried Making a Mail Art?

~ * ~

This article is written by Tamara Dinius

Mail art is created by the artist and generally sent via the postal service to the end receiver. Although the receiver of the mail art will be thrilled with the package, it may be surprising to realize how many others are also touched by the art. Each and every person who handles the mail en route will have an opportunity to view and enjoy your piece of artwork and it’s nice to be able to make someone’s day more cheerful!

How to make a Mail Art

I started sending mail art to my daughters when they were in college. At first, I created mail art using mixed media art techniques on white envelopes. I added phrasing or quotes that I thought my daughters would enjoy. My husband took the letters to the post office for mailing and was surprised at the response from the clerks behind the counter. They loved them! They even asked where we had purchased them. When he explained that I made them, they were quite impressed …and this made my day!

How to make a Mail Art

I still use mixed media techniques but many of my envelopes have become quite grand. I have experimented with using the standard goldenrod office envelopes, as well as the brightly colored envelopes that you can purchase at your office supply store. I have enjoyed using all the different products but typically come back to the basic white envelope for most of my mailings. I find the colors I use show up more vibrantly on the white…and this girl is all about color!

How to make a Mail Art

I have also started packaging my Etsy store orders in these envelopes when sending out a shipment. It is a nice way to say “thank you” to the buyer for purchasing from my store.

Mail art is easy to send and does not require anything special prior to posting at your local post office (send you husband..he will love the response he gets). I typically add a white label with the recipients address for ease of sorting, but it is not required at my local post office. I would encourage you to check with your local post office to find out if they have any special requirements but I have sent hundreds of my mail art without an issue.

The holidays are a wonderful time to send some mail art when sending out your holiday cards!

How to make a Mail Art

~*~*~*~*~*~*~*~*~*~*~*~*~*~*~*~*~*~*~*~*~*~*~*~*~

Tamara Dinius lives in the Pacific Northwest with her husband and chocolate lab. She has two grown daughters who make her life meaningful. They support her, ground her, embrace her, and are amazing people in their own right.

Her love for mixed media has taken over most aspects of her creative journey. She believes mixed media allows for a broad range of styles and anyone can find success in this form of artistic expression.

You can find more of Tamara’s work on her website Women, Wine & WordsEtsyshop,  or via her Facebook

~*~*~*~*~*~*~*~*~*~*~*~*~*~*~*~*~*~*~*~*~*~*~*~*~

.

.

Using Alcohol Inks in Making Landscapes

~ * ~

This article was written by Melanie Statnick

Supply List:

  • Ranger Alcohol Inks in a variety of colors
  • Alcohol Blending Solution
  • Alcohol ink cardstock and/or Yupo paper pad
  • Waterproof ink pad
  • Stamps of choice
  • Old toothbrush
  • Gloves
  • Paper towel
  • Small glass bowl

Instructions:

I have had the Ranger Alcohol inks on hand since they were first introduced. Since then I have seen many different brands and ink tools to use with them. I wanted to take advantage of what I already had invested in and find something new and fun to do.  Mixed media backgrounds can be made many different ways. I have always admired the work of acrylic landscapes. I’m not as tight in my painting and the Alcohol inks allow for some experimental fun. Let me guide you through a quick and addictive background technique with Alcohol inks by Ranger. Using Alcohol Inks to make ladscapes Using Alcohol Inks to make ladscapes I started with picking a large verity of the ranger ink line. Wearing gloves I picked a sky blue ink color and began by spreading the ink from side to side. I moved the card stock/or Yupo paper from side to side allowing the ink to move back and forth across the paper.  The ink will dry fast. I also found that on Yupo paper the ink can become tacky in heavier applied areas. Using Alcohol Inks to make ladscapes Using Alcohol Inks to make ladscapes Using Alcohol Inks to make ladscapes The next step is creating layered inks to achieve the look of a landscape. These can be in traditional colors or you can get creative and make something more abstract. Because the ink will dry fairly quick tilting the paper slightly forward or toward you will depend on where the ink will run. Apply the next color directly under the first. If the color runs, dip a corner of the paper onto some paper towel. Using Alcohol Inks to make ladscapes In this photo you’ll notice that I have gone into the background with a green and by tilting the card away from me and adding a few drops of ink, I then added the Alcohol blending solution to the dots of ink. This allows the ink to disperse and run down the card. This is how I made some abstract trees. Using Alcohol Inks to make ladscapes Using Alcohol Inks to make ladscapes Adding splatters of paint to a painting can make for some interesting texture. Pour some Alcohol blending solution into a small glass dish and dip your toothbrush in. Holding the brush 2 inches away from your card surface run your finger and/or thumb along the bristles away from you to allow for the alcohol to spray the card surface.  This gives you the same look as adding salt to watercolor paint.

Originals and Stamping

You can add more drops to make shapes and you can also go back into a spot on your paper and add more ink to make areas darker.  I found using water proof ink pads and some of my favorite stamps I can add more to my background. Have fun and explore. Using Alcohol Inks to make ladscapes Using Alcohol Inks to make ladscapes Using Alcohol Inks to make ladscapes

~*~*~*~*~*~*~*~*~*~*~*~*~*~*~*~*~*~*~*~*~*~*~*~*~

Melanie Statnick is a Canadian Mixed Media & Collage Artist out of North Carolina. Melanie creates art daily from her private studio. Her style is fun, whimsy and positive. She is also an Art Instructor at local venues and in community colleges to all ages. Her artwork can be found in art galleries and shops extensively in NC with international private collections.

~*~*~*~*~*~*~*~*~*~*~*~*~*~*~*~*~*~*~*~*~*~*~*~*~

.

.

Creating a Mixed Media Art Bag

~ * ~

This article is written by Tamara Dinius

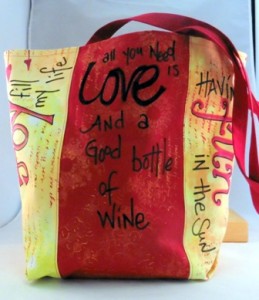
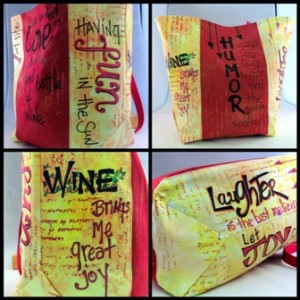
Tamara created this functional mixed media tote bag using canvas fabric and Tattered Angels High Impact paints. Though the creamy, rich colors of Tattered Angels High Impact paints make painting canvas fabric a breeze, one could use almost any brand of acrylic or fabric paints and receive similar results. Tamara created the sewing pattern for this bag but any store bought sewing pattern or canvas tote could be used as well. Even though Tamara will focus on the mixed media techniques of the project and not the sewing of the bag, she will be sharing some sewing tips that will add interest to the final product.

Completed mixed media art bag project

Whether you use your tote for groceries, travel, or about town, you can add a little panache to your day with this stylish bag.

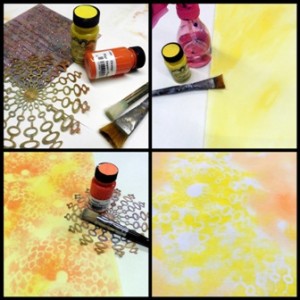
Supplies and first background layer

Top left: Items used are a spray bottle, Tattered Angels High Impact Paints (or acrylic/fabric paints of your choice), stencils, brushes, and permanent markers (not shown).

Top right: Spray your canvas fabric with water and then apply your yellow paint in a haphazard motion.

Bottom left: While still damp, apply your orange paint using a stencil and stencil brush. Please do not try to be precise as this is just your background. A casual approach will give your finished piece a more artsy feel.

Bottom right: In another area of your bag, add water and your yellow paint using a stencil of your choosing. I added the stencil work before the orange background paint so that I would not lose the vibrant yellow color. Next, add some orange around your yellow pattern. Again, this is to keep the vibrancy of the yellow.

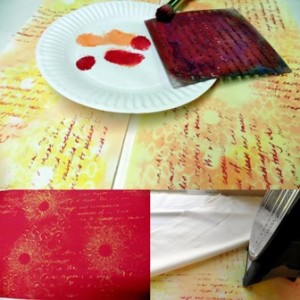
Adding script and heat setting the fabric

Top left: I added additional interest by applying script writing with a stencil and red fabric paint.

Bottom left: Spray water on your contrasting canvas fabric and apply orange and yellow paint using your stencils. At this point we are creating some consistency across the fabrics.

Bottom right: Heat set your paints by using a piece of muslin as a pressing cloth. I ironed both sides of the fabrics on a cotton setting.

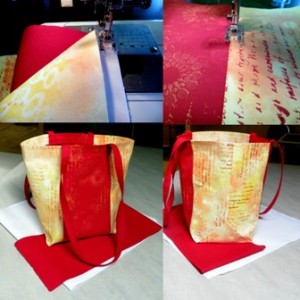
Sewing the bag and the transformation of fabric

Top left: I sewed the bag together using a 16 needle as the fabric is quite heavy.

Top right: By using a contrasting thread and topstitching the seams you create some wonderful details on the finished bag. It would also be fun to add some freestyle quilting to the bag using different colored threads. I may try this on my next bag.

Bottom left: I added long handles to the bag using the same red canvas fabric that I used for the middle portion of the bag.

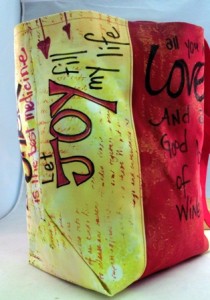
Bottom right: Side panel of the bag. You will also notice the transformation of the original fabric by the white and red canvas fabric that the tote bag is sitting on.

The really fun part! Adding the lettering

The really fun part of the project! I took permanent markers in varying colors and started adding wording and a few doodles. You can let your imagine run free and embellish the heck out of your bag. I will be adding more doodles and lettering as time allows.

The really fun part! Adding the lettering

I hope you have a great time creating your own tote and wishing you much joy in your life!

~*~*~*~*~*~*~*~*~*~*~*~*~*~*~*~*~*~*~*~*~*~*~*~*~

As well as mixed media tote bag, Tamara Dinius creates from her studio on five acres in the Pacific Northwest with her husband and chocolate lab. Most days you will find her covered in flecks of paint, with a cup of coffee in her hand, and a smile on her face.

Her love for mixed media has taken over most aspects of her creative life. She believes mixed media allows for a broad range of styles and anyone can find success in this form of artistic expression.

You can find more of Tamara’s work, and on her website www.womenwineandwords.com or via her Facebook

~*~*~*~*~*~*~*~*~*~*~*~*~*~*~*~*~*~*~*~*~*~*~*~*~

.

.

Creating Acrylic Backgrounds with Water


~ * ~

This article is written by Anjuli Johnson

As a self taught artist, I would say that I’ve experimented with a lot of paint.  Watercolor, oil, gouache- but I always come back to acrylic.  There’s so much to love about acrylic paint- how different brands react so differently to certain techniques, the fact that it dries fairly quickly, and especially how it reacts to water.  My spray bottle is one of the most used tools in my studio because of how often I use water and paint to create acrylic backgrounds for my mixed media paintings.  I have 3 paintings to show you, and I’ll outline how I created the backgrounds for each one.

Texture paste and quilled paper pieces on an acrylic background

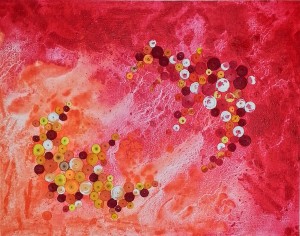
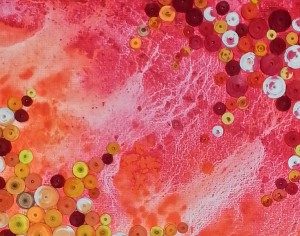
Magnetism- For this piece, I began with a dry canvas.  I used red paint on one corner, orange on the other.  I brushed the paint closer to the center without the two colors touching, and then used my spray bottle over the entire canvas.  The water is what brought the two colors together in the center of the canvas, and I tilted the canvas a little each way until I was satisfied with how the colors were blending.  If you start with a dry canvas, it may take some extra effort to get rid of any brushstrokes, which may or may not be a concern for you.  I don’t usually like to see my brushstrokes, so I’ll continue working until the water has blended the paint smoothly into the canvas.  One tip- this brand of acrylic paint is Liquitex Basics, which was an essential factor in achieving the lightning type blending you see here.  Other brands do not react the same way, which I find incredibly fascinating.

Close up of the point of blending colors orange and red

True North, mixed media painting with an acrylic background

True North- With this piece, I misted the canvas slightly before I began.  As you can see below, I used greater concentrations of paint in certain areas and worked until, once again, all the brushstrokes have disappeared.  I added some splatters of white and blue paint to add more color, which react with the water to blend slightly with the paint around it.  Super cool!

True North mixed media painting with acrylic background

True North progress shot of acrylic background

Mixed Media painting with acrylic background, Pacific Reef

Pacific Reef- For this piece I didn’t use a brush at all.  I started with a dry canvas, and added thick spots of paint in random places, many times overlapping, especially with the white.  I used my fingers to flatten and spread the paint as I sprayed the canvas with water. Make sure you’ve tipped it up so the water will draw the color down the canvas to create that flowing effect, and if you want the colors blended smoothly, make sure you wet the entire canvas.  I have mixed the brands I used with this piece- the craft brands usually spread very smoothly over the canvas, whereas the liquitex or winsor newton brands will spread in different ways.  I love it!

Mixed media Pacific Reef with acrylic background

So many awesome ways to use water with acrylic paint to create amazing colored backgrounds!  I’d love to hear how you create your acrylic backgrounds and if you come up with any new techniques for using acrylic paint and water together.

~*~*~*~*~*~*~*~*~*~*~*~*~*~*~*~*~*~*~*~*~*~*~*~*~

Author bio: Author bio:  Anjuli Johnson  is a Mixed Media Artist from Raleigh, NC.  She began her art career as a scrapbooker, and it’s been an evolutionary process every since.  She loves all things mixed media- paper, glue, paint, canvas, pens, wire, gears… the list goes on and on.  She is constantly trying to push through her fears to discover and develop her talents, meet new people, and learn from those around her. TheFarPavilion

~*~*~*~*~*~*~*~*~*~*~*~*~*~*~*~*~*~*~*~*~*~*~*~*~

.

.