Ten-minute art idea: “Tie-dyed” paper

~ * ~

This article was written by Katja Blum

I love paper marbling. The technique fascinates me, and while it is possible to apply the color to the water or sizing in a controlled manner, the outcome can still be a happy surprise. I love surprises.

However, marbling is somewhat time- and labor-intensive. Making the size, preparing the paper and paints, creating the marbled papers, rinsing… Enjoying one of those busy lives we all lead these days, I rarely find the time. That doesn’t mean I have to do without creatively colored paper or happy surprises. If ten minutes is all you can spare for a little art fix, how about faux tie-dyeing?

“Tie-dyeing”, or rather fold-dyeing, paper is a technique that requires few materials and no preparation. You can do it at your worktable or at the kitchen sink while making tea. On hold with the utility company? No need to get frustrated. Put the phone on speaker and make art.
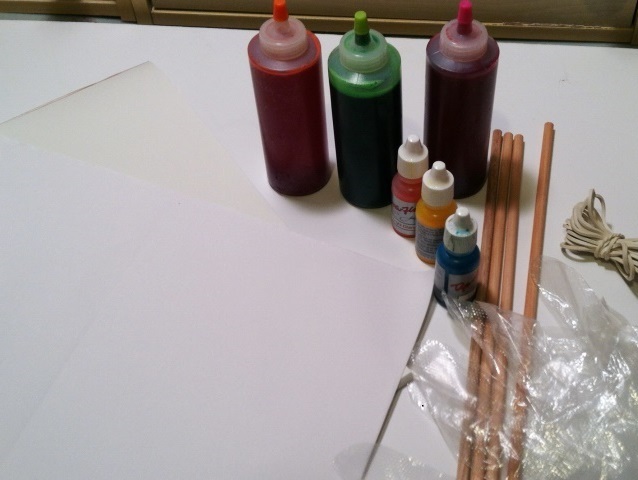
You need:

  • Paper

Most paper qualities will work. I often use my son’s sturdy watercolor paper or rice paper. Since rice paper is fairly thin, it’s a good idea to take several sheets at once and use the stick or folded techniques.

  • Liquid fabric or silk paints

I like Dye-Na-Flow. If you have one of those tie-dyeing kits with the prepared paints for a summer projects with the kids, see that there are leftovers, because they work really well.

  • Gloves
  • Bowl of water (or the sink)
  • • Wooden dowel and rubber bands (for the rolled technique)
  • Paper clips to hold folded papers together for drying

Materials for tie-dyeing paper

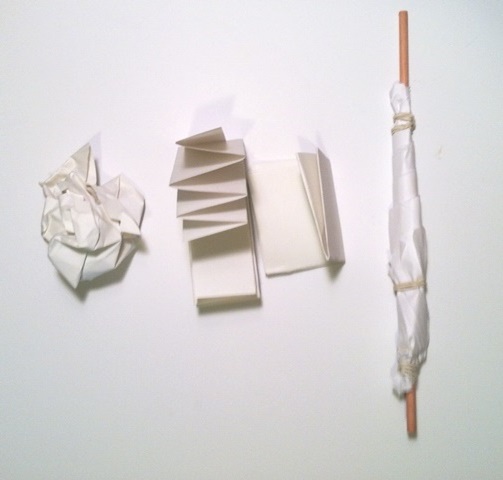
Fold the paper into various shapes. You can also crumple it up or roll it up on the dowel and fasten it with rubber bands.

Paper in different shapes: folded, rolled and crumpled.

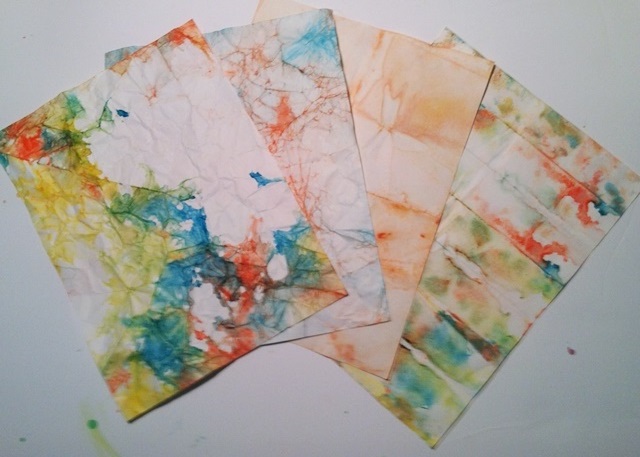
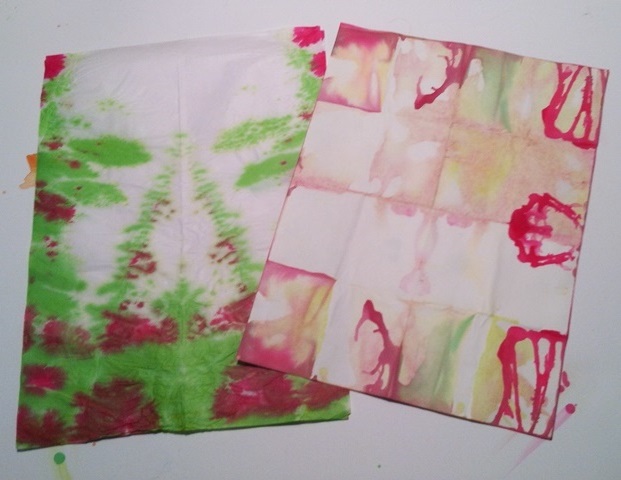
Put on gloves, protect your work surface from paint spatters and apply random drips of fabric paint to the folded or crumpled paper and into the folds. Remember that too many colors might make mud – even though it can be very pretty mud!

You can use the paper dry or wet it before or while applying the color. Seriously, standing at the kitchen sink is a good way of doing this. When you are satisfied with the color application, secure the folded papers with paper clips and leave them to dry. Done.

Do resist the urge to unfold the papers before they are dry, because wet paper breaks more easily and there might still be wet paint in the creases that could run and cause streaks.

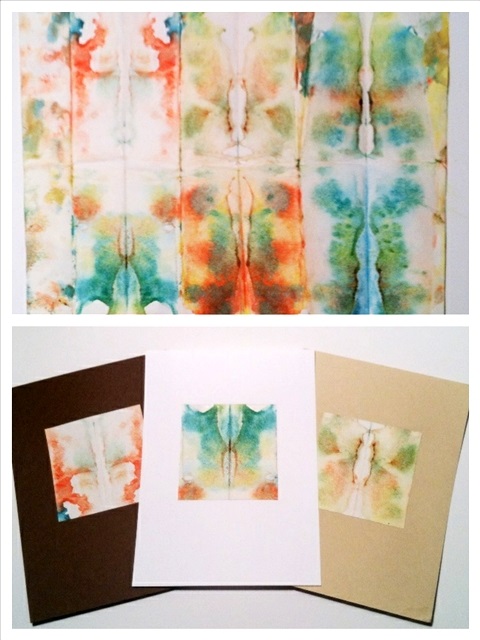
Once the papers are dry, unfold them carefully and enjoy the colors and patterns you have created. Some papers – the folded ones in particular – make terrific Rorschach tests. Let your imagination run wild and see what you can see. To smooth out the creases, iron the papers on a low setting or press them under a few books.

Tie-dyed papers

Tie-dyed papers

Of course you can use your tie-dyed papers as backgrounds for mixed-media pieces or as collage material – or display them as the pieces of serendipitous ten-minute art that they are.

Display your tie-dyed papers as finished art

~*~*~*~*~*~*~*~*~*~*~*~*~*~*~*~*~*~*~*~*~*~*~*~*~

Katja Blum is a writer and translator from Tulsa, OK. As an artist, she started with yarn, fabric and papier mache (rarely together), branching out into collage and other paper arts about ten years ago. Her latest obsession is making soft stuffies and art dolls – to the delight of her toddler. She also likes to find creative solutions for ugly or broken things around the house – to the delight of her husband.

You can see more of her work with fiber, paper and words at www.thewaywardsheep.com

~*~*~*~*~*~*~*~*~*~*~*~*~*~*~*~*~*~*~*~*~*~*~*~*~

.

.

Inkjet Art

This article is written by Francesca Albini

When my inkjet printer tells me that my cartridges are empty, what it really means is that it’s time to buy new cartridges, although there is still a lot of ink in the “empty” ones. My first attempt at recycling the ink for my art was unsuccessful: I tried to open them. I don’t suggest you go down that route, unless you know what you are doing (please let me know if you do). What I do now is I rub a cotton bud over the spongy bit, where the ink normally comes out. If I want to use the ink in a painterly way, I then rub the inky cotton bud over an old CD jewel case and then I pick up the ink with a wet brush, as I would with normal ink or watercolour. If I have more than one cartridge, then I can mix the colours on the jewel case as I would on a palette. (I use the jewel case technique also to paint with any kind of water based markers – just rub the tips on it.) For a grungier effect, I can draw directly with the inky cotton bud.

Mixed media artist Francesca Albini

In the first two works, I was also experimenting with backgrounds for this inkjet art. I love testing pens and trying different marks. The result is usually a quite colourful scrap of paper that sadly gets thrown away. So I wanted to see if I could rescue it, by perhaps scanning and manipulating it with a photo editing programme. The result I liked the most came out looking like some kind of camouflage design, and that prompted the idea of adding a soldier, painted with magenta and black inkjet cartridges (that’s all I had).

I continued experimenting with more manipulation of the pen testing paper, using a pattern-making plug-in. This second background reminded me of vegetation, perhaps a dark, lush jungle, so I added some flowers, using gesso for the petals and inkjet inks, applied both with a cotton bud and an old dry felt-tip pen. I found the felt-tip pen a bit tricky.

Mixed media artist Francesca Albini

The last piece of the series of inkjet art is just one of my doodles done with a cotton bud. As the character looked a bit old-fashioned, I decided to give him a vintage background. I happened to find a 45 vinyl record on the stairs (yes we live like this in this household!), scanned it, copied it on different layers using different blending modes, and that completed the scene with the right atmosphere for this funny looking guy.

Francesca Albini Mixed media artist

Next time you have to change a cartridge, try one of these techniques or discover your own. Inkjet inks and art are wonderfully bright and vivid.

~*~*~*~*~*~*~*~*~*~*~*~*~*~*~*~*~*~*~*~*~*~*~*~*~

Francesca is a visual artist using pretty much everything she finds around her to record and relive feelings and memories of places and emotions. She collages, paints, draws, photographs. Francesca loves mixing modern technology, such as mobile phone apps, with the simplest of tools such as glitter glue, crayons and other children’s art supplies. Read her blog at http://franjournal.blogspot.com/

~*~*~*~*~*~*~*~*~*~*~*~*~*~*~*~*~*~*~*~*~*~*~*~*~

.


.

Create Your Own Original Backgrounds While You Play

This article is written by Linda Giese

For the past year I’ve been putting papers over my plastic covered workspace. It began when I found a roll of thermofax for a dollar at a thrift store.  I put it on my workspace and soon it filled up with random stamps, paint splatters, doodles and notes.  I tore off another sheet and saved the first for collage fodder. I progressed to large sheets of newsprint that came as packing material in boxes.  A friend even gave me old architectural plans she was going to throw away.

making backgrounds while you play

This is an easy way of making original collage papers to make your art unlike anyone else, and it won’t even take extra time!  Now I glory in messing up my surface papers with ideas and oversprays.  Since I teach at my dining room table, there are class notes and ideas for what my students want to learn next.  I test out new stamps and “stamp off” ones I’m using.  There are scribbles trying to get a pen to write or see what color it is.  Sometimes there is even a random fruit label!

making backgrounds while you play

I’m not likely to run out of clean papers to mess up, but thought of an idea if I did.  I’d take sheets of junk mail with clean backs and tape them together.  Or as I’ve done, use sheets of scrapbook paper I don’t like that perhaps came in a stack of paper.  If you take a class, perhaps you can mess up newspapers under your work there too!  Good luck and happy splatters!making backgrounds while you play

Materials I used for my canvas:
Underpainting is blended background of Americana orchid, butter and baby blue
I applied the torn collage papers with Americana DecouPage as well as the Dover clip art woman image
I used the above paints plus Americana cad red, bright yellow(to make the flesh color) and true blue for shading

making backgrounds to add to your mixed media art collage

use backgrounds to create layers to mixed media art

using backgrounds to create layers in mixed media art


~*~*~*~*~*~*~*~*~*~*~*~*~*~*~*~*~*~*~*~*~*~*~*~*~*~*~*~*~*~*

Linda Giese encourages comments, questions, and sharing your art journey at linda.giese@yahoo.com

She teaches classes privately and at a local scrapbook store, The Stamp Addict

~*~*~*~*~*~*~*~*~*~*~*~*~*~*~*~*~*~*~*~*~*~*~*~*~*~*~*~*~*~*


Super-quick Background Resistance Technique

This mixed media technique for creating a resistance image with white crayon is a simple method to make backgrounds, that is super-quick to complete and ideal for making many sheets for a large project.

1. Gather materials; used on old conference paper text sheet (as available in the Ephemera kits), white crayon, brayer (like this Ranger Inky Roller Brayer, Medium 3-5/16-Inch) and Tim Holtz Distress Ink Pads in pine needles.

2. Use the white crayon to draw a pattern on the text sheet. I created swirls and squiggles. While it is hard to see where you have been, the light will just catch the crayon, so you get an indication of where you have already drawn. As I was going for a grunge look, I wasn’t too concerned.

3. Load the brayer up with ink and apply across text page, at varying angles. The white crayon will begin to appear. I tried the direct-to-paper method with the ink pad but it was too hard to get a thick enough layer for the crayon to show through. Also my brayer is small, so each ink application doesn’t go very far and a motley affect results. As I’m going for a grunge look, I wasn’t concerned. A bigger brayer will give a more even finish.

4. Continue to reload the ink onto the brayer and apply to the text sheet until it is completely covered to your satisfaction.

Now I have a background sheet ready to use in making my Christmas cards for this year. As I make about 50 cards each year, I need a design that will be easy to make many sheets and this background method suits that perfectly!

Happy creating!
(Hope that was quick enough for you!)

.
.

.