Inspiring Quotes for Art Journaling

I love the idea of art journaling and often spend hours looking at others creations online – but when I sit down to create my own layout, sometimes I just don’t know where to start. I do love including quotes into my layouts. I started collecting quotes in high school, even before I started making my own Christmas cards. And I suddenly realised that I could use my collection of quotes as a jumping off point for my art journal layouts.

Art Journalling prompts

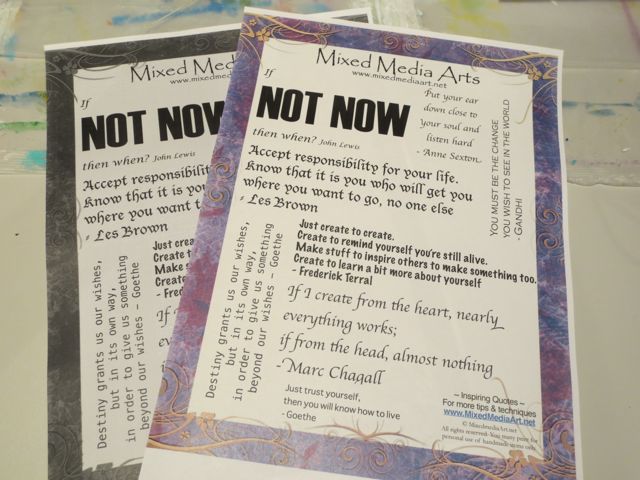
So this months Mixed Media Ephemera sheet was born ~ Inspiring Quotes you can use as a jumping off point for your own mixed media art journals and to make your art journaling process easier!

Here I have used the inspiring quotes in three ways:

1. Used the words to create my own layout

2. Used now quote as the central theme

3. Used lots of printed quotes

Art Journalling prompts

“If Not Now”

1, Print out the Inspiring Quotes ephemera sheet; here I printed it out in colour and in black and white

2. Using an art journal with a background already added, I outlined the quote that inspired me in black Sharpie marker

Art Journalling prompts from inspiring quotes

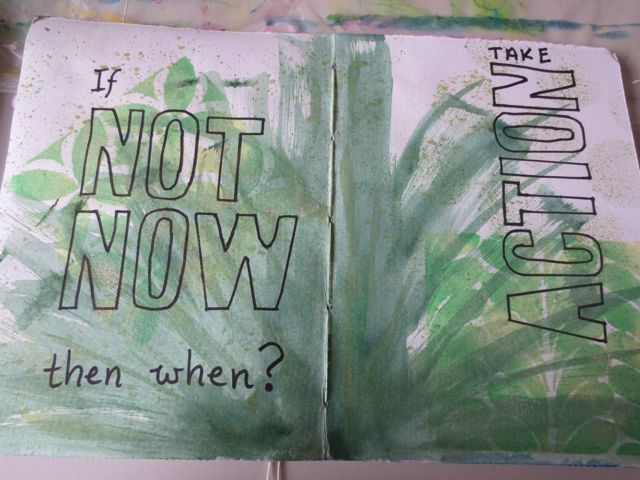
3. I used my Derwent Inktense blocks to shade in the top of the letters and added water on a paintbrush to activate the colour.

Art Journalling prompts from inspiring quotes

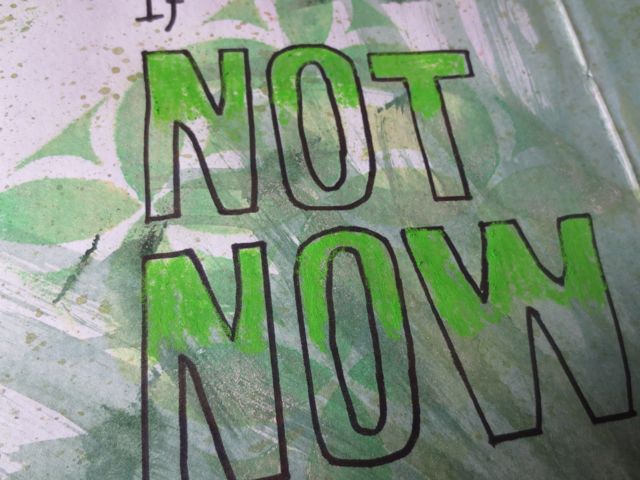
4. Then I used a darker colour to fill in the letters, using the paintbrush to blend the two shades in the middle of each letter

Art Journalling prompts from inspiring quotes

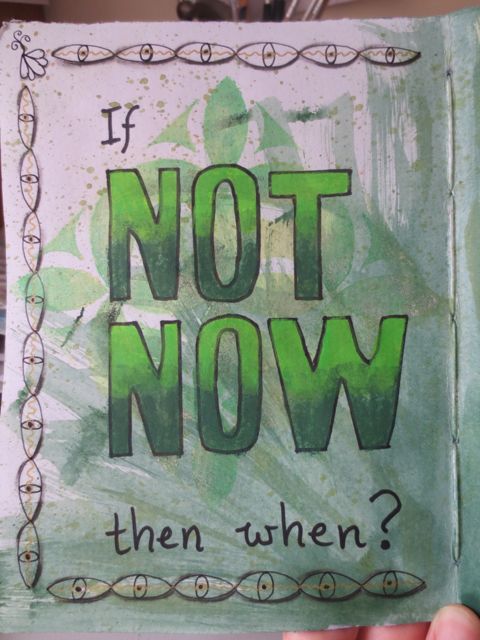
5. I repeated this on the second word, using contrasting colours

Art Journalling prompts from inspiring quotes

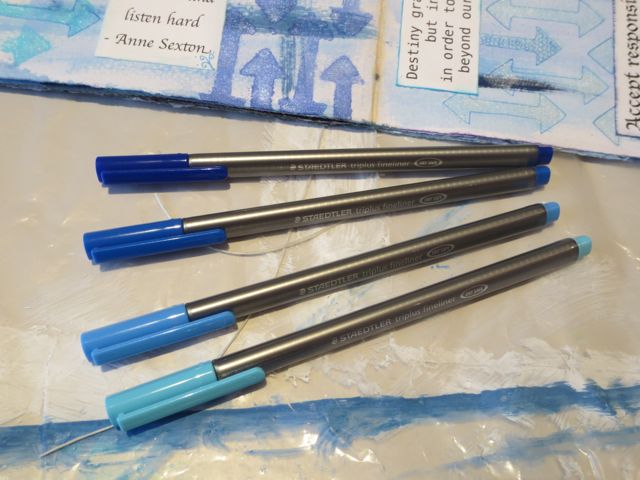
6. The layout was completed by added words and a border with a gold gel pen and Staedtler triplus fineliner markers
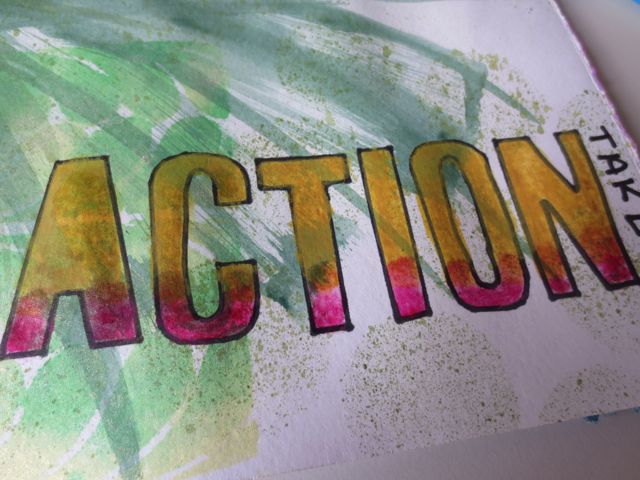
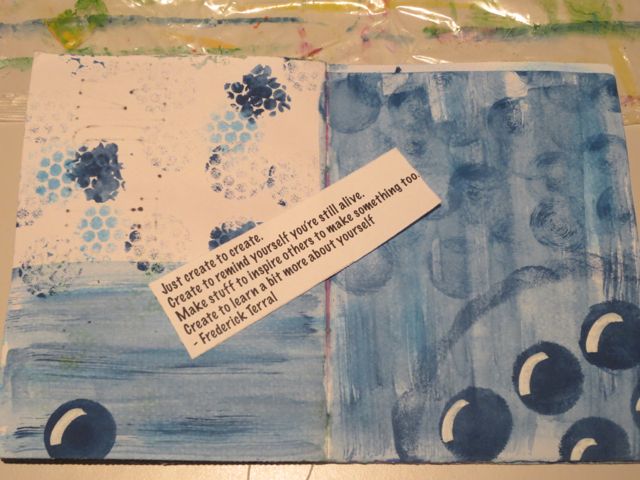
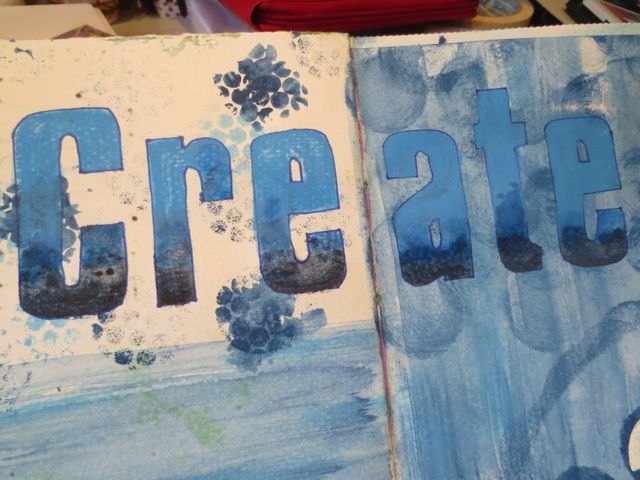
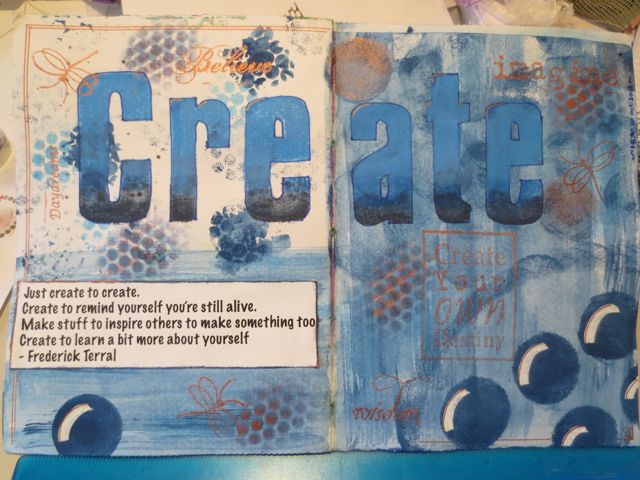
Art Journaling prompts from inspiring quotes

“Create”

1. Another pre-painted art journal page and this quote about creating that struck a chord.

Ready-made Art Journal prompts from inspiring quotes

2. I made a large “Create” on the computer and printed out to make a stencil.

Ready-made Art Journal prompts from inspiring quotes

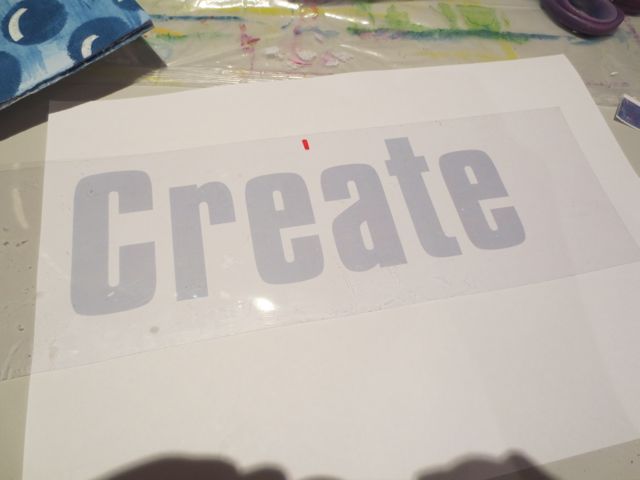
3. Traced the letter outlines onto a piece of acetate with a Sharpie marker

Ready-made Art Journal prompts from inspiring quotes

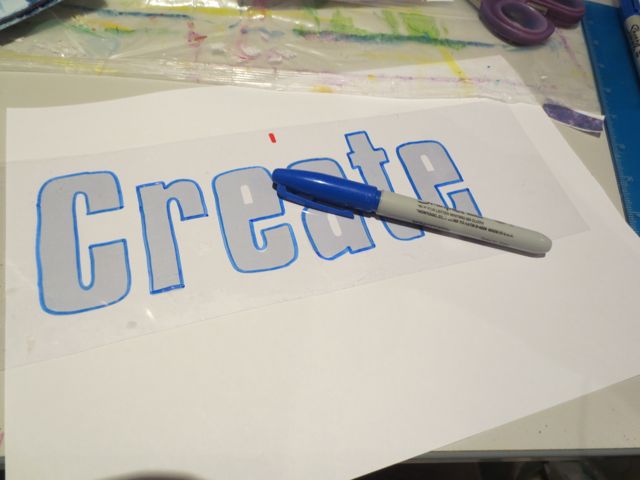
4. Cut out letters to make the stencil.

Ready-made Art Journal prompts from inspiring quotes

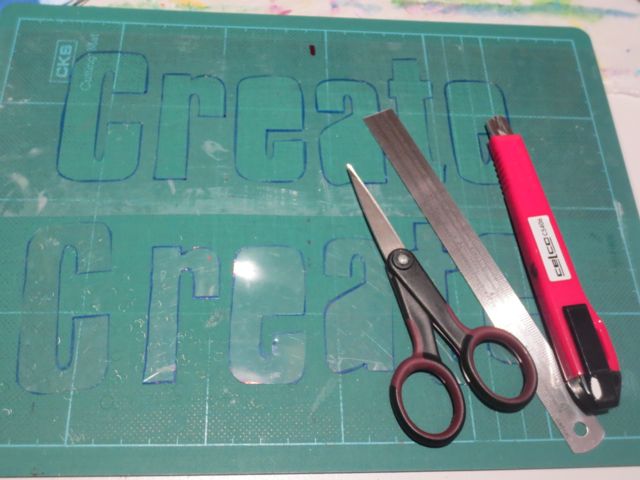
5. Trace the letters onto the art journal using the Sharpie marker.

Ready-made Art Journal prompts from inspiring quotes

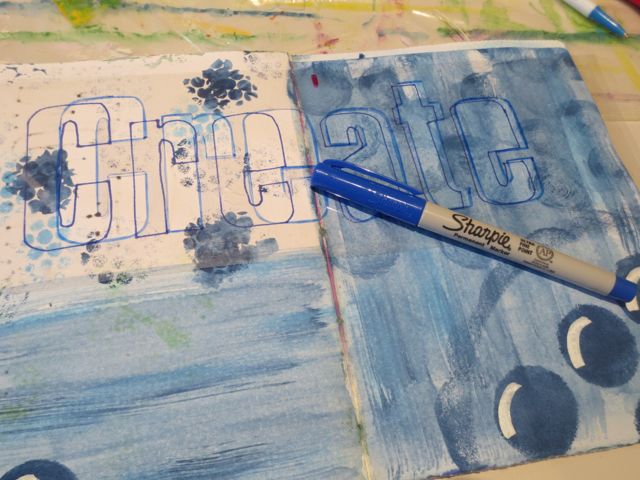
6. Using a blue Derwent Inktense blocks to shade in the top of the letters and added water on a paintbrush to activate the colour.

Ready-made Art Journal prompts from inspiring quotes

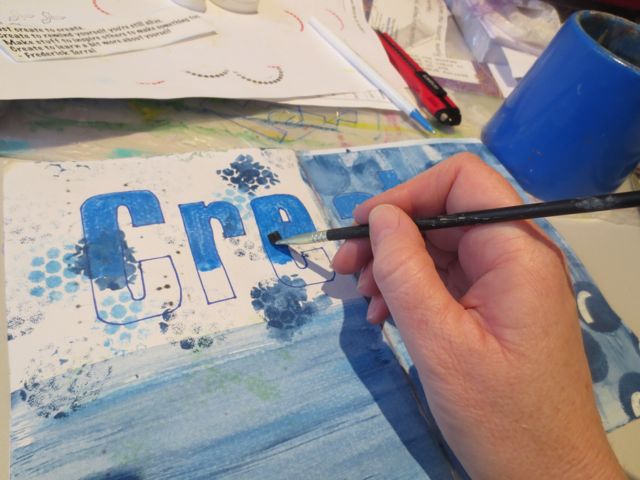
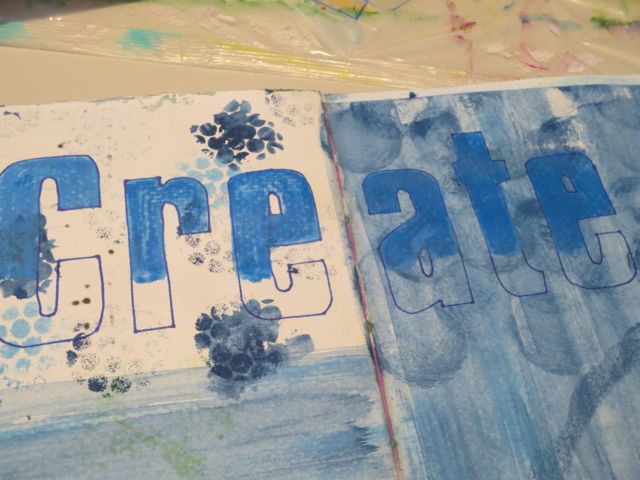
7. Then added a medium blue

Ready-made Art Journal prompts from inspiring quotes

8. Then a darker blue

Ready-made Art Journal prompts from inspiring quotes

9. Finished off the layout by adding the quote and stamping with Brilliance Cosmic Copper ink and a copper gel pen
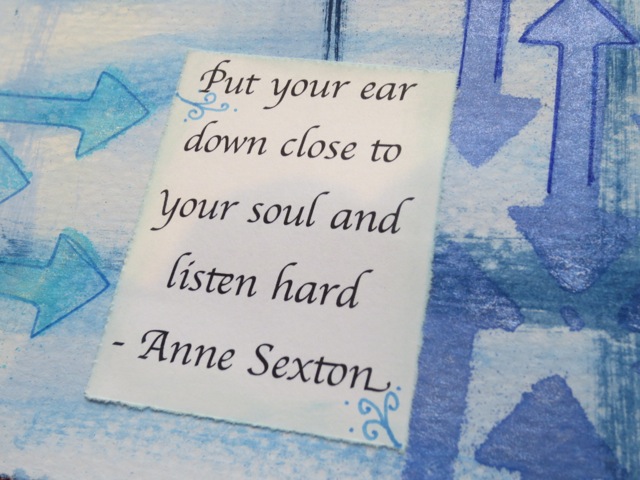
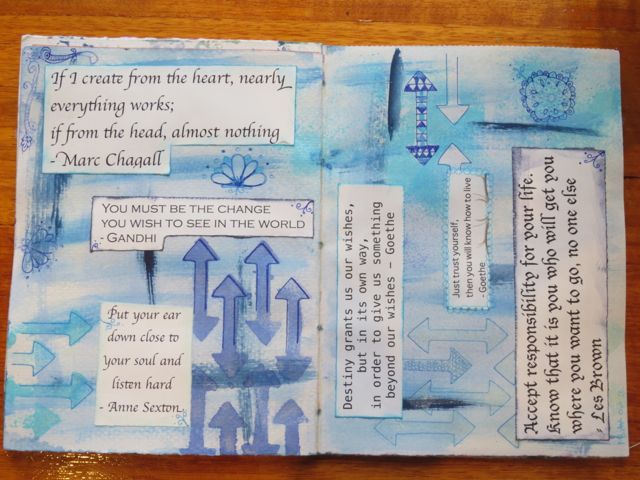
Ready-made Art Journal prompts from inspiring quotes

All the Quotes

1. Tear out the quotes from the Inspiring quotes Ephemera sheet

Ready-made Inspiring Quotes for your Art Journal prompts

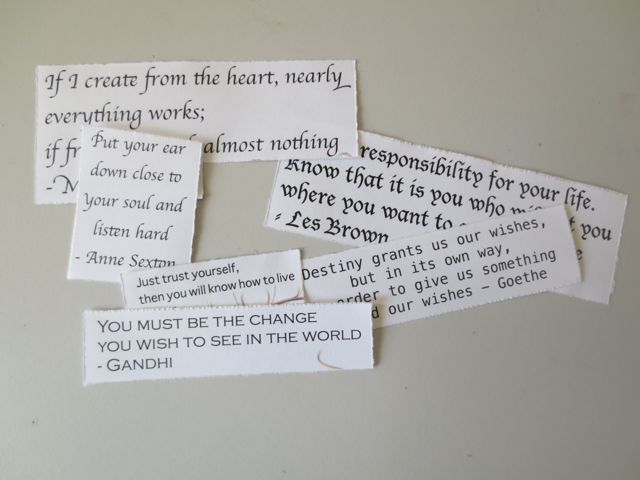
2. Play with layout onto a pre-painted art journal page. Edge with ink and stick into place.

Ready-made Inspiring Quotes for your Art Journal prompts

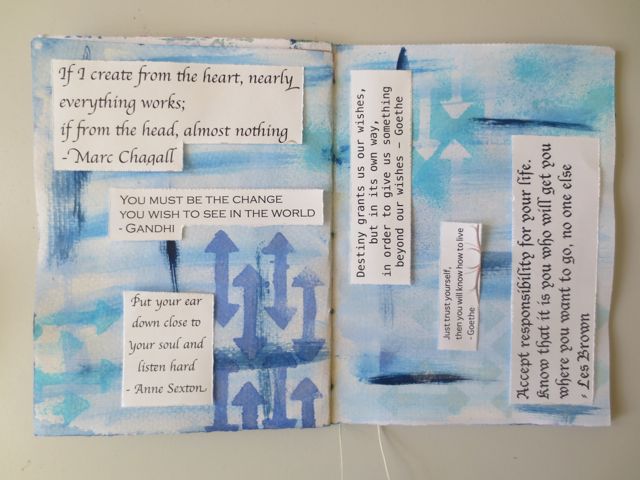
3. Finish off page with various doodles using all of the blues in the Staedtler  fineliner markers set

Ready-made Inspiring Quotes for your Art Journal prompts

I hope you can find inspiration for your art journaling with our Inspiring Quotes ephemera sheet.

Happy creating!


Disclosure: Some of the links in this article are affiliate links, meaning we earn a small commission, at no extra cost to you, to help us continue to bring you fantastic mixed media techniques, reviews and inspiration. Thanks.

My Top 3 Art Journaling Videos

Whenever I need some inspiration or just general arty cheering up – I head over to my reliable favorite videos. It’s not just the art journaling of these three mixed media artists that cheers me up; I love their openness and honesty of their creative process.

Pam Carriker in art journalling mode

There is also something about actually watching the process of the art journalling unfold! Seeing how the paint moves around the page – watching as the layers are built up. It really does bring art journalling to life and makes my fingers itch to get messy and get creating!

Pam Carriker and her “Hear” page

*


In the bluey-green art journal layout, Pam uses Gelli plate printed deli paper to build up the collage layers and her hand carved prints. Pam then adds detail  with water resistance Faber-Castell artist crayons. The colours are then added with the Derwent Inktense blocks – this video was the inspiration for me buying my own set of Intense blocks!

You can see more of Pam’s work per at her blog – Living Art at the Speed of Life

~ * ~ * ~ * ~ * ~ * ~ * ~ * ~ * ~ * ~ * ~ * ~ * ~ * ~ * ~

Traci Bautista

*


I love Traci’s use of bright colors and stencils to create the base of this vibrant art journal page. This background is then collaged over to create the foundation for quick sketching with a charcoal pencil and then highlighted with acrylic paints and various markers – all of the ingredient for a fabulous mixed media art journal page!

You can see more of Traci’s work per at her blog – Kollaj

~ * ~ * ~ * ~ * ~ * ~ * ~ * ~ * ~ * ~ * ~ * ~ * ~ * ~ * ~

Donna Downey with “Imperfection is a Form of Freedom”

*


Donna never shows fear in the face of colour – here she uses orange and turquoise to create this fun art journal layout. Again, it’s great to see the layers being built up with all of the different coloured paints, as there are spots of colors that aren’t as noticeable when looking at the finished picture, but once I’ve seen them added during the process, I notice them. donna finished this layout off with charcoal pencil lines and some stencilling.

You can see Donna’s weekly videos over here at Inspirational Wednesday

.

.

Layering Mediums for a Unique Art Journal Page

*

Kate Palmer, also known around at “Sparkle Tart” is based in Queensland Australia and she shares her multi layered art journaling process with us, with stunning results.

Take it away, Kate…

~*~*~*~*~*~*~*~*~*~*~*~*~*~*~*~

 Hi – I’m Kate Palmer better known as Sparkle Tart, I’m a mixed media artist, Sparkly Experimentalist and lover of all things colourful – you can find me online at www.sparkletart.com  I was a slow starter when it comes to art and sort of fell into creating, while self taught for much of my life, in the last few years I’ve been extremely fortunate to have taken classes online from some amazing women and just recently, my first in person class with Tracy Verdugo.  Tracy’s class opened my eyes to the depth that can achieved through layering, and while this page does not follow her process it was inspired by it.  I was determined after these amazing experiences, to find a way to make to large scale canvas ideas work on smaller scale art journal pages, cards and the much smaller projects I love to create.  So without further rambling from me, this is how I have created ‘Make a Wish’ double page journal spread.

Art Journal layers with paints and stencils to create a brilliant layout

What I’ve used:

  • Stencils:  The Crafters’ Workshop – Mini Punchinella, Mini Flower Garden, Mini Flower Piecing.
  • Copic Markers – R27, R29, R39, Y32, Y35, Y38
  • Copic Multi Liners 0.3 & 0.5
  • Golden Fluid Acrylics: Iridescent Gold Deep Fine & Carbon Black
  • Jenni Bowlin Acrylic Paint: Malted Milk & Brown Sugar
  • Adirondack Acrylic Dabber: Watermelon
  • Molotow Signal White Paint Marker Fine tip
  • Jumbo Zinnia Set (flower stamp) from Stampendous
  • Create with Abandon stamp from Stampington and Co
  • Gold Foil
  • Stippling brush
  • Ranger’s Sticky Embossing Powder
  • Silks Acrylic Glaze in Vavoom Red
  • Liquitex Matt Medium

What I Did:

Draw and colour a simple page of doodles using Copic Multi Liners and Copic Markers – I used R27, R29, R39, Y32, Y35, Y38  and Multi Liners 0.5 & 0.3.  This shouldn’t be some amazing work of art – just background colour.  You can also use copies of previous pages, collage or even magazine photos for this step if you are not a ‘doodler’.
Make a colour copy (or scan and print) your art onto a piece of paper.  Complete all of the following steps directly onto your original doodle (after scanning or photographing) as well as the facing page – to complete a matching 2 page spread.

Art Journal layers with paints and stencils

Cut the copy to size and glue onto facing journal page using Liquitex Matt Medium Gel and leave to dry – coat front and back of copy with Matt Medium for added strength.

Art Journal layers with paints and stencils

Paint Vavoom Red Silks over the darkest Copic coloured areas and let dry, you will find this makes all the other colours appear more vibrant.

Art Journal layers with paints and stencils

Time to get out those stencils!  Choose 3 patterned stencils and 3 colours of acrylic paint – use one stencil and 1 colour of paint at a time and dry between colours.
Apply paints through stencil onto page to break up the original pattern.

Art Journal layers with paints and stencils

Add colour no 1 (Watermelon) & allow to dry, you can use a heat gun to speed this up.

Art Journal layers with paints and stencils

Add colour no 2 (Malted Milk) & allow to dry.

Art Journal layers with paints and stencils

Add colour no 3 (Brown Sugar) & allow to dry.

Art Journal layers with paints and stencils

Ink text stamp with Golden Fluid Acrylic Iridescent Gold Deep Fine (I used a sponge to apply the paint) and randomly stamp text onto page.

Art Journal layers with paints and stencils

It should look a bit like this – it won’t be as crisp as it would be stamped in ink, but you will still get a lovely impression.

Art Journal layers with paints and stencils

Ink flower stamp with Carbon Black Golden Fluid Acrylic Paint and use this to stamp flower onto page multiple times.

Art Journal layers with paints and stencils

Using Carbon black paint, paint all of the page around flowers, until only the flowers are showing colour.  You may want to draw stems and leaves on before doing this and paint around those as well.
Leave paint until completely dry.

Art Journal layers with paints and stencils

I know I know – I’ve just painted over most of my background!  It’s really an important step though, as without these layers and elements, your flower would look pretty flat and boring.  Have a look at this close up image, you can see each layer that has been added, every colour each layer of paint and it all works together to create something with complexity and interest.

Art Journal layers with paints and stencils

Ink the centre of flower stamp with Versamark ink, using a stamp positioner stamp over flowers and add sticky embossing powder – carefully brush off any excess powder.

Art Journal layers with paints and stencils

Heat sticky embossing powder with a heat gun until clear, and while hot add gold foil.  If you don’t have these items (foil & sticky e.p.) you may choose to skip this step and embellish the centre of your flower some other way, glitter, paint, gel pen, micro beads etc.

Art Journal layers with paints and stencils

The gold foil is massively blingy – it may not be to your taste, it turns out looking like this.

Art Journal layers with paints and stencils

At this stage your page will look fairly unappealing, the colours don’t pop, the image is not very defined – this is UGLY stage.  Don’t give up, as the only difference between this and something stunning is a little white paint!

Art Journal layers with paints and stencils

Use a white gel pen (my preference is the Molotow White extra fine nib) to edge the design in white,  colour the patterns in the centre of the flower, draw around each individual petal, the stems and leaves (if you drew any) and add doodling and text as desired – all in white so that it stands out.  You may need to go over the doodling more than once to make the white really pop.

Art Journal layers with paints and stencils

And when you look at the 2 pages together, the result is something like this…
doesn’t the white gel pen make a difference!

Art Journal layers with paints and stencils to create a brilliant layout

I hope you’ve enjoyed this quick tutorial and that it sparks some ideas for your own creations.

May your day sparkle,

Kate

Gratitude Journal Prompts

Here we have used our Mixed Media Art Ephemera Sheet 16 ~ Gratitude Journal Prompts to create this Gratitude Journal.

Tools and Materials

Process

1. Gather up your art journal and print a few copies of the Gratitude Journal pages

2. Using a steel ruler, tear out the journal panels. I do this as I like the teared edges – you can use a cutter or scissors if you prefer straight edges.

3. Get out your art journal with prepared pages

4. Add two strips of double sided tape to the back of the journal panels

5. Stick them into the journal

6. Decorate as desired

7. Continue with other pages.

8. Each week, take a few minutes to reflect on your world and note the things you are grateful for

Note: this art journal isn’t finished – I will add more pics are things progress.