Last-minute Gift Card Wrappers

~ * ~

This article is written by Katja Blum

It took me a while to like gift cards. In my family, gift cards, certificates and all kinds of “pick your own” gift promises were seen as an afterthought, proof that the giver didn’t remember until the last minute or put much thought into your gift. I don’t think that’s true. In my mind, a gift cards says “I think you deserve a treat, please pick exactly what would make you smile right now”. Whereas very sensible and frugal people might use a check or cash to do sensible and frugal things, a gift card is fun. It doesn’t look like “real” money, and it’s perfectly okay to spend it on something entirely frivolous.

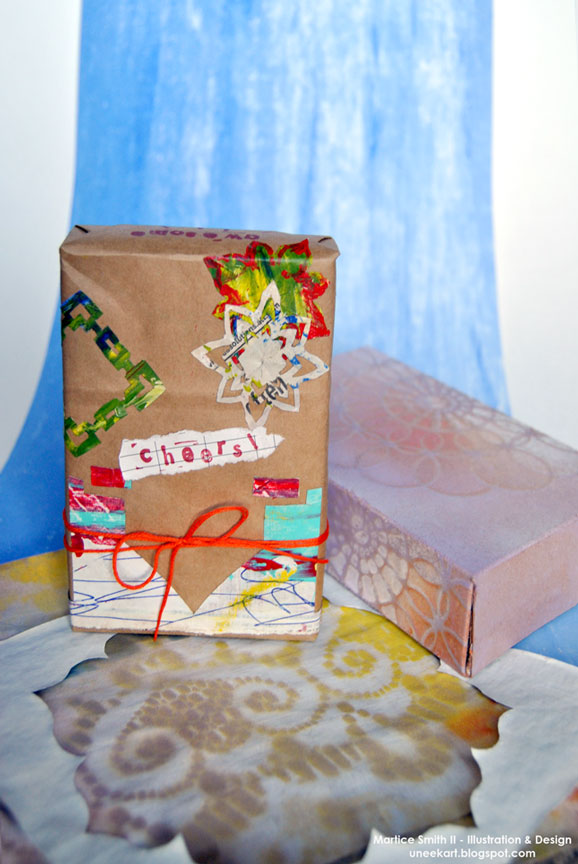
Hurray for gift cards – but let’s be honest: Sometimes we do buy them at the last moment. So here are a few ideas for some mixed media flavored presentation ideas for holiday gift cards.

General tip: You shouldn’t glue, staple or otherwise directly attach a gift card to anything, because you might damage the strip on the back. Many cards come with a small envelope anyway.

If you have a day

If you still have a day, anything is possible! How about making a collage or mixed media painting and using the envelope as part of the background? Just affix it to whatever paper or canvas you are using and paint, stencil and decorate right over it. Just make sure you have the flap facing out, so the card can be inserted and removed without ripping the envelope off the painting. And don’t glue the flap shut with gel medium. Or make your own simple card pocket by gluing a piece of paper, card or fabric to the piece on three sides, leaving the top open. While painting, you can slip a piece of freezer paper into the pocket to avoid pasting it shut.

If you have a few hours

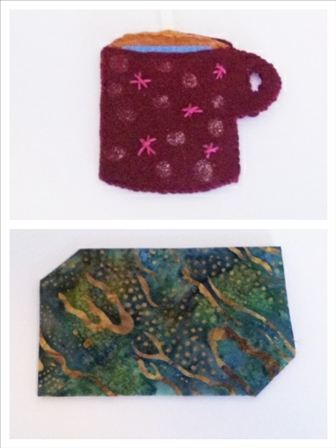
I like felt ornaments. They are easy to make – and felt can be decorated with anything. The coffee shop card I’m giving this Christmas is going in a little mug ornament, which I plan to slip on the recipient’s tree, so she can find it later.

Cut out parts of the felt ornament

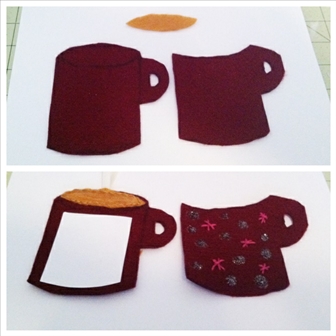
  1. Cut out the mug shape and oval “coffee”. Use the shape as a template to cut out the mug again, but without the top. This will be the pocket for the gift card. You can do this with any shape. If you want to make a snowman, for instance, just cut out the bottom snow balls. Or you could cut out your ornament and put a rectangular pocket on the back – but I like the card peeking out in the front.
  2. If your ornament is a bit on the big or your felt is on the thin side, you can make it less floppy by gluing a piece of cardstock to the base ornament.
  3. Sew the coffee to the bigger mug shape, also attaching a ribbon loop for hanging, and decorate the front pocket – beads, embroidery, paint, glitter glue … The back of the pocket won’t be visible later, so it doesn’t have to be super neat.
  4. Sew the front pocket to the mug base. If, like me, you are not very good at sewing, thin thread in a similar color and a regular sewing needle works best, as your stitches will not be very visible.
  5. Place the card in the pocket. Give away.

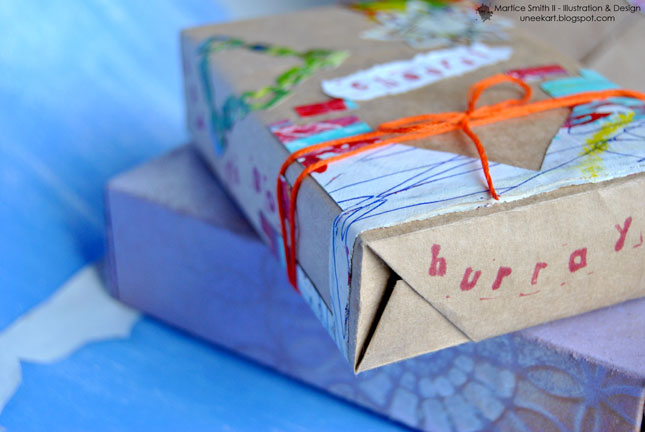
If you have an hour or less

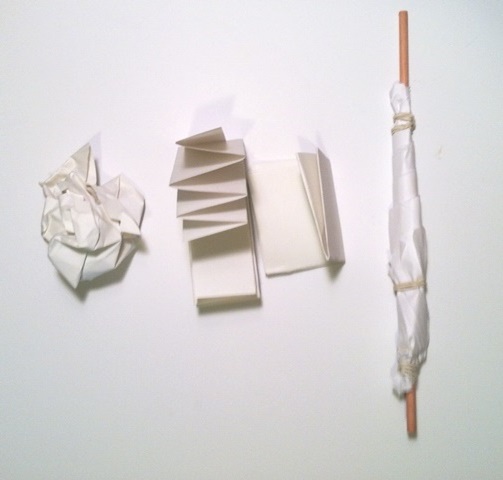
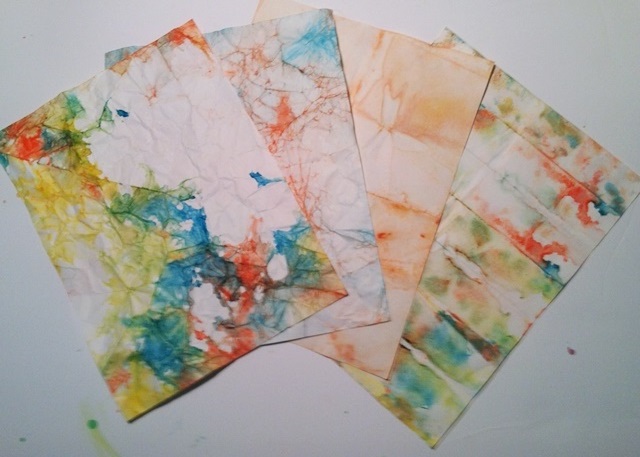
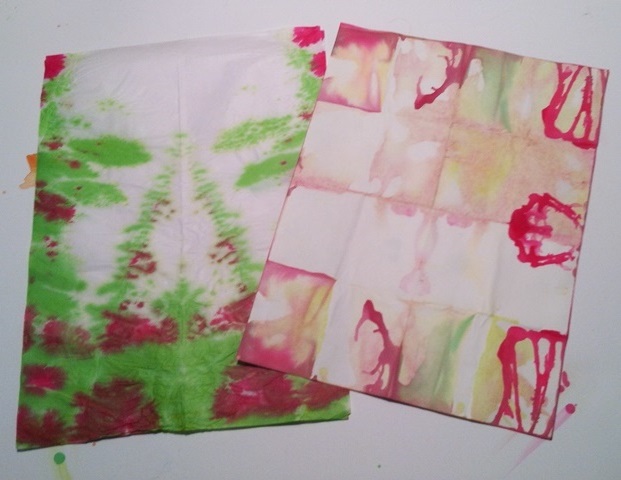
The second item on my art to-do list for 2015 is “Learn origami”. I’m fascinated by the possibilities, especially in combination with fabric. If you are really pressed for time, a simple origami envelope can be folded in minutes. Almost any kind of rectangular paper works for the envelope here – and you can, of course, decorate it as much as time allows. Using a piece of fabric gives an unexpected twist – lightweight to medium fabrics work best, my favorite is quilting cotton.

The fabric needs to be stiffened to hold the creases better. You can spray it with a thin coat of varnish or laundry starch. The one thing I always have in the house is white glue, so I dunked the fabric rectangle in a solution of two parts water and one part white glue. Smooth the fabric out on a sheet of freezer paper or plastic. It will peel off when dry. The fabric is going to be stiff, but can still be decorated with needle and thread, if desired.

I used paper to demonstrate the folding steps – a rectangle of about 8″ x 11.5″ makes an envelope big enough for most cards.

Folding steps for the origami envelope.

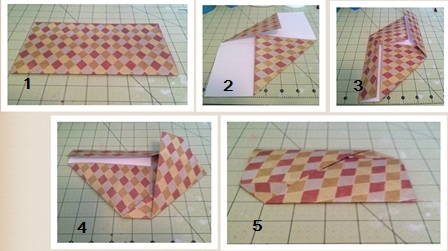
Folding instructions:

  1. Fold the paper in half, make a sharp crease and unfold.
  2. Fold the top right and bottom left corners down to the center crease.
  3. Fold the top left and bottom right sides inward so that they meet the vertical triangle edges.
  4. Turn the paper 90° and fold the right side down to meet the bottom edge. Tuck the edge into the flap at the bottom.
  5. Fold the left side to the top edge and tuck it into the flap as well.

Slide the gift card into the slit in the center. The envelope has two layers of folds. Slip the card into the bottom layer, because the short sides are open in the layer above.

Finished ornament and fabric envelope

Enjoy giving a gift card to someone special this holiday season!

(Oh, and just in case this article is giving my family some festive ideas – remember the mantra, guys: books, crafts, coffee!)

~*~*~*~*~*~*~*~*~*~*~*~*~*~*~*~*~*~*~*~*~*~*~*~*~

Katja Blum is a writer and translator from Tulsa, OK. As an artist, she started with yarn, fabric and papier mache (rarely together), branching out into collage and other paper arts about ten years ago. Her latest obsession is making soft stuffies and art dolls – to the delight of her toddler. She also likes to find creative solutions for ugly or broken things around the house – to the delight of her husband.

You can see more of her work with fiber, paper and words at www.thewaywardsheep.com

~*~*~*~*~*~*~*~*~*~*~*~*~*~*~*~*~*~*~*~*~*~*~*~*~

.

.

Ten-minute art idea: “Tie-dyed” paper

~ * ~

This article was written by Katja Blum

I love paper marbling. The technique fascinates me, and while it is possible to apply the color to the water or sizing in a controlled manner, the outcome can still be a happy surprise. I love surprises.

However, marbling is somewhat time- and labor-intensive. Making the size, preparing the paper and paints, creating the marbled papers, rinsing… Enjoying one of those busy lives we all lead these days, I rarely find the time. That doesn’t mean I have to do without creatively colored paper or happy surprises. If ten minutes is all you can spare for a little art fix, how about faux tie-dyeing?

“Tie-dyeing”, or rather fold-dyeing, paper is a technique that requires few materials and no preparation. You can do it at your worktable or at the kitchen sink while making tea. On hold with the utility company? No need to get frustrated. Put the phone on speaker and make art.

You need:

  • Paper

Most paper qualities will work. I often use my son’s sturdy watercolor paper or rice paper. Since rice paper is fairly thin, it’s a good idea to take several sheets at once and use the stick or folded techniques.

  • Liquid fabric or silk paints

I like Dye-Na-Flow. If you have one of those tie-dyeing kits with the prepared paints for a summer projects with the kids, see that there are leftovers, because they work really well.

  • Gloves
  • Bowl of water (or the sink)
  • • Wooden dowel and rubber bands (for the rolled technique)
  • Paper clips to hold folded papers together for drying

Materials for tie-dyeing paper

Fold the paper into various shapes. You can also crumple it up or roll it up on the dowel and fasten it with rubber bands.

Paper in different shapes: folded, rolled and crumpled.

Put on gloves, protect your work surface from paint spatters and apply random drips of fabric paint to the folded or crumpled paper and into the folds. Remember that too many colors might make mud – even though it can be very pretty mud!

You can use the paper dry or wet it before or while applying the color. Seriously, standing at the kitchen sink is a good way of doing this. When you are satisfied with the color application, secure the folded papers with paper clips and leave them to dry. Done.

Do resist the urge to unfold the papers before they are dry, because wet paper breaks more easily and there might still be wet paint in the creases that could run and cause streaks.

Once the papers are dry, unfold them carefully and enjoy the colors and patterns you have created. Some papers – the folded ones in particular – make terrific Rorschach tests. Let your imagination run wild and see what you can see. To smooth out the creases, iron the papers on a low setting or press them under a few books.

Tie-dyed papers

Tie-dyed papers

Of course you can use your tie-dyed papers as backgrounds for mixed-media pieces or as collage material – or display them as the pieces of serendipitous ten-minute art that they are.

Display your tie-dyed papers as finished art

~*~*~*~*~*~*~*~*~*~*~*~*~*~*~*~*~*~*~*~*~*~*~*~*~

Katja Blum is a writer and translator from Tulsa, OK. As an artist, she started with yarn, fabric and papier mache (rarely together), branching out into collage and other paper arts about ten years ago. Her latest obsession is making soft stuffies and art dolls – to the delight of her toddler. She also likes to find creative solutions for ugly or broken things around the house – to the delight of her husband.

You can see more of her work with fiber, paper and words at www.thewaywardsheep.com

~*~*~*~*~*~*~*~*~*~*~*~*~*~*~*~*~*~*~*~*~*~*~*~*~

.

.

Usable Art: Mixed Media Papier Mâché Containers

~ * ~

This article is written by Katja Blum

Papier mâché (French for “chewed paper) is a sculptural technique that most people know from elementary school, Mardi Gras floats and big rocks falling on Captain Kirk. But did you know that papier mâché was used for making coffins in Ancient Egypt, for armor, medieval church and castle interiors, boats and even aircraft fuel tanks during World War II?

Paper – as pulp, meaning shredded, soaked paper bits, or strips – combined with various bonding agents like paste, glue, oil or lacquer can be used to build amazingly sturdy, even waterproof, structures and made to resemble pretty much any other material. Many artists today use fine paper clay for dolls or other kinds of sculptures, but I would like to invite you to channel to inner third-grader and glue paper strips to a balloon. It’s fun, satisfying, not to mention a great way to recycle – and you can make objects that are not just interesting substrates for a wide range of mixed media techniques, but also perfectly usable containers to bring more of your art into your everyday life.

Materials for making papier mâché containers

I’m willing to bet that you have everything you need to make a papier mâché bowl in your house right now.

You need:

  • Air-filled balloon and/or a household container lined with plastic wrap
  • •Paper, torn into strips and pieces – tissue paper, newsprint, junk mail, gift wrap, scrap paper, cardboard (for making bases, handles etc.). If it’s paper, you can use it.
  • •Fiber, fabric, threads and other light, “glueable” things
  • •Flour or wallpaper paste
  • •Masking tape for adhering bases, handles etc.

I use a very simple flour paste recipe:

Whisk one part flour into one part water, until the liquid is smooth and of a consistency somewhere between heavy cream and Sauce Hollandaise. Add a squeeze of white glue for extra strength, if you like.

When working mainly with tissue paper, make the paste a little runnier, because applying heavy paste tends to rip thin paper.

Balloon bowl

Steps for making a bowl on an inflated balloon

Take a piece of paper, apply the paste with your fingertips and smooth the wet strip onto the balloon. When working on top of a form, you are creating the layer that will show on the inside of your bowl first. If you want to use decorative paper for the inside layer, remember to paste it on with the “good” side down.

Build up layers of paper strips and pieces. You don’t have to let one layer dry before putting on the next. When working with paper strips, try to cross-hatch the layers – one layer of vertical strips, one of horizontal strips. If you get bubbles and creases, wait a few moments for the paste to soak through the paper and smooth them down with your fingers or with the back of a spoon. (Pro tip: Don’t use a pointy bone folder on a balloon project. Bad things can happen.)

When you have almost reached the desired thickness, think about the base for your balloon bowl. You can get as creative as you like, but one easy method is a base ring. Twist a long piece of paper (a newspaper page works well) into a tight paper rope, form a ring and tape the ends together with masking tape. Position the ring on the balloon bowl – doesn’t have to be in the center, my bowl is supposed to stand a little tilted. Cover the ring while building your next couple of layers.

You can also use this technique to make handles and rims. A rim around your bowl is very useful if you don’t want the bowl to be thick – for instance if you want to decorate it with stitching and need to get a needle through the paper layers later. A rim will give the bowl a lot of stability without adding thickness.

Once your balloon bowl pleases you, let it dry thoroughly. If you dry your papier mâché objects outside, try to avoid direct sunlight, especially for thinner items. Drying too quickly in intense heat can warp the object. Same goes for oven drying.

Container bowl

Steps for making a papier mâché bowl inside a household container

If you want to create a papier mâché container shaped like one you already own, cover the inside of that container with plastic wrap and use it as a form. Make sure that the form’s opening is not narrower than the rest of it; otherwise you’ll have a hard time extracting the paper object. It’s safer to work on the inside of containers you don’t want to cover permanently with papier mâché (which, by the way, is a great way to turn plastic bottles into pretty vases). The paper tends to shrink while drying, and you don’t want to have to tear off your art object to get your casserole dish back.

Remember that you are working the outside first this time. Again, layer decorative papers into the bowl “good” side down.

Proceed as described for the balloon bowl. In my example, I’ve lined the bowl with a full sheet of tissue paper without paste. It gives the outside of the bowl an interesting texture and makes a sturdy start for a bowl with thin walls. Press in the next, wet layer – the paste will soak through and hold the tissue in place.

When working in a bowl, you won’t need a base to make your object stand, but you can certainly add one later, as well as handles etc. Let the papers hang over the edge of your form for now. You can always make a neat edge later after drying. Or not.

I used pieces of polyester lace for this project. Fabric, yarn and fiber can be used just like paper here – just paste them on.

Finishing

Once the objects are dried all the way through, lift your papier mâché bowl out of the form and pop the balloon. Cut the containers into any shape that pleases you.

If you didn’t build a layer of decorative paper, acrylic gesso gives you an even, neutral surface to work with. I like my objects to look like papier mâché, so I tend to leave them pretty rough and torn-looking, but the hardened papier mâché (with or without gesso) can be sanded smooth, if you prefer a sleeker look.

Decorated balloon bowl

Decorated bowl made in a form

Decorate the papier mâché bowls. You can always add more paper or cardboard elements. Painting, stamping and stenciling all work well on these objects. Thinner containers can be stitched or beaded. Painted felt balls find a use here. Spray varnish is a good protective finish.

Enjoy your useable papier mâché art and experiment with the infinite possibilities of this ancient technique.

~*~*~*~*~*~*~*~*~*~*~*~*~*~*~*~*~*~*~*~*~*~*~*~*~

Katja Blum is a writer and translator from Tulsa, OK. As an artist, she started with yarn, fabric and papier mâché (rarely together), branching out into collage and other paper arts about ten years ago. Her latest obsession is making soft stuffies and art dolls – to the delight of her toddler. She also likes to find creative solutions for ugly or broken things around the house – to the delight of her husband.

You can see more of her work with fiber, paper and words at www.thewaywardsheep.com

~*~*~*~*~*~*~*~*~*~*~*~*~*~*~*~*~*~*~*~*~*~*~*~*~

.

.

Intricate Paper Stencils, PART 2: Gift Wrap

This article was written by Martice Smith II

Martice Smith II demonstrates how to make your own gift wrap using intricate, paper stencils

Make the stencils, first! PART 1 of this tutorial can be found here.

Gather Supplies & Tools

Gather supplies and tools

If you have used watercolors, water-soluble pencil or any other water-based mediums on the stencils you created, go ahead and spray 1-2 light coatings of varnish (matte or gloss; it’s your choice) to seal everything in and to prevent bleeding or mixing of colors on your stencils.

1. Position stencils onto kraft paper 

Position stencils onto kraft paper

Unless your stencils are very large, there’s no need to work on large areas for this step. You will be able to control your work surface much easier if you’re able to work in manageable sections, at a time.

Try a layered look by overlapping the stencils.

Don’t clutter too many of your intricate paper stencils in one area. It’s ok to leave some larger areas of kraft paper!

2.  Apply spray adhesive

Apply spray adhesive

Do this step outdoors, as the fumes are very strong and can be harmful or cause irritation to eyes and throat.

On a separate work table, turn over 2 or 3 stencils so that the ‘wrong’ side (the side with no paint) is facing up. Spray each stencil, individually, with an even layer of adhesive. (Sometimes, I allow the spray adhesive to sit on the stencil for about 3 seconds. This will create a stronger bond to the paper.)

Gently place the stencil onto the kraft paper.

Use light pressure from the palm of your hand of fingers to flatten the raised areas of the stencil.

3.  Brush on decoupage medium

09May_MFS_IntricatePaperStencils_PART2_GiftWrap-Pic5

Take your large, bristle brush or a foam brush and generously apply Mod Podge® directly to the stencils.

Depending on the design and delicacy of your paper stencil, spread the Mod Podge®, working from the center, then out to the tips.

4.  Let dry, then trim excess

This step is very important! You need to allow the Mod Podge® to dry completely.

Drying time will vary, depending on how many layers you applied, but a good 15 minutes should be fine.

TIP: If any of your stencils are extending beyond the kraft paper, use scissors to cut off the excess. (Yes, you can use these pieces, too! Go ahead and glue them down.)

5.  Repeat or re-roll

If you like what you see so far, continue adding more of your intricate paper stencils.

When you are done, you can cut off what you need to wrap a package or you can re-roll the kraft paper until you’re ready to start again, later.

Now go wrap some gifts!!

Now you're ready to wrap some gifts!

Now you're ready to wrap some gifts!

Great for mail art packages, too!

Would you like to try 10 more stencil designs? If you’re interested, you can sign up to receive “10 NEW Intricate Paper Stencil Designs”, a free e-book that showcases more of these stunning designs…click here to sign-up to the Uneek Art Letter to get access to download this pdf! (Courtesy of Martice Smith II – Illustration & Design Studio)

~*~*~*~*~*~*~*~*~*~*~*~*~*~*~*~*~*~*~*~*~*~*~*~*~

Author bio:

Mixed-media illustrator and designer Martice Smith II

Martice Smith II is creative director of Martice Smith II – Illustration & Design Studio, based in Kansas City, Missouri and owner of Uneek Art Boutique. She established herself as a freelance Illustrator and graphic designer after receiving her Bachelor of Arts Degree.

Martice also contributes as an article writer for the Creating Mixed Media Art website.

You can see more of her work via her Facebook page or her blog. She invites you to join her monthly newsletter, Uneek Art Letter, for art biz tips, advice and free digital goodies!

~*~*~*~*~*~*~*~*~*~*~*~*~*~*~*~*~*~*~*~*~*~*~*~*~

.

.