Mixed Media Magnet

~ * ~

This article is written by Sandra Parés

Today I am going to show you how to make a decorative fridge magnet with mixed media. If you have spent these holidays at home or if you have come back from your trip and you haven’t remembered to bring gifts … you can make these fridge magnets to give away to your family or friends!

The supplies I am going to use are the following:

  • A square piece of wood 6x6cm (you can also use hard cardboard).
  • Gesso
  • Modeling paste
  • An old credit card
  • 1 stencil to make abstract backgrounds
  • 1 stencil with a sharp image to fit inside the square 6x6cm
  • Acrylic paints in various colors (I am going to use Silks Acrylic Glaze because they will give amazing brightness)
  • 1 brush
  • 1 sponge
  • 1 piece of adhesive magnetic tape

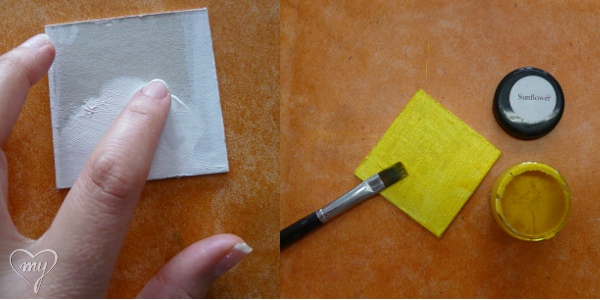
First of all we will put gesso on wood and we will let it dry completely. With this first step we will have the support ready for painting. Then we choose a light colour of our acrylic paints and we will paint the surface with it.

Putting gesso and painting the first coat of acrylic paint.

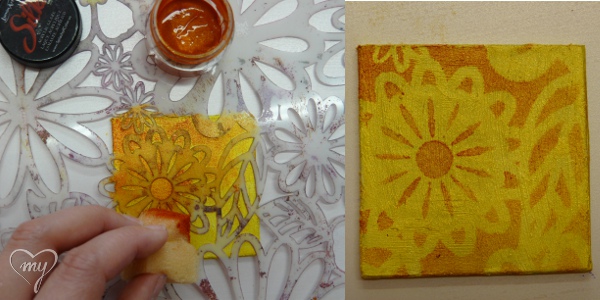
When the layer is dry, we will take a stencil that allows us to add texture over the background and with a sponge we will stencil the template using a contrasting color to the background layer.

Stenciling the background with a acrylic paint

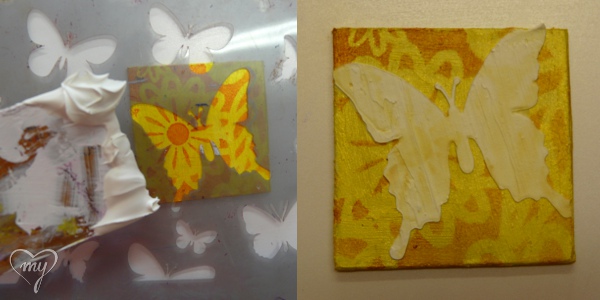
Once dried we will take another template, this time we will choose a stencil with a sharp image. And with the credit card we will catch some modeling paste and we will fill the gap with the paste. With this step we will have a embossed figure. We will let it dry a few hours until the paste is completely harden.

Filling the stencil with modeling paste

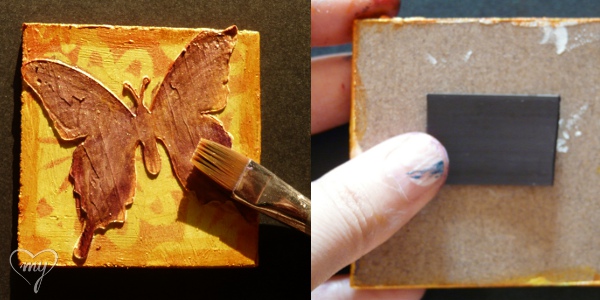
When the paste is dry we can paint the figure with acrylic paints. Also we can paint around the edge to give sense of well finished. Finally when all the work is dry we have to put a piece of adhesive magnetic tape to get the magnet.

Painting the magnet and putting the adhesive magnetic tape

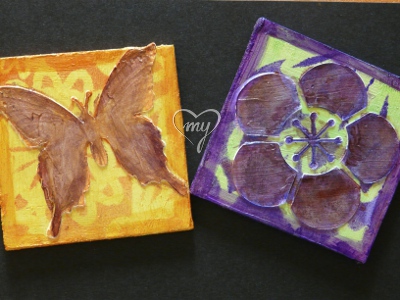
And with this easy way we can make these beautiful fridge magnets:

Handmade mixed media magnets

~*~*~*~*~*~*~*~*~*~*~*~*~*~*~*~*~*~*~*~*~*~*~*~*~

Sandra Parés loves working with mixed media! The colors and textures leave her amazed and she enjoys creating and getting their hands dirty with paint and gesso! On her site My mixed media you can find a mixed media online store, art and craft products, mixed media workshops in Spanish, tutorials, ideas and mixed media techniques.

~*~*~*~*~*~*~*~*~*~*~*~*~*~*~*~*~*~*~*~*~*~*~*~*~

.

.

Handmade Candle Holder

~ * ~

This article is written by Sandra Parés

Today I am going to show you how to make a candle holder with a magic light to illuminate our summer nights.

Candle holders with a magic light for our most special nights

The supplies I will use are the following:

  • An open top container glass (to make these candle holders usually I use recycled glass jars)
  • white tissue paper
  • the big shot and a star die
  • 8”x10” Gelli Plate
  • a brayer
  • black acrylic paint
  • a stencil
  • extra heavy gel medium (gloss)
  • 2 paintbrushes
  • Facetten-Lack metallic platin Vica Deco
  • a makeup brush
  • Primary Elements of LuminArte
  • hairspray
  • wire and a candle

First of all we will start using the Gelli Plate: we will use the brayer to put the black paint over the stencil, then we will press the stencil over the gelli plate. With this step we can print the mark of the stencil over the gelli plate. Then we will take a piece of tissue paper, it must be large enough to surround our glass jar. And we put the tissue paper over the gelli plate to print the texture. With this step, the mark of the stencil will print in our tissue paper.

And with the Big Shot and the star die we will open a few holes in our piece of tissue paper.

Create a pattern with black ink and gelli plate over the tissue paper

Then we will paste with extra heavy gel medium the tissue paper around our glass jar and we will leave it to dry. Then we will paint the holes with Facetten-Lack to give a touch translucent at the glass. For this step, also you can use any paint or paste that allows you to do this translucent effect.

Paste the tissue paper around the glass jar

Once dried we can add the color. I will paint with the Primary Elements of LuminArte, I will use the pigment directly. First of all we have to spray the entire glass jar with hairspray, you will see how the jar is wet. Taking advantage of this dampness, we will catch the Primary Elements pigments (the color or colors that you want) with a makeup brush and we will paint with them making circles. When we run out of pigment or hairspray dries, we will go back to add more product to get the whole jar painted.

Finally, if we want to hang it somewhere, we only need to put some wire around the jar. And don’t forget to put the candle inside!

Painting with Primary Elements the whole glass jar

You will see that the result will be beautiful and shining: a candle holder with a magic light for our most special nights. The first time I used these candle holders was at my craft stop in the “Enchanted Night“, the shopping night from my city, and they produced an amazing shine!

Candle holders with a magic light for our most special nights

~*~*~*~*~*~*~*~*~*~*~*~*~*~*~*~*~*~*~*~*~*~*~*~*~

Sandra Parés loves working with mixed media! The colors and textures leave her amazed and she enjoys creating and getting their hands dirty with paint and gesso! On her site My mixed media you can find a mixed media online store, art and craft products, mixed media workshops in Spanish, tutorials, ideas and mixed media techniques.

~*~*~*~*~*~*~*~*~*~*~*~*~*~*~*~*~*~*~*~*~*~*~*~*~

.

.