“Share the Moments of Joy” through Mixed Media Painting

~ * ~

This article is written by Marilyn Harris Mills

Creating mixed media feeds my soul. When I need to immerse myself into creativity and inspiration, I reach out to my supplies that are beckoning me to discover fresh ideas of using them.

I’m a Golden lover!  I use the Golden line of products exclusively, whether it be their fluid, open or heavy bodied acrylics or their abundant choice of mediums.  There is nothing better than to leave my studio gummed up with molding paste and dried paint!

See Marilyn’s video on her mixed media painting process

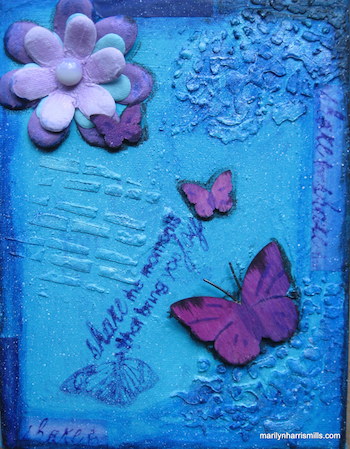
This project I’ve created for you is about using various supplies to create a small work of art.  As artists, we tend to overload on our addiction for art supplies.  Consequently we don’t always take the time to co-mingle the supplies working them in tandem with each other to create something that they lead us to discover.  In this project I’ve reached for and used fluid acrylics, molding paste, a rubber stamp, twinkling H2O’s, washi tape, dye ink sprays and pads, and embellishments such as  flowers, buttons & wooden butterflies.  What didn’t I use?!!  These products are my favourites…ones I reach for time and again.  Using embellishments I’ve collected over the years, it is fun to combine them into an art piece.


I create based on my intuition….my inner voice tells me the journey to take while I reach for my supplies during the process. I have no pre-conceived notions of where I will end up.  I choose the colours of my paints & the mediums first….then the supplies that will add the meaning to the project; in this project I chose a rubber stamp ….next I simply reach for “do-dads” as I call them (embellishments)  to enhance the project. The final step is to bring harmony to the project.  In this particular piece, I used an old toothbrush to splatter white paint over everything….creating harmony and cohesiveness in the project is an important step I believe and one that is often overlooked.

Each project is as they say “a labour of love”…..but it’s not labour, it’s simply my inner muse, my soul coming out to play….the process is the love part.  An opportunity to express with art what I cannot say with words. With this project, I’m sharing with you the moments of joy this creation offered to me.

~*~*~*~*~*~*~*~*~*~*~*~*~*~*~*~*~*~*~*~*~*~*~*~*~

A bit about Marilyn Harris Mills:

I’m passionate, creative and eccentric, at least that’s what my girlfriends tell me! I’m a professional published artist, designer and teacher living in Ottawa Canada.  I journey through life with my dogs Lucy and Mozart. Practicing yoga, journaling, meditating and walks in the forest nourish and excite me. I did try knitting once but gave that up…couldn’t remember to count the stitches. In my free time, I practice Zentangles and Mandalas. I also love creating mixed media art – it feeds my soul.  I volunteer, teaching art to teenage girls at a treatment centre.  It is the most rewarding endeavour of my life. One of my favourite quotes is “I work in whatever medium likes me at the moment!” (Marc Chagall)

~*~*~*~*~*~*~*~*~*~*~*~*~*~*~*~*~*~*~*~*~*~*~*~*~

.

.

Don’t Be Afraid To Texture

~ * ~

This article was written by Kim Kelley

In this age of technology we have sites, blogs, tweets and Pinterest making all sorts of suggestions to use their brand of paste or gel; even sites on how to make your own paste. There are so many choices that it can be overwhelming. 

Kim Kelley tried three different types of texture paste

In this project I decided to use 3 name brand products; Wood Icing by Stencil Girl, Stucco Patch (from local hardware store), and Gloss Gel by Golden. The Wood Icing cost me $12.99 but had $12.00 shipping, whereas the Stucco Patch cost $5.99 and we were going to the store anyway! The Gloss Gel I purchased a few months back at Michael’s and used a coupon, so it probably cost me just under $5.00 but it is about half the size of the Wood Icing and ¼ the size of the stucco.

I am going to make a layout that can be used as a scrapbook page, framed art, or just wall decor. This is a kit that I purchased from Scrapbook Diaries consisting of papers, frames, flowers, sprays and even micro beads.  This is the first creation I actually made on paper, rather than canvas or wood.  So we will all be surprised at the result. 

Kim Kelley tried three different types of texture paste

 After getting my papers layered and glued where I want them, it is time for texture. I decided to use my “circles” stencil and started with the stucco. First thing I noticed was the texture! No pun intended. It is rougher, having almost a concrete feel. I used it in both top corners of my project.

Kim Kelley tried three different types of texture paste
The lower two corners I used the Wood Icing. My only problem with this is it has a brown tint to it. The way to get past the color issue is to add gesso over it before adding any paint, spray or color technique. The feel and thickness you achieve is perfect, so for me it is worth it to use.

Kim Kelley tried three different types of texture paste
Next I added the regular gloss gel, really just dabbing it anywhere on the page with my palette knife. Then added micro beads to give it some texture, since it dries clear and the beads are clear it really shines. You can buy the medium with the beads already mixed in, but you are stuck with the color and consistency. If you add your own beads you can change the color of them and add as many as you want. You can even change the size of the beads that way.

Kim Kelley tried three different types of texture paste
Now for some color. The kit comes with Amber and Dark Brown Chalk spray. The colors are very pretty but I really wanted and added pop…so I used some sprays from Lindy’s Stamp Gang. These gave it the sparkle and shine that was needed.

Kim Kelley tried three different types of texture paste
Once I was happy with the colors, I started on some embellishments I wanted to add. I colored a chipboard frame with sprays, paints and crackle gel. I attached this to a piece of paper that was also colored the same…this way someone can slip a picture right behind the frame. I had to add some flowers, chain, stickers and some chipboard. Then I used a few Tim Holtz stamps to add not only color but some dimension.

Kim Kelley tried three different types of texture paste
Now for the fun part and something I had never tried before…glue gun goop…yes that is a technical term! (ok- ok one I made up but still technical) For this you take your glue gun and make swirls, circles, loop de loops; whatever you want to create and let it dry right on your project. You can paint or spray over it for added color or leave it clear and shiny. I did both.

Kim Kelley tried three different types of texture paste
The final step is putting it all together. Whatever you feel looks right, is right. That is the best part about Mixed Media Art, there is no wrong or right way to end a project. Here is the end result.

Kim Kelley tried three different types of texture paste
I did add some gloss Mod Podge over the top; it seals it as well as gives it that glorious shine!

~*~*~*~*~*~*~*~*~*~*~*~*~*~*~*~*~*~*~*~*~*~*~*~*~

Kim Kelley is borderline obsessive about her crafting and her art. She loves mixed media art because you are free to go beyond your comfort zone, using your imagination and exploring an anything goes mind set. Kim loves to learn and explore new techniques and hopes that any art she creates leads someone to find their inner creative artist!

Sites: itsallaboutcrafting.blogspot.com and www.facebook.com/kimscraftyconcepts

~*~*~*~*~*~*~*~*~*~*~*~*~*~*~*~*~*~*~*~*~*~*~*~*~

.

.