This article is written by Francesca Albini
I wanted to do a little booklet of imaginary landscapes and thought it would be fun to use only stamps and stickers. I have a large collection of stickers that I find in children’s books and magazines, or that I buy when I travel. Most of the stamps I used in my booklet are homemade. All you need is some lino carving knives, scissors, a brayer, some kind of plastic sheet to spread acrylic paint onto and… a trip to the pound (or dollar) store. There you will find lots of things that can be used to make stamps – flip-flops, erasers, foam sheets, gardening mats, etc. You can find novelty erasers in the shape of fish, frogs, triangles, that can be quite cute. Also don’t forget the small erasers at the back of pencils, they make lovely dots. After a while you’ll develop an eye for what items make interesting patterns.
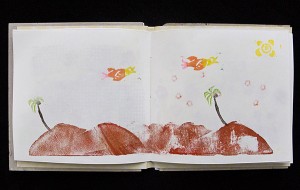
Normal white erasers are ideal for carving simple designs, like my palm trees, the bird and the sun. I draw the (mirror) image with a marker on the eraser and then carve out very carefully all the bits that I don’t want printed. I ink the stamp and do a print, if it needs tweaking I carve some more and test it again. I use both sides of the eraser, so I get two stamps out of one eraser. Tips, sides and corners of erasers can also be used to print lines and rectangles.
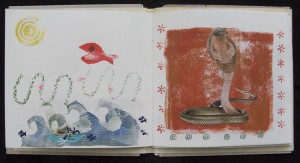
I cut the fish and the waves from a foam sheet that came from a children’s card making kit. I cut the foam gardening mat into blocks, and with a double sided sticky tape I attached a thick windy string on one, some paper clips on another and buttons on a third.

To ink my stamps, I use ink pads, stamping brush markers and acrylic paint. When using acrylic you have to wash your stamps straight away, before the paint dries. Sometimes it helps to put a foam sheet under the page where you want to stamp, so that you get a better print (with the buttons stamp, for instance.)
I like the idea of a theme, like landscapes. I guess one could also make portraits out of stamps, compositing hair, eyes, hats. The possibilities are endless.
Happy stamping!
~*~*~*~*~*~*~*~*~*~*~*~*~*~*~*~*~*~*~*~*~*~*~*~*~
Francesca is a visual artist using pretty much everything she finds around her to record and relive feelings and memories of places and emotions. She collages, paints, draws, photographs. Francesca loves mixing modern technology, such as mobile phone apps, with the simplest of tools such as glitter glue, crayons and other children’s art supplies. Read her blog at Frans Journal Blogspot.
~*~*~*~*~*~*~*~*~*~*~*~*~*~*~*~*~*~*~*~*~*~*~*~*~
.
.


Recent Comments