Top Tips for Storing your Mixed Media Art Materials

Part of practising you mixed media art skills is to get out your collection of tools and materials and use them on a regular basis. There is nothing more frustrating than not being able to find something you are SURE you have bought or found and put somewhere “safe”; so safe that you can’t remember where it is. Here are my top tips for storing your mixed media art materials.

1. Good Papers

These are the beautiful sheets of paper that you do intend to use at some stage but for now they are just too pretty to use. I store mine in folders with plastic pockets so I can leaf through them. They are grouped into paper types (vellum, metallic etc).

2. Small Papers

Once a larger sheet has been used up and you want to keep the off cuts, these can be stored in boxes and sorted in colour groups.

3. Embellishments

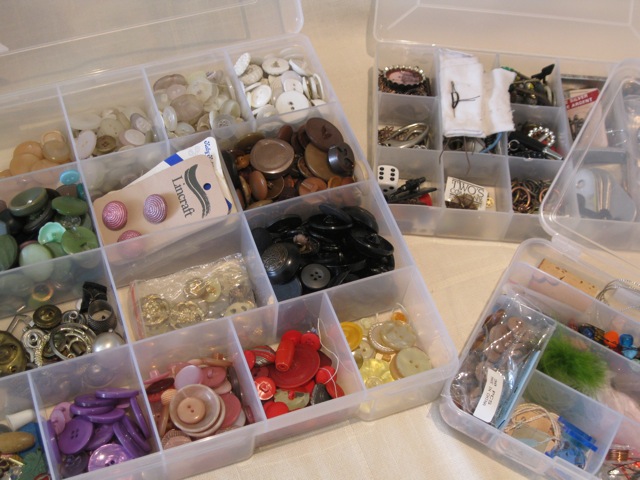
Buttons, shiny things, beads and stickers are all fantastic items to use as embellishments but without keeping them in neat storage, you will have lots of trouble finding just the one you want.

4. Other stuff

For everything that’s left, large boxed are great to putting those odds and ends into. Don’t forget to label each box to make things easier to find.

.

.

Jewellery Elements – Setting Eyelets

Incorporate jewellery elements into our mixed media art introduces a whole new world of embellishments and tools, as well as new skills. In this series we will look at the basic tools and elements needed to get us started.

Previously we looked at the basic tools we need to begin using eyelets in our mixed media art work. Here we will continue with the skills needed to add eyelets into our work.

Eyelets

Eyelets come in a range of sizes and colours. To get you started, I’d suggest buying a bulk set of gold or bronze with 1/8″ diameter.

mixed media art embellishments

These will complement many different pieces of work. The colours can be changed by using a metallic leafing pen, like Krylon.

mixed media art embellishments

While there are lots of pretty colours out there (many of which I have bought!) I find that I don’t use them unless I have bought them for a current project. Those pretty colours can be distracting.

With the different diameters, the eyelets also come in different lengths. If you are planning on using the eyelets into thick board, the consider choosing a longer length. For most mixed media artwork, the standard sizes will be okay.

Making the hole
Take the eyelet you want to add and check the size compared to the hole punch.
mixed media art embellishments
The body of the eyelet needs to fit neatly but the head needs to nestle onto the work surface. A little movement in the hole is okay but too much will make the eyelet move when setting. This makes getting them in the right place a little tricky, making a pair or row of eyelets look untidy. Once set, eyelets are very hard to move.

Lightly mark the position on your work where the eyelet is to go.
mixed media art embellishments
Line up the punch, hold it straight up and down, and hit it firmly with a hammer. If the punch hasn’t gone right through, line it up again and hit it a few more times.
Embellishments in mixed media artmixed media art embellishments

Getting the hole positioned exactly where you want it takes a little practice, so do a few test holes on scrap cardboard to get the hang of it.

Setting the eyelet
Check the eyelet size against the setter diameter to check the setter head will fit into the shank of the eyelet, without being too sloppy.
mixed media art embellishments

Put the eyelet into your work with the head onto front side you want visible. Turn the piece over and lay it flat onto the mat.
mixed media art embellishments
Check the position of your work and the eyelet. Place the setter into the end of the eyelet and hit it firmly with the hammer.
mixed media art embellishments
Have a look at the tail; if it has opened more that halfway, hit it with a hammer to flatten it. If it hasn’t move much, use the setter again.
Embellishments in mixed media artmixed media art embellishments

Using a Crop-a-dile
Using a crop-o-dile is a similar process. There are two sizes to choose from (1/8″ and 3/16″), so chose the one that fits your eyelet best. Lightly mark where the eyelet is to go. Line up the punch side and make the hole.

Then put the eyelet through your work, insert it into the right sized setter and gently squeeze the crop-o-dile to set your eyelet.

There you have it; a finished eyelet!

mixed media art embellishments
Repeat the process with next eyelet until they all are set.

Happy creating!

.

.

.

Jewellery Elements – Eyelet Tools

Incorporating jewellery elements into our mixed media art introduces a whole new world of embellishments and tools, as well as new skills. In this series we will look at the basic tools and elements needed to get us started.

Here I have used eyelets to join two sections of this wall hanging together.

eyelets as embellishments

Here I used eyelets to reinforce the corners to hang beads in making this Christmas decoration.

eyelets for decorations

Tools needed for eyelets
Eyelets are those fantastic embellishments that originated to reinforce a hole in fabric or paper  and allow us to thread things through.

The tools needed to start using eyelets will require an initial outlay and can be expensive. Like any tools, you do get what you pay for. Once bought, these tools can be used again and again.

Hole punches
To add eyelets into our mixed media artwork we need to make a hole that is the right size for our eyelets. They come in a range of diameters and lengths and need a hole to match the size.

I have a universal hole punch set, which has interchangeable heads so I can make different hole sizes, anywhere on my artwork. To go with this, I need a hammer and a mat to protect the work surface.

mixed media art

mixed media art tools

The bees-knees of hole punches is the Crop-a-dile punch – this has two different hole sizes and punches with ease through a range of cardboard thicknesses. It is much quieter than the hammer and punch approach.

crop-o-dile punch

Eyelet Setters
Eyelets need “setting” by splitting the end and laying them flat, so the cardboard is clamped between the head and tail of the eyelet. We need a setting tool to do this.

These also come in different sizes to suit the eyelet. The one I use is a Making Memories brand with interchangeable heads. To go with this, I need the hammer and a mat I use to punch the holes.

mixed media art tools

Again, the bees-knees of eyelet setters is the Crop-a-dile , which can also set the two different sizes that match the hole punches. This works really well with the soft eyelets.

I hope this article has got you thinking about incorporating jewellery elements into your artwork. In the next article we will show how to make the right hole for your eyelet and how to set it to get a great finish.

.

.

My Favourite Materials – Part 5 Embellishments

It’s no secret that at Mixed Media Arts we love to create. We want to use materials that we have at hand, or are fairly cheap and easy to buy, as compared to corporate lines of specialty papers and embellishments where you need to buy something from the entire range as the colours don’t match with anything else. It can be very frustrating.

Today we will look at what we need to add those finishing touches to our mixed media artwork.

Part 4 – Embellishments and Found Objects

Another of my favourite mixed media materials is everyday objects to use as embellishments, adding that finishing touch or element of gold to complete your piece. I collect all sorts of metal and found objects as you never know when one may come in handy. This greeting card is embellished with an old sandal buckle and ribbon.

Mixed media collage greeting card

Metallic paint to add in touches to the backgrounds will make a great highlight. Or glitter glue that comes with a fine nozzle makes adding features or highlights by hand easy. (like this Stickles™ Glitter Glue Silver By The Each)

Use buttons as embellishments, reused from old clothing or spare ones from sewing friends or project.

mixed media art arch

Brads or eyelets are fun to use but we don’t need lots of colours; stick to basic black or gold. Then if you need to change colours, you can paint them, change colour with alcohol inks or metallic leafing pens. By using these in your work as well, it ensures the colours will match. It is amazing how many shades of gold there are and you will be forever trying to match odd ones if you have collected too many over the years.

By using paint to colour your embellishments as well as in your background, your colours will always match.

Using punches is also an economical way of creating embellishments. After the initial outlay of the punch, you can use papers to match your background or paint with the same colours. Circle punches are my favourite!

mixed media art greeting card

I hope you have enjoyed our mini-series on our favoutire mixed-media materials.

Happy Creating!

.

~*~*~*~*~*~*~*~*~*~*~*~*~*~*~*~*~*~*~*~*~*~*~*~*~*~*~*~*~*~

Here are other materials that I like:

My Favourite Materials – Part 1 Cardboard

My Favourite Materials – Part 2 Text Ephemera

My Favourite Materials – Part 3 Painting Tools

My Favourite Mixed-Media Materials – Part 4 Plastic Sheeting
Some further reading…

.