Mixed Media Family History Collages

~ * ~

This article is written by Anjuli Johnson

When I was finishing my history degree, I worked on a project that quickly became one of my favorites. The main stipulation was that all of my research had to be based on what historians call “Primary Documents”. Primary documents are direct evidence of the topic being researched, and were created by witnesses or recorders of the events. Examples of primary documents include journal entries, birth certificates, and newspaper articles.

Making Family History Collages

I remember researching my project required hours in the library, searching through rolls of microfilm for hundreds of birth and death certificates and interpreting the information I found there. It sounds so tedious, but going through those letters and certificates and seeing the names of actual people, their handwriting, and the tiny portions of their lives that were recorded there- it was fascinating. I’m not sure what it is about old certificates and journal entries- it’s like they contain secrets that are just waiting to be discovered.

Making Family History Collages

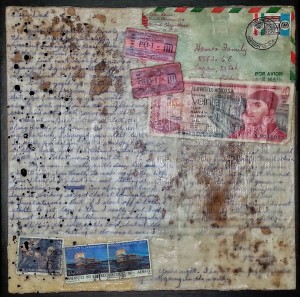
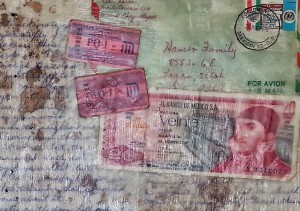
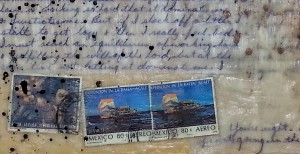
When the journal entries and letters are from your own family, that feeling of fascination triples. A few years ago, my grandparents basement flooded and we had to bring out all kinds of boxes to keep things from being ruined. It was then that I discovered a cache of letters from my father to his family while he was a young missionary in Mexico in 1974-1975. What an amazing feeling, going through those letters, reading about my dad who at the time was even younger than I was. Seeing his handwriting, the little tidbits he had collected, the replies his parents sent him, pictures, etc. were just like a window to the past. As a historian, those documents represent the truth of who my dad is and was, as well as who I am, as his daughter. I want to immortalize that truth, to make sure that it doesn’t get buried at the bottom of a drawer or inside a box. How could I do that in a way that would be respectful, beautiful, and long-lasting?

Making Family History Collages


Making Family History Collages

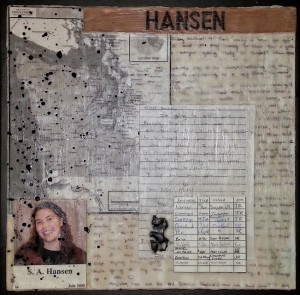
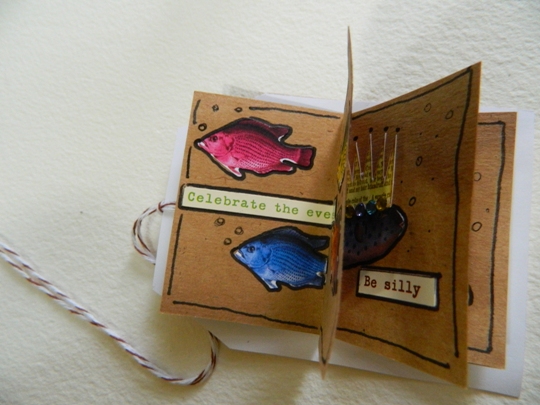
I decided on a set of encaustic collages- one of my Father during his mission and one of me during mine, 30 years later.

Since I knew I was going to be using primary documents, I started by choosing what to include and made copies and scans of every piece. I debated using the originals in my art, but I finally decided that the true value of my collage is in the fact that these are actual pieces of my own history. These artifacts represent my past, and by extension, my present and my future. Using printed copies just didn’t seem right, yet I still needed to make sure that nothing would be lost by including the originals in my collage. Once I have each piece framed, the letters I chose to include will be typed in their entirety and adhered to the back, so that even though parts of the originals are covered in the collage by wax and other elements, the whole letter can be seen simply by looking at the back of the painting.

The collage I created about my father is much more vintage looking than mine- I think the nature of the elements I used for his, and the fact that they are 30 years older adds to that look, but I also used rust in between layers of wax. To use this technique, I soaked a portion of steel wool in a white vinegar and water solution, and shook the droplets directly onto the wax. Once they dried, I was able to add more layers of wax and elements to imbed the rust in the middle of the collage. Adding the drops of India ink to the left side of each collage as a final touch brought more continuity to the set, as well.

Making Family History Collages

Don’t be afraid to showcase your family history through your art.  I will admit, I was a little nervous to be using the original letters of mine and my dad’s but to be honest, they mean so much more in this form than they do stacked in a box.  Collect your family’s primary documents, make copies and scans- you can even use the copies in your art if you prefer- but do something with your family’s memories that will spark interest and ensure that those memories are remembered and cherished, never misplaced or forgotten.

~*~*~*~*~*~*~*~*~*~*~*~*~*~*~*~*~*~*~*~*~*~*~*~*~

Anjuli Johnson is a Mixed Media Artist from Raleigh, NC.  She began her art career as a scrapbooker, and it’s been an evolutionary process ever since.  She loves all things mixed media- paper, paint, pens, wire, gears, clay… the list goes on and on.  She is constantly trying to push through her fears to discover and develop her talents, meet new people, and learn from those around her.  To see more of Anjuli’s art and techniques, check out her website at www.thefarpavilion.com  and like her Facebook page www.facebook.com/TheFarPavilion

~*~*~*~*~*~*~*~*~*~*~*~*~*~*~*~*~*~*~*~*~*~*~*~*~

.

.

Digital Quote Collage with Martice

~*~

This article was written by Martice Smith II

Digital Quote Collage with Martice

SUPPLY LIST: 

  • Image editing program/software (Photoshop, or a free program like Picmonkey)
  • Monoprints / collage
  • White cardstock
  • Pigma Micron pens, black (05 and brush)
  • pencil + vinyl eraser

Creative Hand-lettering:


photo example of Martice demo of creative hand-lettering, using a pencil

Write your favorite quote on white cardstock.

Have fun with this! Write some words bigger than others to put visual emphasis on them.

Made a mistake? No problem! I like using a vinyl eraser to remove mistakes and accidental graphite smears.

(TIP: place a sheet of paper under your palm to prevent smearing. Saves time on cleaning up your final image!) 

Creative hand-lettering, using Pigma Micron pens

Trace over your quote with black Pigma Micron pens.

I traced the entire quote with 05 and a brush pen for a faux-calligraphy look. Add variety to the design of your letterforms. Making the downstrokes thicker will give the letters more visual weight! Finally, erase all pencil lines with a vinyl eraser. 

Now, let’s dive into the digital realm of this tutorial! 

STEP 1// Scan your monoprinted/collage background and your hand-lettered quote. These should be two separate documents.

(TIP: Adjust the settings so that your image is black and white with high contrast.)

STEP 2// Launch Photoshop. Open your monoprinted/collage background. Duplicate the background layer.

Next, create a new layer.

Using the rectangle tool, draw a rectangle large enough to fit the quote.

Fill the rectangle with a light color. (I chose yellow as my fill color.)

Lower the opacity to 48% or play around with the opacity level so that the monoprinted/collage background barely peeks through.

STEP 3// Select the brush tool then choose white for the brush color. Outline the rectangle with white dots.

Rearrange the layers: Click and drag the yellow rectangle on top of this layer of white dots. (Now the dots look as though they’re behind the yellow rectangle. Cool, huh? 😉

STEP 4// Import your hand-lettered quote into this document. 

Set the blending mode to Multiply. (Cycle through the various blending modes to see which one looks best for you.) Position the quote on top of the yellow rectangle.

(TIP: You’ll want the quote to stand out from the colored rectangle, so that the words aren’t competing against the image behind it. Black letters are best to work with.)

STEP 5// Add a layer mask

The purpose of a layer mask is, simply, a non-destructive way to edit an image. It gives you more control over certain parts of an image so that it only changes specific parts.

Take a look at the final image, below. Notice how you can see through certain parts of the yellow rectangle while other parts or more opaque?

Martice's completed, digital quote collage

To create a mask, just click on the layer with the yellow rectangle, then click the rectangle icon, next to the ‘create a new fill or adjustment layer’ thumbnail, at the bottom of the Layers panel  (See screenshot, below).

Screenshot of 'Add layer mask' icon, at the bottom of Layers Panel in Photoshop

STEP 6// Select the brush tool. Use black for the brush color.

With this approach, you’re removing color where you don’t want it. Or in other words, you’re erasing the yellow.

Switching the brush color to white adds the yellow back in.

(TIP: You can change the opacity, shape and size of the brush strokes by accessing the brush preset menu. Here’s how I remember which color to use: Black conceals, white reveals.)

Troubleshooting Tips: 

  • Did you remove too much color? If so, change the color of your brush to white. Paint in where you want the color to re-appear.
  • Vary the size of your brush to get as detailed as you wish.
  • If you make a mistake, simply alternate between black and white to “conceal or reveal” the color.
  • Try adjusting the Opacity of the brush to reduce the impact of the adjustment in some areas.

STEP 7// Merge layers and crop!

Merge all layers together. For this example, I gave myself one inch borders on the top, left and right sides and 2 1/2 inches on the bottom for visual weight.

STEP 8// Save and name your document

I hope this tutorial encouraged you to try your hand at digital art making! Feel free to ask questions, if you’re unsure about a specific step. I’m always happy to help 🙂

Happy creating!

~*~*~*~*~*~*~*~*~*~*~*~*~*~*~*~*~*~*~*~*~*~*~*~*~

Author bio:

Mixed-Media artist, designer, and instructor Martice Smith II

Martice Smith II is creative director of Martice Smith II – Illustration & Design Studio and online boutique owner. As a published multi-medium artist, Martice shares her passion as an educator and design team member for multiple manufacturers, where her tutorial topics range from merging traditional art with digital techniques, to fashion illustration, to creative hand-lettering and more.

Martice is committed to helping you create + live your most soulful, wildest + colorful dreams…to the maxx! Discover more tutorials on her blog and join her colorful museletter

~*~*~*~*~*~*~*~*~*~*~*~*~*~*~*~*~*~*~*~*~*~*~*~*~

.

.

Tag Books

This article was written by: Melanie Statnick

~ * ~

Making little story books from paper tags.

These have to be the cutest thing I’ve seen yet. Little story books or note books made from tags. I used some scrapbook paper and Kraft paper with collaged images to make a little books. This first one is about The Fish King.  Gather tags either pre made or shape to cut. Use any type of paper in between for your pages.

Making little story books from paper tags.

Fold tag in half, you’ll use the string to wrap your book. Cut and fold blank pages to size and staple to the inside of your tag. Cut assorted images and words and glue them onto your pages to create or story or note book. You can use the front and back of each one or use just one side.

Making little story books from paper tags.

Making little story books from paper tags.

Don’t forget to decorate your cover. These are so cute and quick, you can make a dozen in a day. Have fun and be creative! I used a micron pen to outline the pages and images and added scrapbook gems to the images for a little sparkle. I also used a hole punch because I cut my tags from scrapbook paper.

Making little story books from paper tags.

Making little story books from paper tags.

Making little story books from paper tags.

Making little story books from paper tags.

~*~*~*~*~*~*~*~*~*~*~*~*~*~*~*~*~*~*~*~*~*~*~*~*~

Author bio: Artist Melanie Statnick is a Published Artist/Writer out of North Carolina who writes and creates art daily from her private studio.

~*~*~*~*~*~*~*~*~*~*~*~*~*~*~*~*~*~*~*~*~*~*~*~*~

.

.

Collage Bubble Fix

~ * ~

This article is written by Vicki Ross

What is a Collage Bubble? We all get ‘em, we all hate ‘em, but what are you gonna do with ‘em?

Simple, really. I worked with an xActo knife so many years during the pre-computer paste-up graphics days that I would wear mine behind my ear like some people do a pencil. Really!

So, suffice it to say, I have pretty good knife skills. This short video will explain my way to fix bubbles in your collage work. You don’t have to fix them, but if they seem problematic with what you intend the finished product to look like, you can fix in a few short minutes.

collaged mixed media can often result in bubbles

Because of the aforementioned knife skills, I did not use a cutting mat under my page. This striped paper is wallpaper, probably washable, and pre-pasted. However, with a generous coat of matt medium on both the wallpaper and the journal page, I still ended up with bubbles (note: not all the wallpaper I experimented with did this). SO, even though you are cutting just through the wallpaper, you might want to put that cutting mat under the page.

I’m just sayin’.


All images © V.N.Ross

~*~*~*~*~*~*~*~*~*~*~*~*~*~*~*~*~*~*~*~*~*~*~*~*~

Vicki Ross is focused on sharing her journey to art and how life events can shape us through creativity. www.Axully.com Vicki has always been involved deeply in the creative arts, from professional soft crafts publications (knitting/crochet/needlework) to French Hand-sewing, stencilling to macramé, oil painting to encaustics. Whatever your leaning, she believes in the healing power of creating.

You can see more of Vicki’s work at VickiRossArt or via blog posts at Axully – Solid. Useful. Beautiful

~*~*~*~*~*~*~*~*~*~*~*~*~*~*~*~*~*~*~*~*~*~*~*~*~

.

.