“Flavor for Mixed Media” by Mary Beth Shaw

~ * ~ 

This article was written by Michelle G. Brown

Mary Beth Shaw has put together “Flavor for Mixed Media – a feast of techniques for texture, colour and layers” with the mixed media artist who loves to get stuck in and set her hands dirty in mind. Published by North Light Books in 2011, Mary Beth brings her talents and those of 15 of her artist friends together for this feast of mixed media projects.

Mary Beth Shaw Stencil Girl

The key theme of Mary Beth’s book is to combine the skill and flavours of cooking with those of art, highlighting that “Art and food: Two of life’s most sensory pleasures and certainly two of my favourite things”. As I am NOT a particularly skilful cook, I did find the two themes clashed a little awkwardly at first but as I continued to feast on the wonderful colors and layers in Mary Beth’s projects I began to understand how the two themes could be used side by side.

The chapters run us through Preparation and making sure our artistic “pantry” is properly stocked. Then we run through Color, Texture, Layers, Flavors and Combinations. Each chapter includes three guest artists and three projects, so not only do we hear form 15 very different mixed media artists, we also have 15 projects to sink our teeth into. Mary Beth also offers alternatives to consider when one of the key “ingredients” is missing. Many of the guest artists also provide real recipes which adds a real element of tying the cookbook and art book together.

Flavor for Mixed Media Mary Beth Shaw North Light Books

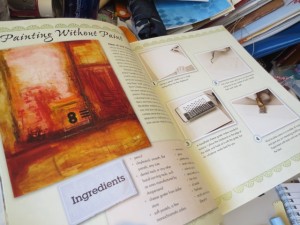
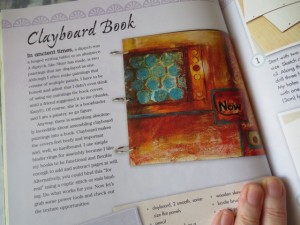
My attention was captivated by two projects; the “Painting without Paint” piece (p.16) and the “Clayboard book” (p.38). I loved the colors used and the texture and depth of layers in the final pieces. As I had actually bought some clayboard on a recent trip to the US, I was eager for a project that guided me through how to get the best out of the product and not just use it as another variation of canvas.

Flavor for Mixed Media Mary Beth Shaw North Light Books

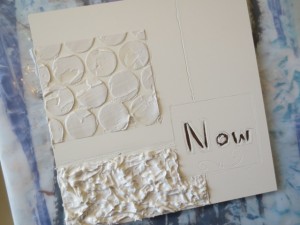
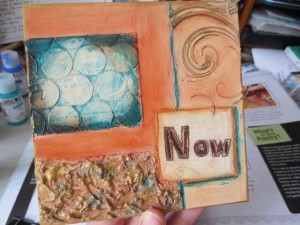
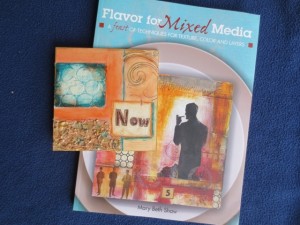
Claybord(™) is made by Ampersand and has a wood backing with a “Ultra-smooth clay surface” across the top. Mary Beth had us start by sketching out a rough layout and then scratching into the clay surface to add the first layer of texture. Mary Beth put her Dremel to good use here; I used an awl and stamp carving tools (probably not the proper way to use them!) to make my marks. Then I used Impasto medium with sequence scrap to add the circles. I used post-it notes to mask the areas around where I wanted the texture added. Mary Beth used Glass Bead Gel to add more texture – I added some seed beads into the Impasto medium – not quite the same effect but in the spirit of “making do” I ploughed on! I left the piece to sit over night so the Impasto medium could dry completely.

Flavor for Mixed Media Mary Beth Shaw North Light Books

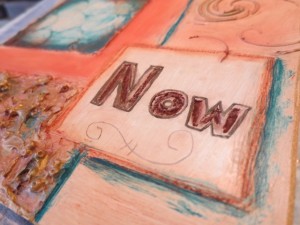
Next I combined the “Painting without Paints” technique with the Clayboard project colours by using artist pastels and chalks. I really had no idea how these soft mediums would go onto the clapboard but I was very brave and kept going! It was BLISS! The chalks went on SO smoothly and they were easy to blend and add depth and shading. It was easy to remove some of the colour as well. Some of the lines weren’t as fine as I would have liked as the pastels were thick, but I liked the end result. I used the Golden paint teal to add the color that goes so well with the earthy browns.

Flavor for Mixed Media Mary Beth Shaw North Light Books

I highlighted the “Now” letters with a brown marker and added highlights with gold acrylic paint on a dry brush. Once the paint was dry I coated the whole piece with spray glass varnish. When this was dry the pastels and chalk were sealed and now won’t rub off.

Flavor for Mixed Media Mary Beth Shaw North Light Books

I was very pleased with the results.

Overall Verdict

Overall such a fun book, especially for those ready to advance your mixed media skills or those fearless artists who are quite willing to jump straight into the deep end of the mixed media techniques pool. The combination of 15 artists and 15 projects certainly provides a wide range of different styles.

~*~*~*~*~*~*~*~*~*~*~*~*~*~*~*~*~*~*~*~*~*~*~*~*~

Michelle G. Brown is passionate about mixed media art and enjoys sharing her knowledge and techniques with you to allow you to express your own creativity. Michelle understands that many of us have an inner need to create. By learning a few basic techniques the amazing world of mixed media art is accessible to everyone!

Michelle lives with her husband and two boys in Melbourne, Australia.

~*~*~*~*~*~*~*~*~*~*~*~*~*~*~*~*~*~*~*~*~*~*~*~*~


~*~*~*~*~*~*~*~*~*~*~*~*~*~*~*~*~*~*~*~*~*~*~*~*~

Disclosure: This book was bought with our own money.  All opinions are that of the MixedMediaArt team. Some links on this page may be affiliate links and any purchases help to support the ongoing work by MixedMediaArt.
.

.
Finding Inspiration

This article is written by Debbie Davis

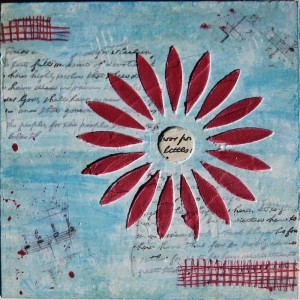
When I’m at work and on the phone, I usually doodle on a sticky note pad.  Sometimes I bring home my doodles to use as ideas for artwork, or in my artwork.  Recently I was writing on a pretty blue sticky note pad using a red pen.  I realized how much I really liked the blue and red colors together and decided my next project had to be created using these colors.

Molding paste and collage in mixed media painting

Using a claybord, I glued on some pretty blue scrapbook paper along with some text out of a vintage book.  I randomly brushed on some acrylic paint in a blue color that was a little darker than the blue on the paper and also blended the book paper edges into the collage using a bit of gesso.

I love doing quick image transfers on my projects.  The music notes were added by spreading a medium layer of soft gel on the panel where I wanted the image to be.  Next I put some torn out papers with music notes (printed from my inkjet printer) face down into the medium, burnished it onto the collage and then lifted off the paper.  This technique is quick, fun and so simple.

I had never used molding paste before and was excited to try it out using a new flower stencil I just purchased.   I love the molding paste!  It added some great texture.  Once it dried, I painted the petals red and added some of the book text to the center.

I was working on the collage on my kitchen counter and spotted a red mesh bag of potatoes.  The bag was such a pretty red and just matched the red in my flower, so I cut out a few pieces and glued them onto the collage.  I think my hubby thought I was just a little weird.  Ha!

To finish it off, I randomly stamped on some white paint using a piece of cardboard and splattered on a bit of the red paint.

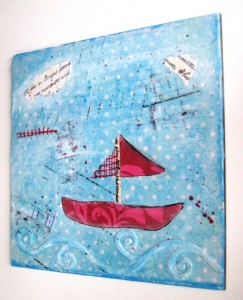
This piece reminded me of a hot summer day.  I decided to create another using the same color scheme with a little sailboat.

Molding paste and collage in mixed media painting


~*~*~*~*~*~*~*~*~*~*~*~*~*~*~*~*~*~*~*~*~*~*~*~*~

My name is Debbie and I live in Morton, Illinois (USA). I’m happily married and have a wonderful family that includes a daughter, son, son-in-law and 2 of the sweetest grandchildren ever!

What I love most about mixed media art is that you don’t have to be an expert at anything to create beautiful art. It is a great way to recycle found objects. Art is such a wonderful stress reliever. I just wish I had more time to play!

I have a shop on Etsy called Artful Explorations where I place some of the art I have created for sale. I just recently started a In Art Therapy blog having been inspired by others who are willing to share their techniques and ideas.

~*~*~*~*~*~*~*~*~*~*~*~*~*~*~*~*~*~*~*~*~*~*~*~*~

Mixed Media Artist – Debbie Davis

~ * ~
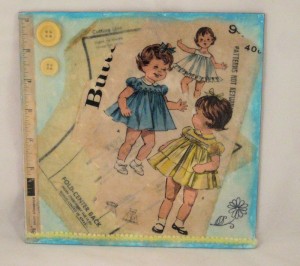
Our Mixed Media Art community is a diverse bunch; from all around the world, with different interests and reasons why we create and a wide range of skills. We love featuring a wide range of mixed media artist. Debbie Davis has come over to play with us this week. She shares her vintage children’s dress pattern on clayboard piece with us.

I’ll let Debbie tell us about herself…

~ * ~ * ~ * ~ * ~ * ~ * ~ * ~ * ~ * ~ * ~ * ~ * ~ * ~ * ~ * ~ * ~ * ~ * ~

I’ve always loved art and have been creating arts & crafts off and on for many years.  My most favorite childhood Christmas present was a little box of art supplies.  I recently discovered beeswax and really enjoy working with it because it’s a natural, non-toxic product and it smells wonderful.

I live in Morton, Illinois (USA) not too far from the house I grew up in.  I’ve been happily married for 31 years and have a daughter, son and 2 wonderful grandchildren. Besides art, I love to work in my flower gardens and read.

I think what I love most about mixed media art is that you don’t have to be an expert at anything to create beautiful art.  It is a great way to recycle found objects. Art is such a wonderful stress reliever.  I just wish I had more time to play!

Recently I was shopping at a Mission Mart looking for items to use in collage art.  I was inspired by a vintage children’s dress pattern I spotted in the store.  I made a collage using beeswax to adhere some of the pattern tissue and pattern package to a claybord.  I painted the board with beeswax and then added scrapbook paper, pattern tissue and part of the pattern envelope by painting them on with beeswax and fusing each layer together with a heat gun and mini iron.  I stamped a flower onto tissue paper and adhered it to the collage with beeswax along with some buttons and fabric trim.

Mixed Media Encaustic clayboard

I don’t have a blog but have been thinking about starting one.  Thanks so much for the invitation to guest post.  I really look forward to receiving your emails and love the inspiration I get from them.

~ * ~ * ~ * ~ * ~ * ~ * ~ * ~ * ~ * ~ * ~ * ~ * ~ * ~ * ~ * ~ * ~ * ~ * ~

Thanks for sharing your gorgeous artwork with us. I love the vintage dress pattern with the beeswax – they go so well together. And I’m sure everyone here will encourage you to start your own blog to allow you to share more of you work with the Mixed Media Art community.

.

.