This article is written by Sandra Parés
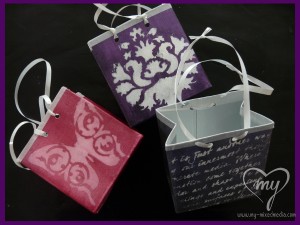
Today I am going to show you an easy way to make a small gift bag, an ideal bag to cover a gift for someone special on the Christmas day.

Here are the materials:
- 1 recycled tetra brik that we will have cleaned before
- Scissors
- Black gesso
- Sponge
- Acrylic paint: Acrylic Glaze Silks, in my case I will use the violet colour of Irresistible Iridescence
- 1 Brush
- An adhesive tape, like washi tape or colored tape. I will use a white adhesive tape
- A regular white acrylic paint
- 1 template
- Crop-a-dile or some tool to make holes.
- Ribbon to make the handles.

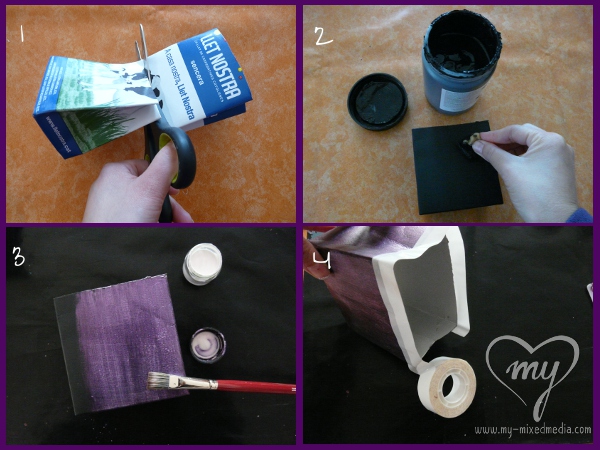
Step 1 – We start cutting the tetra brik. We cut the tetra brik in a half and we get a small bag. We can make it larger or smaller according our personal idea.
Step 2 – Then, with a sponge, we will cover the whole outer surface of the tetra brik with black gesso. If you want, you can also cover it with white gesso, depends on the type of paint you will use after and the result you want to obtain. In my case, as I will use the Silks Acrylic Glaze Irresistible Iridescence to colour the bag, I prefer the black gesso. The Irresistible Iridescence paint works good on dark backgrounds and gives a beautiful bright.
Step 3 – Once gesso is dry, we can paint the whole surface of gesso with the acrylic paint. The colour I choose is a metallic violet with a very nice metallic shine.
Step 4 – When the paint is dry, we can polish the edges of the tetra brik with the adhesive tape.

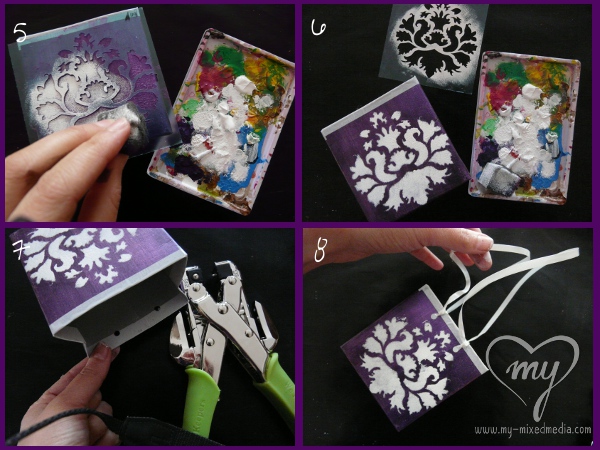
Steps 5 & 6 – Then we take a template to add a picture on the bag. In this step we will stencil the template with a sponge onto one side or both. If we stencil onto both sides, we have to wait to have the first side dry before to stencil onto the other side.
Step 7 – And we only need to make some holes with the crop-a-dile to get a place where we can put a ribbon to make the handles
Step 8 – add ribbon to make handles
With this simple way we will have a beautiful small bag for a gift for this Christmas!
~*~*~*~*~*~*~*~*~*~*~*~*~*~*~*~*~*~*~*~*~*~*~*~*~
Sandra Parés loves working with mixed media. The colors and textures leave her amazed and she enjoys creating and getting their hands dirty with paint and gesso. She lives near Barcelona and works in her art workshop. On her site My mixed media you can find a mixed media online store, art and craft products, mixed media workshops in Spanish, tutorials, ideas and mixed media techniques.
~*~*~*~*~*~*~*~*~*~*~*~*~*~*~*~*~*~*~*~*~*~*~*~*~
.
.


Recent Comments