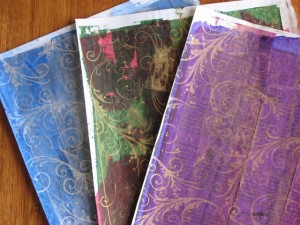
Creating your own backgrounds is an exciting part of any mixed media art project. While there are many commercially available papers and products out there, creating your own background from scratch is a great way to ensure no one else will have a project looking like yours.Making your own backgrounds also allows you to tune the colours to match your theme.

Credit card painting backgrounds
Background papers can be made in a variety of ways. Today will concentrate on using the credit card painting technique. I’m not sure who created this technique, but the likes of Lisa Vollrath and others have all added to my knowledge and inspired me to give it a go.
The materials we need are items you will have around the house; base paper(mine has text on it from an old conference papers book), two different coloured paints, one metallic paint and an OLD credit card or store card or any other small, flexible plastic card. I read somewhere that using your real credit card with the paints will wreck the magnetic strip on the back, so please do not use your current card! We will also need some backing newsprint or plastic, to protect our working surface from the paint.
The credit card painting technique can create lots of backgrounds in a short space of time, so be prepared with extra text paper and somewhere to put them flat to dry, before you begin to get dirty. Lay out your work surface and place the text sheets on top.Give the paints a good shake and apply a line of the first of the two paints, directly onto the top of the page. Hold the top of the page with one hand and use the credit card in the other. Hold it angled towards you and carefully drag in down the length of the page. When you’ve reached the bottom of the text page, lift the credit card and move across the the next bit of paint. Again, angle it towards you and carefully drag in down the length of the page, going parallel to the first strip on paint. Continue until you’ve covered the text page or run out of paint. Sit aside this first paint layer to dry. Move onto the next sheet, with the same paint.
As you experiment with the mixed media technique, you will find different paints have different runniness (or viscosity) and this will vary how well it spreads down the page.Also the different in angles the credit card is held will change the effect that is created. These are the fun aspects of this technique as each attempt produces a slightly different result.
Once the first layer of paint is dry it is time to repeat the process with the second colour or shade. Depending on how different the two colours are will alter the results. If the second colour is a lot darker than the first, then I often apply it sparingly, so the colour comes out patchy,rather than having the second colour obscuring all of the first colour. Once more, give the paint a good shake and apply a line of the paint directly across the top of the page. Hold the paper with one hand and use the credit card in the other. Hold it angled towards you and carefully drag in down the length of the page, then move across the the next bit of paint. Drag the card down the length of the page, going parallel to the first strip on paint. Sit aside to dry.
The third, metallic layer of this technique is often what bring this background to life.Spot the gold or silver or bronze paint across the top of the page and lightly drag the credit card down the page. The metallic paint brings a sparkle to the painted paper that adds a wonderful finishing touch.
So that’s the basics for creating a mixed media background using the credit card painting technique. Feel free to experiment with different paint and paper combinations to see what wonderful creations you can make. You can even elaborate on these painted sheets by adding some stamping, or adhering them straight on to your next mixed media art project.
Happy creating!


Great ideas. I also use credit card ( mine are antique Tele cards). It can also be used to scratch or create texture work on media such as acrylic and pastle. It provides edges of various width and is also suitable for etching activities for children.
I have used this credit card technique many times, and another exciting layer can be made by spraying methylated spirits onto the wet acrylic paint. Magical things will appear before your eyes!!!
I use this technique on paper also, then I cut them in smaller pieces and make note cards out of them. I just use glue to attach the mini painted pictures on my note cards. Make my cards look very expensive. I also will use stamping to add to the look.
After my first or even second layers of paint are dry, I sometimes drag some white or gray gesso around to soften the edges of the paint. Then with a damp papertowel or wipie I rub some areas of gesso off to let the layers under neath peak through. It works to scratch into the paint or gesso creating added textures as well! Thanks for a great website, such fun!