Mini ArtBooks: Matchbook-styled!

This article was written by Martice Smith II 

Create Mini ArtBooks: Matchbook-Styled!

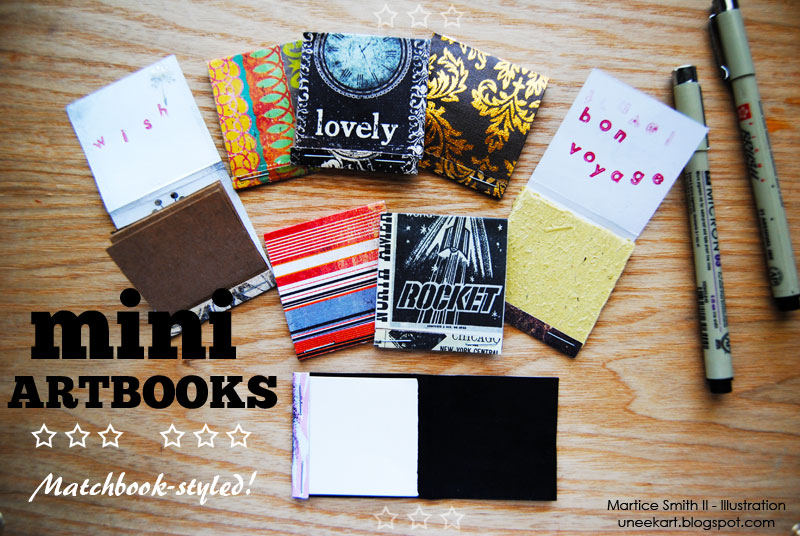
No-sew, mini artbooks…matchbook-styled!

Martice Smith II shows us a fun twist on the classic matchbook style design. Follow along as we create beautiful, miniature artbooks with a variety of decorative cardstock, sketchbook papers and a stapler. At least half a dozen in less than 30 minutes!

Gather supplies


Gather supplies and tools for Mini ArtBooks project

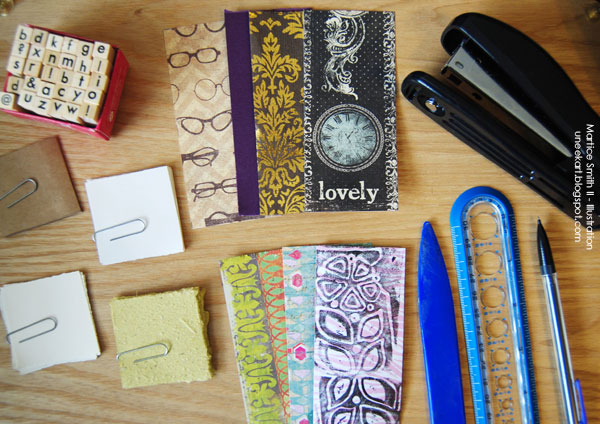
  • cardstock or decorative papers (for this project, I’m using paper from The Paper Studio®, Prima Marketing, Inc., and Crate Paper, Inc.)
  • blank sketchbook paper
  • ruler
  • pencil
  • bone folder
  • stapler
  • scissors (optional)
  • variety of stamps (optional) (I’m using the alphabet stamp set from Studio G and my own, handmade stamp)

Cut the cardstock and sketchbook papers, to size

Measurement for artbook cover (cardstock): 4.5 inches long by 2 inches wide

Measurement for blank sketchbook paper: 2 inches by 2 inches
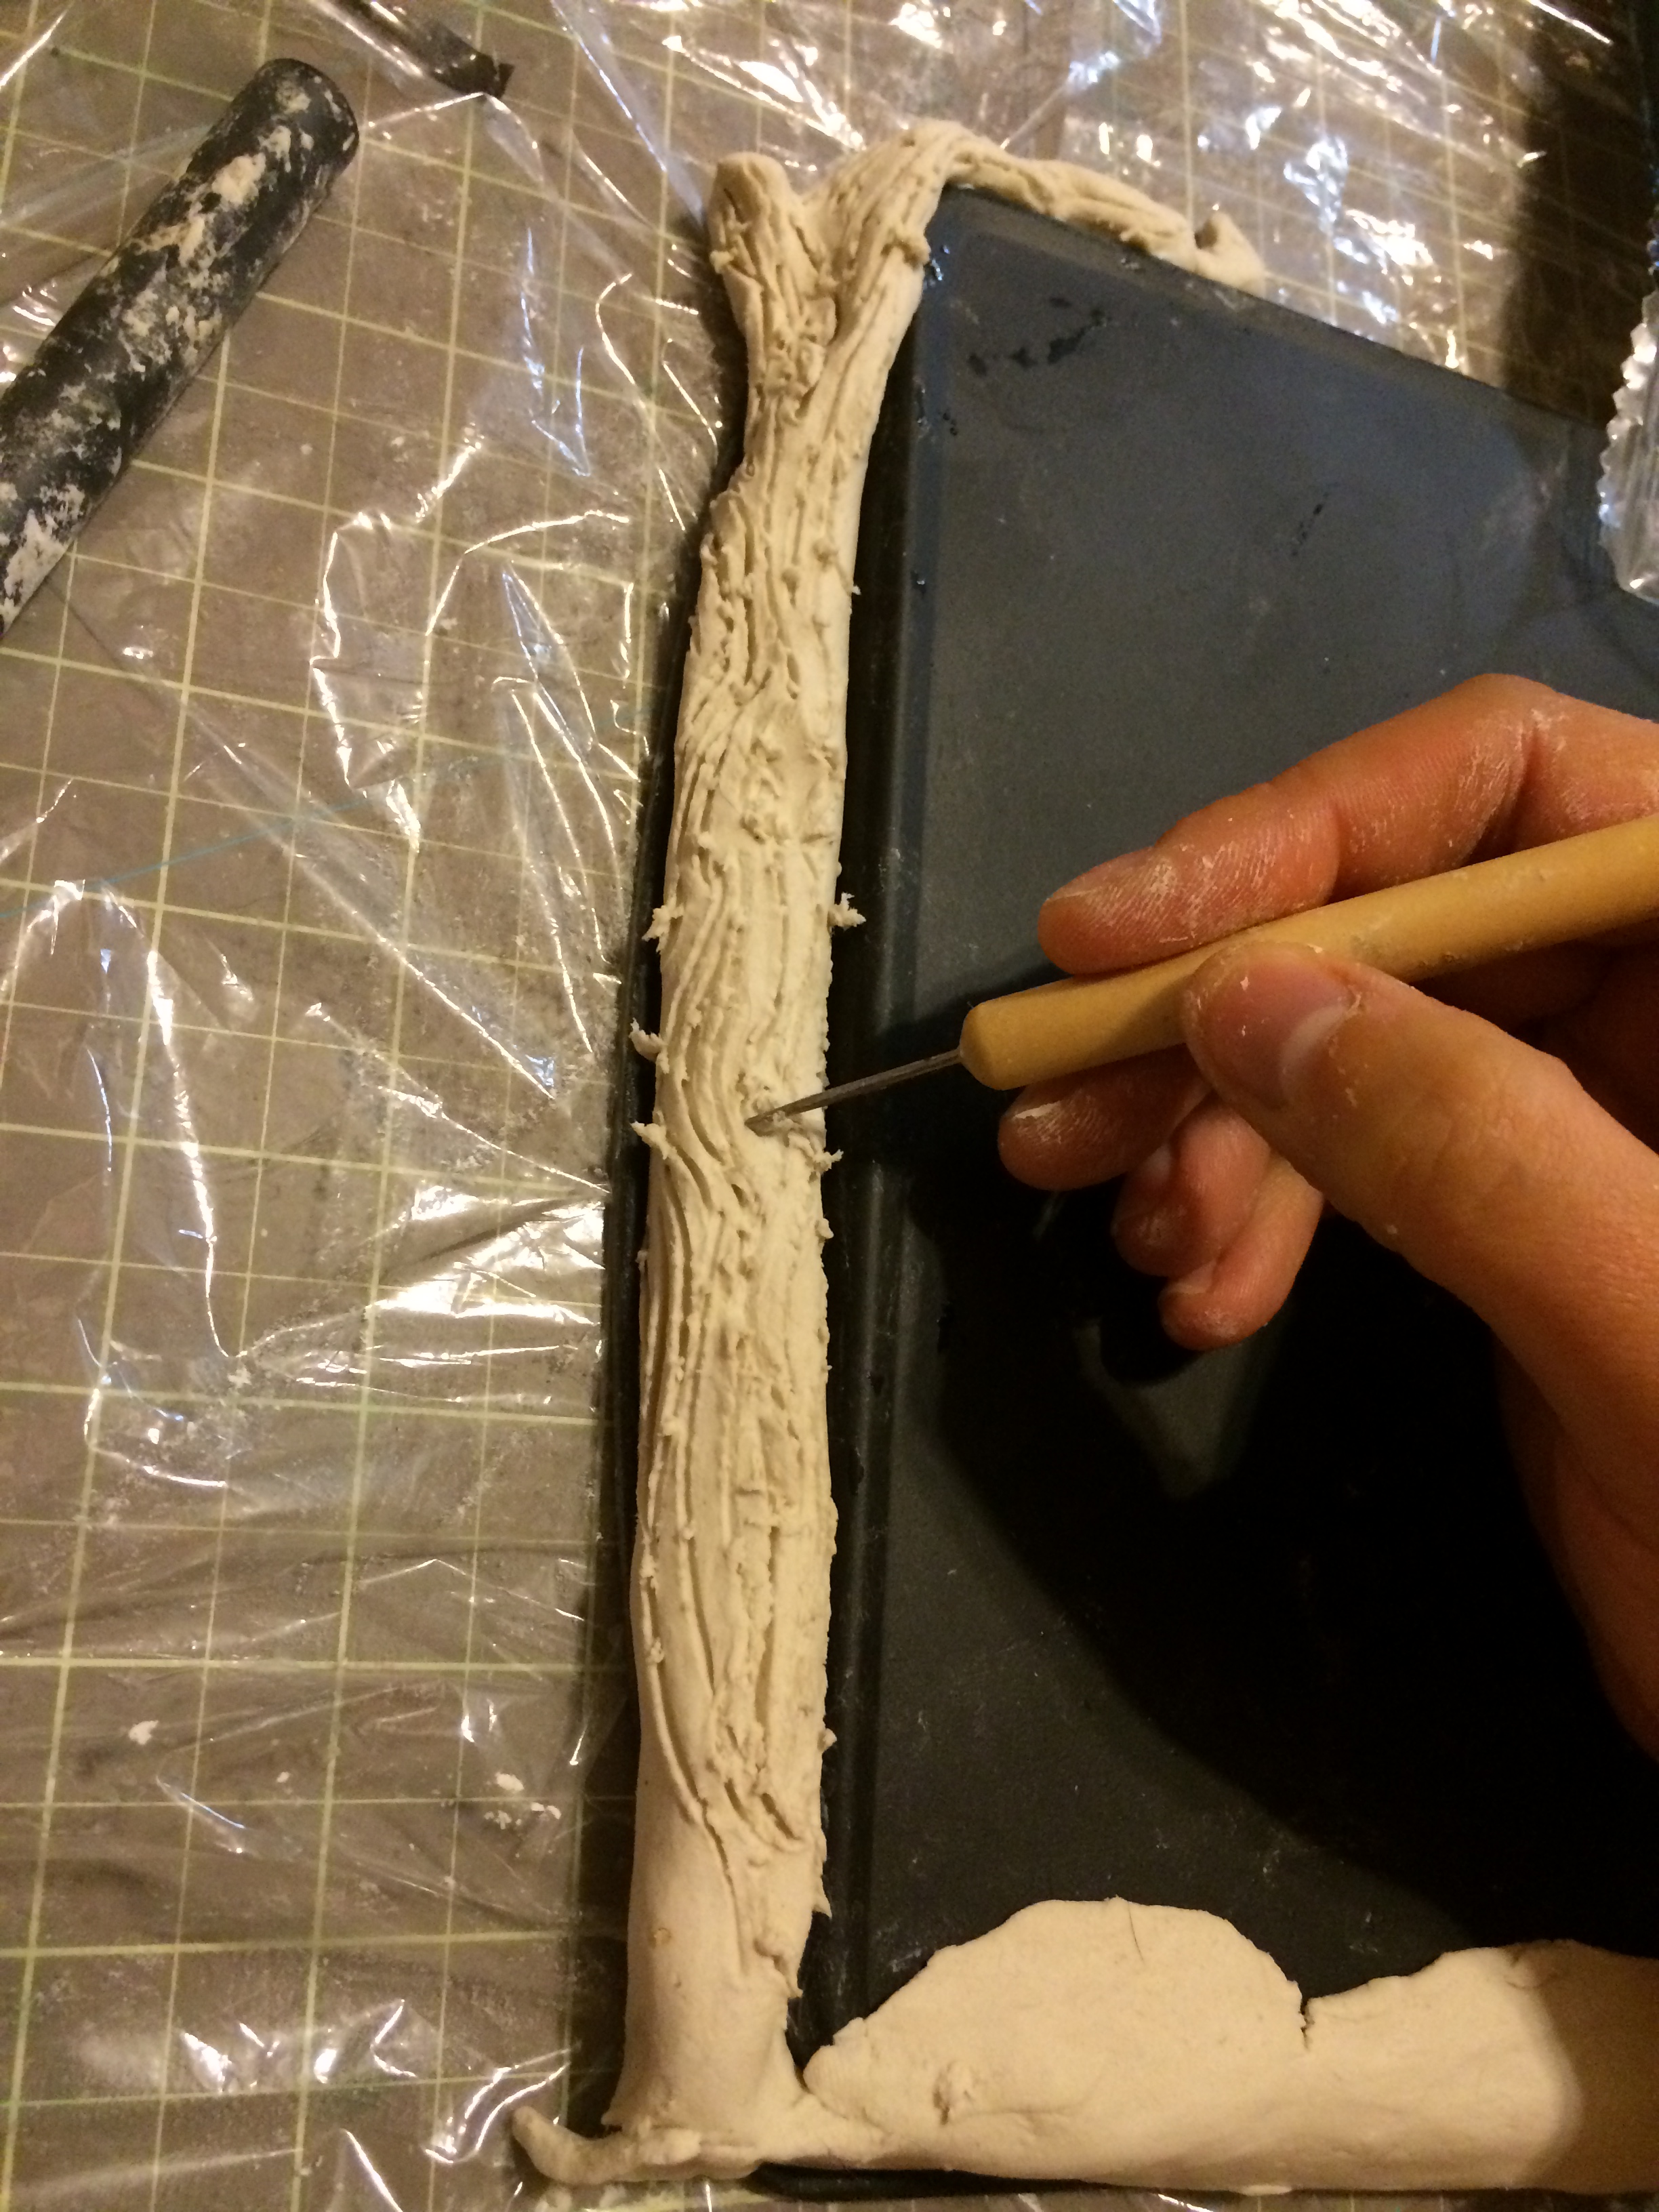
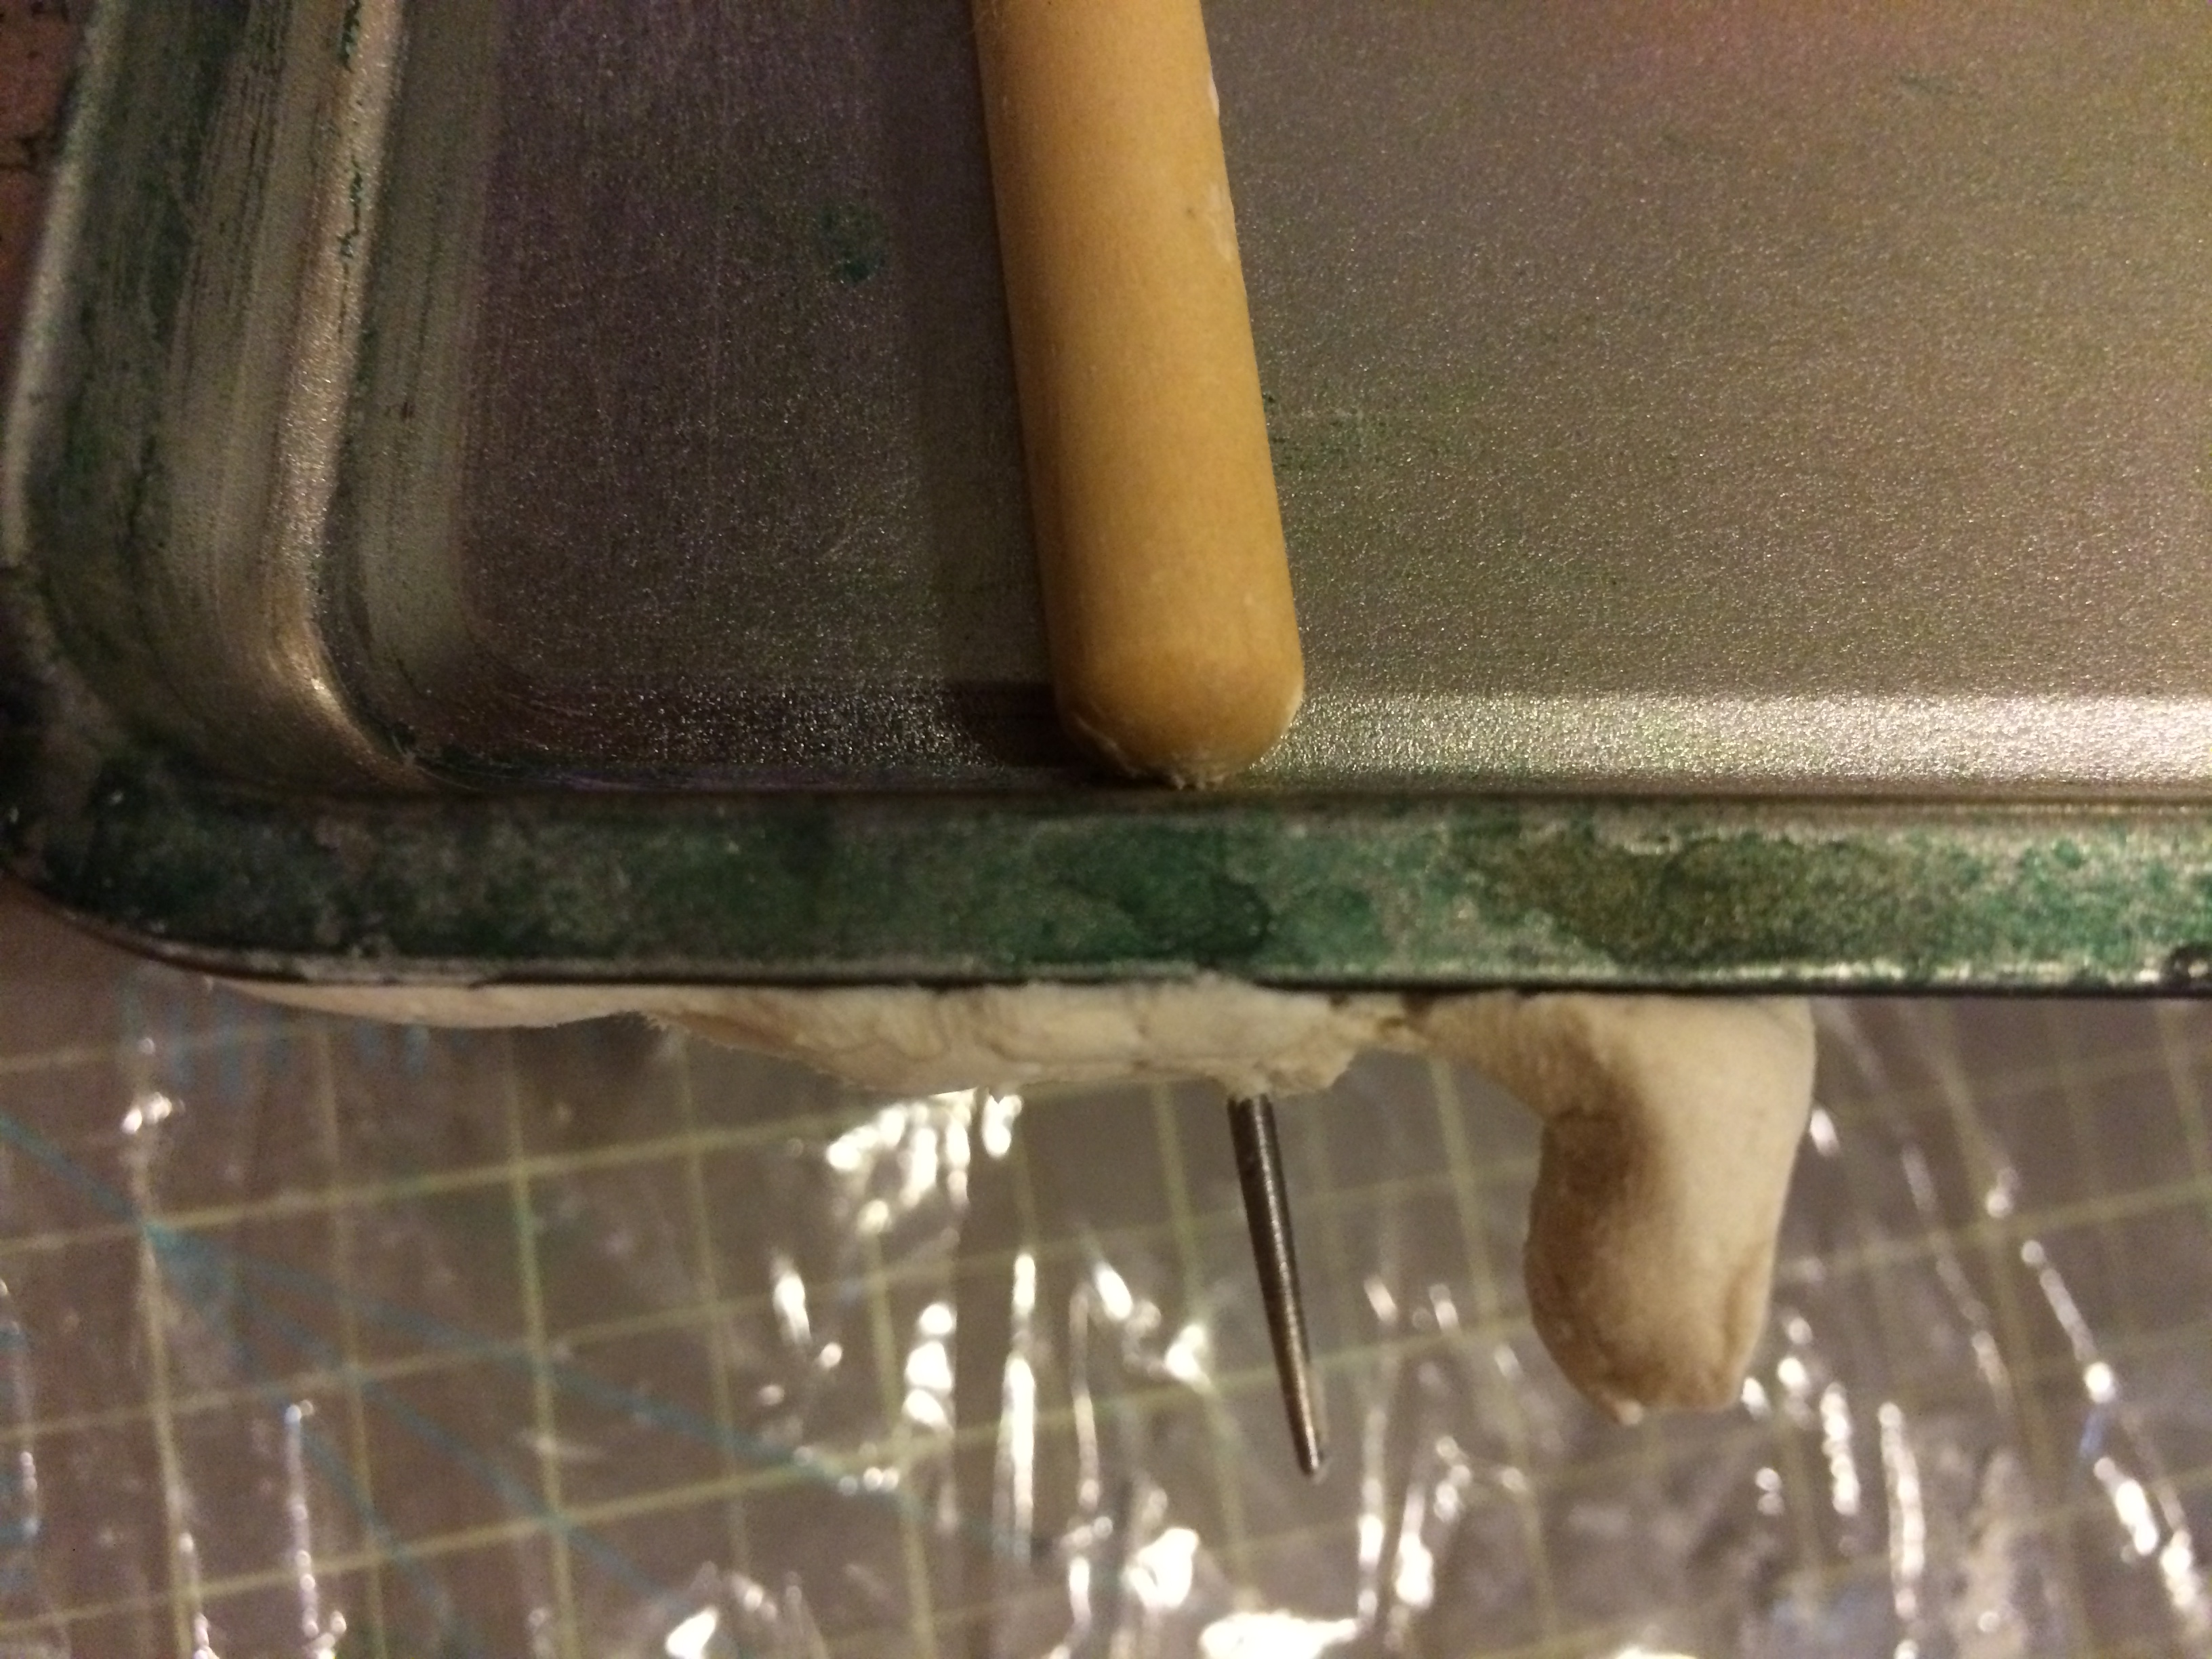
Fold up one edge


Fold up one edge of cardstock paper. Crease fold.

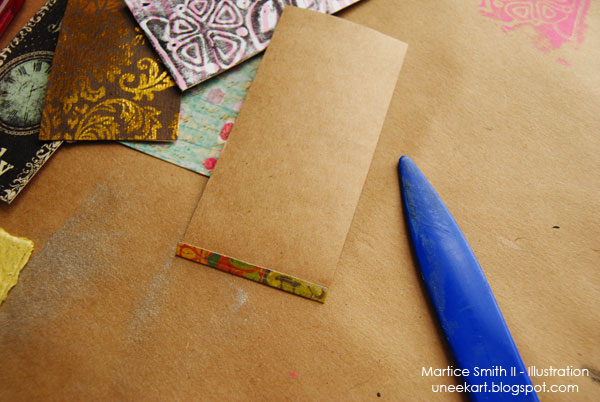
Decorative side facing down, fold up one of the edges about 1/2-inch.

Crease with bone folder.

Add paper


Add sketchbook paper. Use paper clip to hold paper in place.

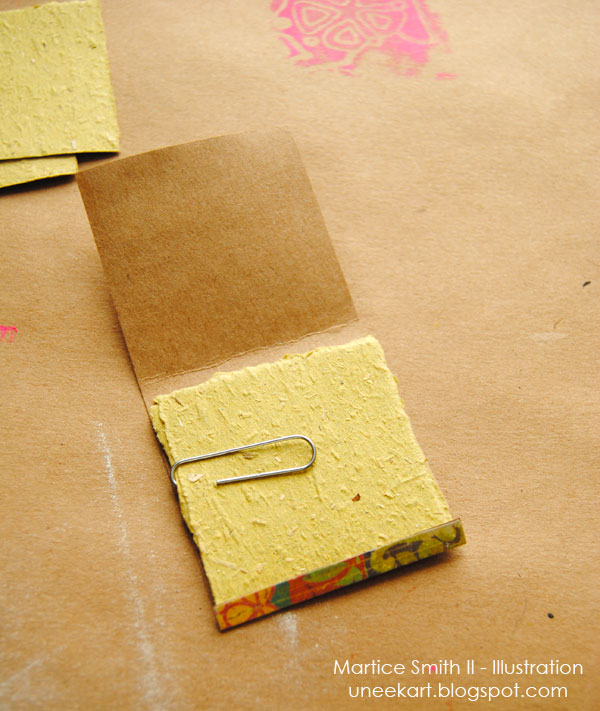
Gather the pieces of blank sketchbook paper and tuck them inside the fold. (Tip: to keep the papers nestled together, use a paper clip.)

I used a variety of paper types. For example, some of my mini artbooks contain handmade paper, charcoal and regular sketchbook papers. I was able to fit 6-7 sheets of paper in each matchbook-style mini artbook.

Lightweight paper works best for this project. If you decide to use heavier paper, you will need to add less paper; maybe 3-4 sheets instead of 7.
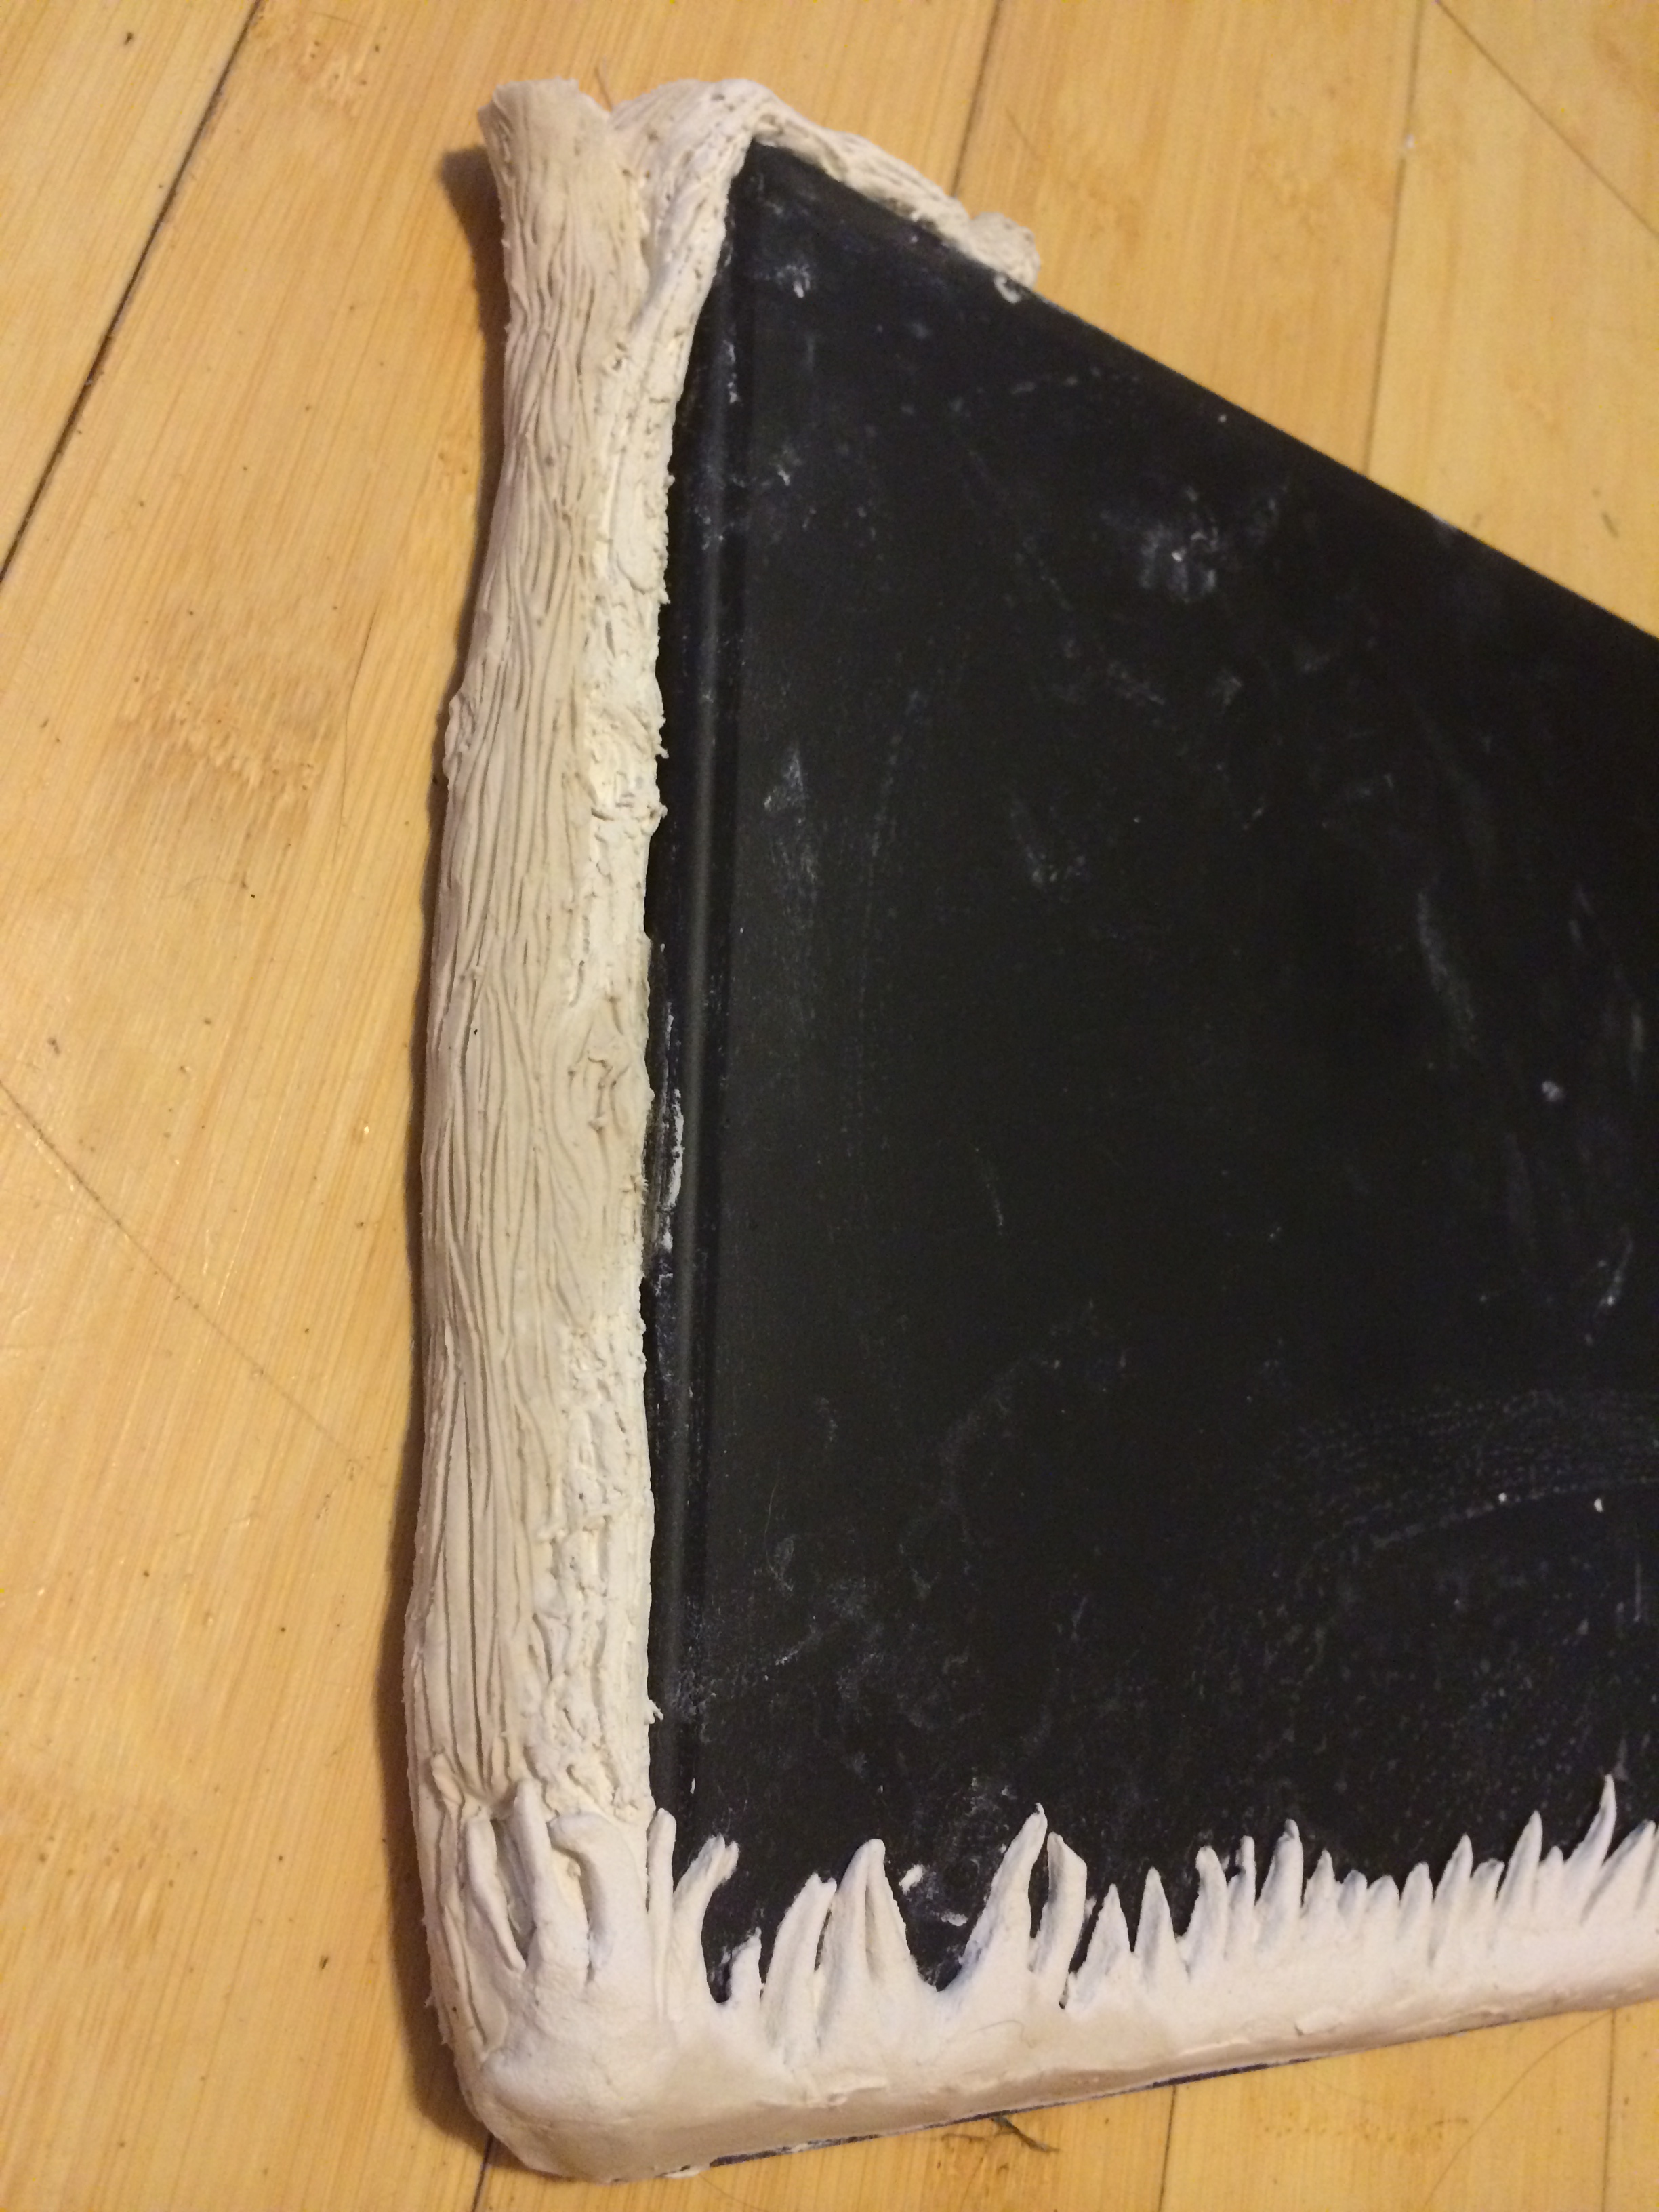
Staple the fold


Staple the folded edge

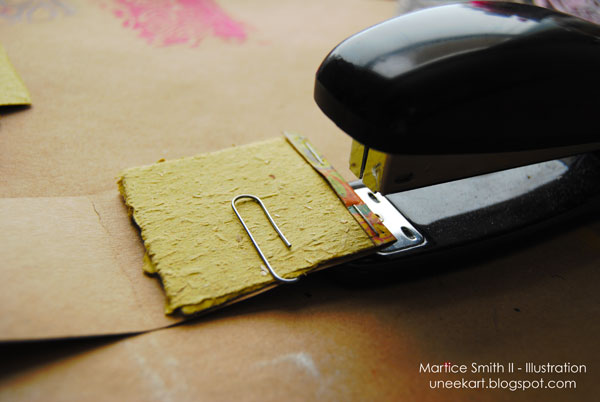
Staple the fold 1/4-inch up from the folded edge.
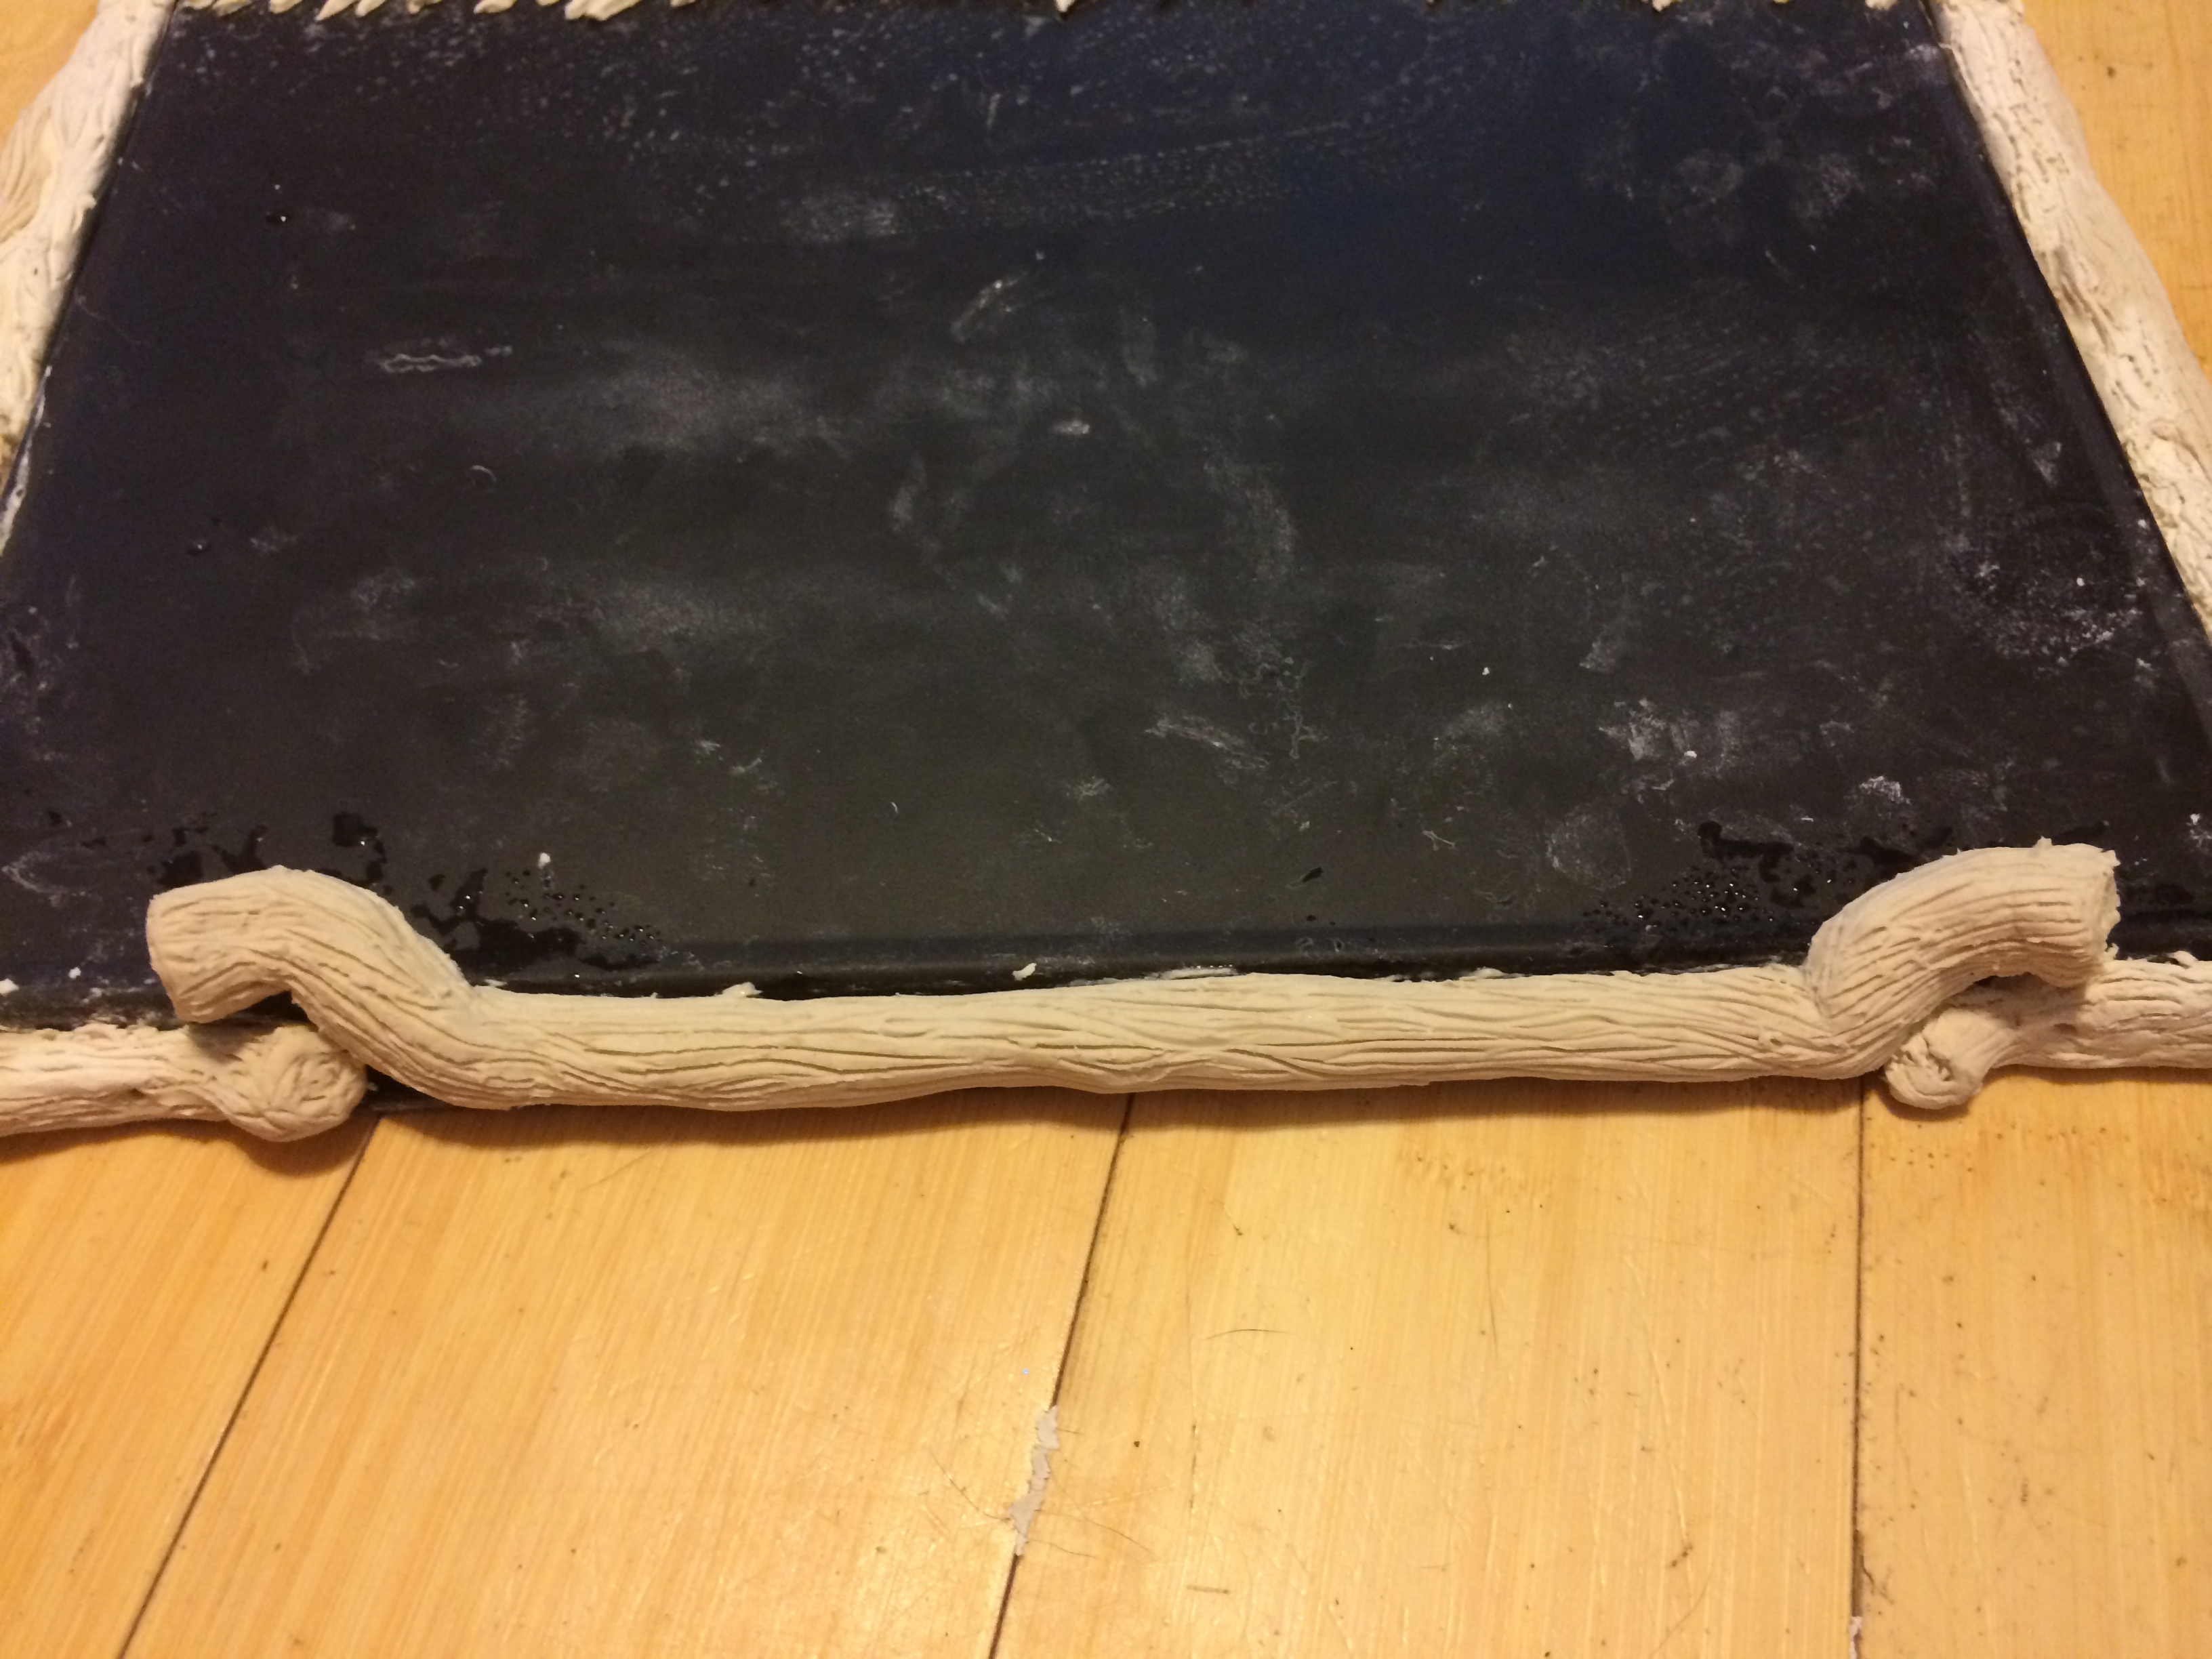
Fold the center


Fold opposite end of cardstock cover to finish the mini artbook.

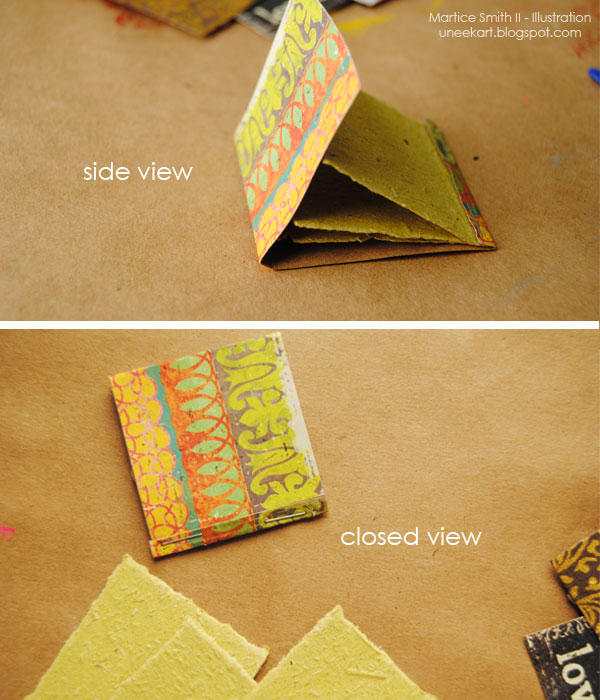
Take the other end of the cover over the blank sketchbook paper and line it up with the bottom edge of the fold. Crease with bone folder.

Tuck this same edge under the 1/2-inch piece of stapled cardstock to form the matchbook-styled artbook.

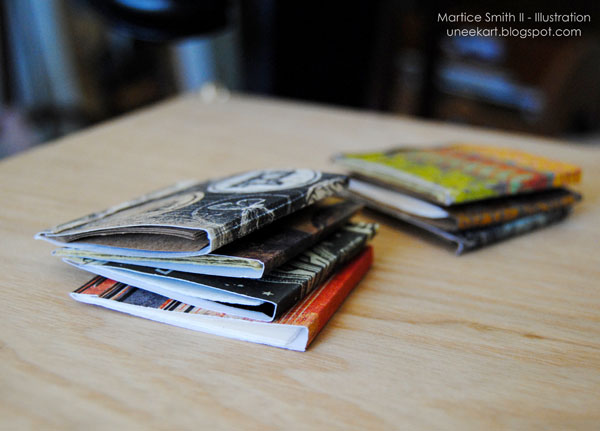
Since these are so easy and quick to make, why not make a dozen of ’em?! They look really nice in a big pile, ready to share with friends! Give them away as small gifts or make some out of collage papers and add them to your art journal when you’re on the go.

Stack of Mini ArtBooks with variety of cardstock covers

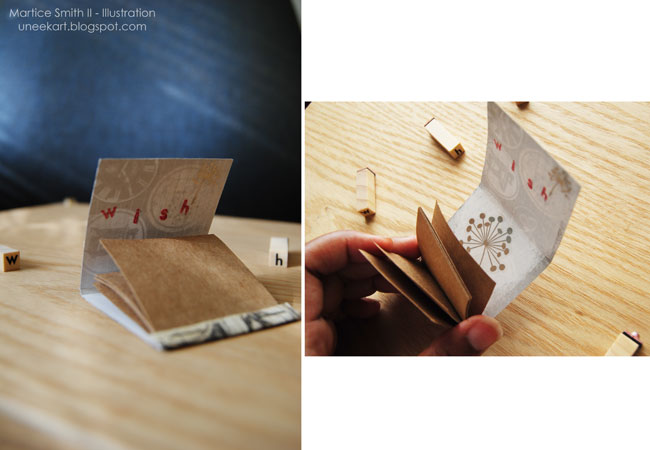
*Optional: use alphabet stamps to add a personal sentiment, rub-on stickers for contrast and distress inks to create a worn-out look. The possibilities for these mini artbooks are endless! Use your imagination to make them uniquely yours. Have fun!

Add embellishments to your Mini ArtBook for a more unique look

~*~*~*~*~*~*~*~*~*~*~*~*~*~*~*~*~*~*~*~*~*~*~*~*~

Author bio:

Mixed media artist and designer, Martice Smith IIMartice Smith II is creative director of Martice Smith II – Illustration & Design Studio, based in Kansas City, Missouri and owner of Uneek Art Boutique. She established herself as a freelance Illustrator and graphic designer after receiving her Bachelor of Arts Degree. Her stunning illustrations reveals her love for fashion, typography and wildlife- using a combination of analog and digital techniques.

Martice also contributes as an article writer for the Creating Mixed Media Art website.

You can see more of her work via her Facebook page or her blog. She invites you to join her monthly newsletter, Uneek Art Letter, for art biz tips, advice and free digital goodies!

~*~*~*~*~*~*~*~*~*~*~*~*~*~*~*~*~*~*~*~*~*~*~*~*~

.

.

Mixed Media Jack-o-Lanterns with Creative Paperclay

~ * ~

This article is written by Gloriann Irizarry

Welcome back and hola to all my wonderful followers, collectors and friends.  It’s Gloriann Irizarry here to show you how easy it is to use household items like LED lamps to light has an armatures to light up your paper sculpt projects.

mixed media jackie o lantern handmade halloween decorations

I have to say this is a great way to enhance any project and to give is a little bit of pizzaz to any sculpture. I do have to thank one of my wonderful friend and amazing Folk Art artist Mr Patrick Gill. He create the most amazing art challenges and welcomes us artist to create pieces. His group Every Witch Way Lane is full or great artist whiling to lend a hand and guide you through the sculpting process. His group can be also found under #EWWL. His guidance was my inspiration for this piece Jack O Lantern or in my case a Jackie O Lantern .

Now let me show you how I sculpted this piece and what I choose to be the lighting source will make you look at house hold items differently from now on.

handmade jack-o-lantern halloween decorations

Now let hunt down some LED battery operated lamps. I like to start any search at my Dollar Tree Store and could not believe it I could not believe what a find. I found these great solar LED desk lamps and I couldn’t resist them. I have to say this one was a big successful hunt.

Let purchase a few for this and future projects

handmade jack-o-lantern halloween decorations

I start by taking the LED lamp apart. I will not be using the top lamp shade only the lamp, post and the base. So I discarded those out.

handmade jack-o-lantern halloween decorations

I grab a pack of Creative Paperclay and roll the clay  into a ¼ thick sheet. I recycled a old thick wrapping paper roll and used it to roll the clay sheet.

handmade jack-o-lantern halloween decorations

I decided to create a folk art Jack O Lantern. Use the clay sheet and cover the top of the lamp

creative_paperclay_ewwl_jackie_o_lantern_mix_media_article_5

Pinch the clay all around the top of the lamp make sure you cut any excess out and smooth all the edges with water to make it easy to work with.

creative_paperclay_ewwl_jackie_o_lantern_mix_media_article_6

For the facial expression I wanted her to bring a smile to you.

To give your sculpt the smile you’re looking for grab a sewing needle and free hand cut the eyes, nose and mouth off. Remove any excess paperclay.

creative_paperclay_ewwl_jackie_o_lantern_mix_media_article_7

Make sure the head smile is what you’re looking for test it by turning the lights on.

I did turn mine by covering the solar panel. It looks good!

creative_paperclay_ewwl_jackie_o_lantern_mix_media_article_8

While the head dries you can start working on the dress.

I grab the aluminum foil and sculpt a dress form.

creative_paperclay_ewwl_jackie_o_lantern_mix_media_article_9

Use has much foil you want to create the desire shape you are looking for. Press, twist and turn until you are completely satisfy with the form.

creative_paperclay_ewwl_jackie_o_lantern_mix_media_article_10

After your satisfy with the aluminum foil form cover completely with a rolled ¼ thick Creative Paperclay sheet and let it dry completely to create the base for your Jackie O Lantern

creative_paperclay_ewwl_jackie_o_lantern_mix_media_article_11

While we wait for the dress core to dry I work sculpting the face. I add a little more clay on the eyebrows, cheeks and jaw. Moist your tools or fingers and smooth the clay by moving in place little by little. Add a little more or take some out depending on your taste.

creative_paperclay_ewwl_jackie_o_lantern_mix_media_article_12

I like to add clay little by little and let the sculpt speak to you. For the most part it will tell you when to stop adding or removing Creative Paperclay.

creative_paperclay_ewwl_jackie_o_lantern_mix_media_article_13

I added a more clay and move it in shape to create the desire smile. You can make if chunky or thinner is all up to you. Just make sure to smooth all the clay edges with the water bottle or with the soft wet brush blender.

creative_paperclay_ewwl_jackie_o_lantern_mix_media_article_14

The key to add more character to any piece is the on the details. So focus on these to give your sculpt your signature style. For this piece I wanted to give her a female look by adding some hair bands and little stomp hat.

creative_paperclay_ewwl_jackie_o_lantern_mix_media_article_15

I’m not quite done yet my friends. I wanted my pumpkin head to look natural and spooky at the same time, so I created the pumpkin vertical seems and I also added some more detailed to the head. Like a couple leaves to decorate the pretty root hair bands.

creative_paperclay_ewwl_jackie_o_lantern_mix_media_article_16

Add a couple wrinkles here and there. This will give your folk art paperclay sculpt the spookiest and unique character ever

creative_paperclay_ewwl_jackie_o_lantern_mix_media_article_17

I also smooth the edges all around the head to make sure is all round a plump. This will give Jackie O Lantern the pumpkin look you are looking for.

creative_paperclay_ewwl_jackie_o_lantern_mix_media_article_18a

Make sure your leaving the solar panel cell free from shadows and excess clay.

You have to remember this solar panel is the one will recharge your batteries to illuminate the Jackie O Lantern face.

creative_paperclay_ewwl_jackie_o_lantern_mix_media_article_18

I waited for the dress form to be completely dry to start giving the dress the neck and sleeves.

Add a little more clay to create the top. I added texture to the dress by pressing the lace fabric to the ¼ thickness sheet. This will give a nice fabric finish to the dress.

creative_paperclay_ewwl_jackie_o_lantern_mix_media_article_19

Do the same for the skirt. Roll a long enough piece of paperclay to cover the entire skirt.

creative_paperclay_ewwl_jackie_o_lantern_mix_media_article_20

Now to make sure the skirt flow naturally I cut start by cutting some triangles off from the top portion of the skirt to remove the excess material off.

creative_paperclay_ewwl_jackie_o_lantern_mix_media_article_22

Applied the skirt to the sculpt and adjust the sheet to flow naturally and press the dress edges smooth to the waist. Don’t worry much about the look once the skirt is dry and set you will cover the waist with a thin sheet in shape of a corset.

creative_paperclay_ewwl_jackie_o_lantern_mix_media_article_23

Here you can see the final simple corset piece I made to cover the imperfections of the skirt.

creative_paperclay_ewwl_jackie_o_lantern_mix_media_article_24

Don’t forget to give her a set of arms

creative_paperclay_ewwl_jackie_o_lantern_mix_media_article_27

creative_paperclay_ewwl_jackie_o_lantern_mix_media_article_28

I like to sand the piece in stages with 3M sponge sanders.

I start the shaping with the medium size grit

creative_paperclay_ewwl_jackie_o_lantern_mix_media_article_26

When sanding the pumpkin head sand it vertically so the lines can look naturally once the piece is painted. I like the stress effect this type of sanding gives to the final sculpt.

creative_paperclay_ewwl_jackie_o_lantern_mix_media_article_29

Lightly sand the any imperfection or clay excess of the dress and even out the stand.

creative_paperclay_ewwl_jackie_o_lantern_mix_media_article_30

I mix myself some red and blue to create my very own shade of purple and apply 2 coats of acrylic paint to the entire dress.

creative_paperclay_ewwl_jackie_o_lantern_mix_media_article_31

I wanted to give a nice sheen to the pumpkin head so I used the Martha Stewart pearls orange. I painted the stumps pearl green and accented with a brown dry brush.

creative_paperclay_ewwl_jackie_o_lantern_mix_media_article_33

Add more sheen to the dress with Martha Stewart gold glitter.

I glued a stick to the shoulders of the doll to hold the arms in place .

creative_paperclay_ewwl_jackie_o_lantern_mix_media_article_35

I also use the black acrylic paint to give her some accents here and there.

Use some pink acrylics to blushed the cheeks with the dry brush technique.

Let the paint dry overnight so you can seal your sculpt with a nice spray sealer and the piece is ready to be display once it is all dry.

Now it is time for you to display your new Jackie O Lantern.

Well I hope you enjoy this article and if you have any questions or concern please feel free to send me an email at gloriann@byglori.com

Feel free to like or comment on this article below.

Have a bless day and like always have fun crafting.

Sincerely Gloriann Irizarry

creative_paperclay_ewwl_jackie_o_lantern_mix_media_article_36

~*~*~*~*~*~*~*~*~*~*~*~*~*~*~*~*~*~*~*~*~*~*~*~*~

My name is Gloriann Irizarry. I was born and raised in the beautiful Caribbean island of Puerto Rico. Ever since I can recall, I always had my hands on crayons, scissors and paper. My parents knew from the start how much I love to create!

As a mother of three young wonderful daughters, I find myself working, caring for my family, and taxiing kids from here to there for various sporting events.  I have to say I’m never bored!  I enjoy every little moment I spend with my girls, but will always continue to work time to create art into my daily schedule as that means doing what I love the most. My girls are learning the joys of creating also!

I love to sculpt and will never stop creating. I was born this way and for that I thank GOD every day. Art has been a great way to be creative and to express myself.  I like to keep my hands busy creating – whether it is unique jewelry, art dolls, oak sculpture figures, fairy wings for all your project needs, or even wigs and clothing for your sculptures.  I love all the variety in art! Why? because ART is so rewarding. Seeing your creation take form is an awesome feeling.

You can see more of my work on my website – ByGlori

~*~*~*~*~*~*~*~*~*~*~*~*~*~*~*~*~*~*~*~*~*~*~*~*~

.

.

Designer Block Puzzle

~ * ~

This article was written by Martice Smith II

Remember those little A-B-C blocks you may have played with as a child? This tutorial is a spin on that very concept, although, this one is the “grown-up” version! (Well, if you have a baby Einstein on your hands, that’s a different story…) Each side of the wooden block will have a different design. I will demonstrate how to use various techniques from stamping, cut-outs, stenciling and masking to create a beautiful designer block puzzle. Let’s get started!

Create a Designer Block Puzzle

Need to add a bit of visual interest in a corner of your living room, craft space or maybe even a coffee table, this designer block puzzle packs some major punch of creativity! It may look challenging- given that there are 10,077,696 different combinations – but don’t let it fool you. This puzzle is very easy to create yourself.

Gather supplies

Gather supplies; wooden blocks

Any size blocks will work. For this tutorial, I used nine 7.5 inch wooden blocks.

Gather supplies; stencils and stamps

Stencils, stamps

Spray paints (various colors) and a face mask

Masking tape

Prepare the wooden blocks

I love the natural look and feel of the wood, so I let them remain that way.

(Other options to consider: use a clear gesso or wood stain on all six sides of the wooden blocks. This will need to be done in stages to ensure that each side is dry before doing the next side.)

Set up the blocks

Set up the blocks and mask off sides

Working on an even surface, set up the blocks three wide by three long.

Use low-tack masking tape around the sides to secure them together, leaving six surfaces facing up together to make a 7.5 inch diameter square surface. (The tape prevents any over-spray from the spray paint.)

Use a stamp to design SIDE 1 

Use a stamp to design SIDE 1

SIDE 1 is designed with my popular chevron stamp (tutorial on how to make your own)

* Let dry and turn each wooden cube to a random side, so that there are 6 blank surfaces on top again. (I will call this step: “Reset the blocks“)

* Re-tape the sides to prevent any over-spray.

Let dry and turn each wooden block to a random side. (Reset the blocks)

Spray paint the cardboard cut-outs and stencils for the remaining sides

Spray paint the cardboard cut-outs and stencils for the remaining sides

Wearing a face mask and working in a well-ventilated area, spray the first color of spray paint over the cut-outs using a steady, consistent motion.

Design SIDE 2 with lightweight cardboard

Here’s how cardboard stencils and masks can be used as well. I’ve used circular, hand-cut shapes as masks and my custom made ampersand cardboard as a stencil. (Side note: The ampersand is on SIDE 6).

SIDE 2 shows how I arranged my circular, hand-cut shapes in an interesting pattern. Kind of looks like bokeh from photographs!

Design SIDE 2 with lightweight cardboard using circular, hand-cut shapes

* Apply spray paint. (Note: Spray paint can remain tacky for up to 30 minutes depending on the humidity.)

* Remove the shapes.

* Once the spray paint is completely dry, reset the blocks

Design SIDES 3 and 4 with commercial stencils

A couple of my favorite commercial stencils from StencilGirl!

SIDE 3 is designed with Square Dance.

Design SIDE 3 with commercial stencil; Square Dancing by StencilGirl

* Spray the stencil; let dry

* Reset the blocks

For SIDE 4, I used the Art Nouveau stencil.

Design SIDE 4 with commercial stencil; Art Nouveau by StencilGirl

Design SIDE 5 and 6 with handmade stencils

Add more of your own flair to this project! Here are two handmade stencils that I cut out by hand. This one has a tribal and primitive feel, displaying the triangle and rectangular patterns.

Design SIDE 5 with handmade stencil for personalized touch.

Reset the blocks

Finally, for SIDE 6, I took a more bold and graphic approach by using the “and” symbol (technically called, the ampersand. Look how much style this has!)

Design SIDE 6 with lightweight cardboard using the "and" symbol.

Now that all sides have been designed, you can create different looks for your visual pleasure! This will keep your imagination fresh and give you a good challenge to recreate your own, unique combinations.

I will use my designer block puzzle as props and a cool backdrop for my product photo shoots!

01Aug_MFS_DesignerBlockPuzzle-Pic12

Try utilizing this puzzle in unexpected ways. Add visual interest in a corner of your living room, craft space or maybe even place them on a coffee table. It’s your choice!

How will you use your Designer Block Puzzle?

~*~*~*~*~*~*~*~*~*~*~*~*~*~*~*~*~*~*~*~*~*~*~*~*~

Author bio:

Mixed-media illustrator and designer Martice Smith II

Martice Smith II is creative director of Martice Smith II – Illustration & Design Studio, based in Kansas City, Missouri and owner of Uneek Art Boutique. She established herself as a freelance Illustrator and graphic designer after receiving her Bachelor of Arts Degree. Her stunning illustrations reveals her love for fashion, typography and wildlife- using a combination of analog and digital techniques.

Martice also contributes as an article writer for the Creating Mixed Media Art website.

You can see more of her work via her Facebook page or her blog. She invites you to join her monthly newsletter, Uneek Art Letter, for art biz tips, advice and free digital goodies!

~*~*~*~*~*~*~*~*~*~*~*~*~*~*~*~*~*~*~*~*~*~*~*~*~

.

.

Magnetic Chalk Board

~ * ~

This article is written by Gloriann Irizarry

Hi my dear friends, followers and collectors. I been a little absent minded lately so I wanted to create a piece that will help me out getting a little organized. What’s better than a bulletin board. Not any ordinary board but a multi uses one.

Yes a great Magnetic Chalk Bulletin board. Here I will now show you how to make your own OAK board.

create your own chalkboard with a paper clay boarder

Materials

Creative Paperclay 16 0z

Cookie baking sheet ( I found mine at the dollar Store)

Chalkboard Valspar Paint

Acrylic paints

Paint Brushes

Super Strong Magnets

Fast Grab Tacky Glue

Leaf Cutters

Creative Paperclay board

Creating your own Magnetic Chalk Board

I started this project by spraying the can of the Chalkboard spray paint all over the back of the baking cookie sheet and let it dry. For a better chalk writing, I spray 2 coats of the paint.

Creative Paperclay board

To get this project going I rolled a big clay sheet manually to a ¼ in thickness.

Creative Paperclay board

I pre drill 2 holes one on each top corner of the cookie sheet. So I can thread a ribbon to hang the board up. Now use your Xacto or hobby knife to cut a big rectangle that will cover both sides of the cookie sheet.

Creative Paperclay board

Roll the clay sheet you just cut so we can start to create the trunks for the trees that will be covering the frame of this Magnetic Chalk board

Creative Paperclay board

I use a needle tool to draw and create the wood grain effect for the tree.

I will do the same procedure with the other side tree.

Creative Paperclay board

Since nature is so beautiful to begin with the wood grain don’t have to be perfect. Feel free to draw lines along the trunk.

Creative Paperclay board

I carry the trunk all over the top and draw more wood grain lines.

Creative Paperclay board

I dint wanted to be all flat so I give the over lapping trunk effect to give more interest to the piece.

Creative Paperclay board

Before the completed top wood trunk dry, I use my needle tool to pierce the pre drilled holes in the clay and let it dry.

Creative Paperclay board

I wanted to add a nice grass effect to the lower portion of the board. I did this by rolling a Creative Paperclay sheet to a ¼ in thickness. Place it on the bottom and with my needle tool cut the grass off.

Creative Paperclay board

Spray it with water so we can then soften it with a soft wet brush and set aside to dry.

Creative Paperclay board

It is Painting time!

Creative Paperclay board

To create the leaf for decoration I rolled again some Creative Paperclay to a ¼ thickness.

Once it is rolled, I let it dry a little not much.

Creative Paperclay board

Grab your favorite leaf cutters and start stamping away.

Creative Paperclay board

I wanted the magnets to be flush to the board so before they fully dry I pressed the magnet to each leaf that will become a magnet.

Creative Paperclay board

I water the acrylic paint down and started brushing the grass bottom

Creative Paperclay board

Also painted the leaf and set aside for them to completely dry.

Once they dry, I used my Fast Grab Tacky Glue and glued the super strong magnet to the leaf I had chosen to be the magnetic holder.

Creative Paperclay board

I set the magnets to dry backward on the magnetic board so they will hold while the glue dries.

Creative Paperclay board

To paint the tree trunk, I water down the brown acrylic paint and brush it lightly to the dry trees.

Set aside for the paint to completely dry.

Creative Paperclay board

Once the paint had dry, it is time to glue some of those leaf we had work on.

Use your favorite adhesive. Mine is Arleenes Fast Grab Tacky Glue.

Grab each leaf and one by one place a glue dab to the leaf and place it to the tree trunk. Alternate positions to make the leaf look natural while they flow on the Magnetic bulletin Chalk board.

Creative Paperclay board

Now it is the time for you to check and see if you like the leaf placement. If you are satisfied, all you need to do is set aside for the glue to completely dry.

After the glue dry get you favorite sealer and brush it on the piece to help it stand the test of time. I choose matte to keep the natural look and keep it looking beautiful.

Creative Paperclay board

With the help of a needle you can tread a ribbon cut to size to proudly hang your master piece.

Creative Paperclay board

Now your new Magnetic Bulletin chalk board is ready to be hang. Feel free to write, pin or stick all your reminders.

I hope this help and allow you to keep track of your events. Please email , post or comment down any question you might have.

Sincerely,

Gloriann Irizarry

~*~*~*~*~*~*~*~*~*~*~*~*~*~*~*~*~*~*~*~*~*~*~*~*~

My name is Gloriann Irizarry. I was born and raised in the beautiful Caribbean island of Puerto Rico. Ever since I can recall, I always had my hands on crayons, scissors and paper. My parents knew from the start how much I love to create!

As a mother of three young wonderful daughters, I find myself working, caring for my family, and taxiing kids from here to there for various sporting events.  I have to say I’m never bored!  I enjoy every little moment I spend with my girls, but will always continue to work time to create art into my daily schedule as that means doing what I love the most. My girls are learning the joys of creating also!

I love to sculpt and will never stop creating. I was born this way and for that I thank GOD every day. Art has been a great way to be creative and to express myself.  I like to keep my hands busy creating – whether it is unique jewelry, art dolls, oak sculpture figures, fairy wings for all your project needs, or even wigs and clothing for your sculptures.  I love all the variety in art! Why? because ART is so rewarding. Seeing your creation take form is an awesome feeling.

You can see more of my work on my website – ByGlori

~*~*~*~*~*~*~*~*~*~*~*~*~*~*~*~*~*~*~*~*~*~*~*~*~

.

.