Artistic Jewelry made from Fiber and Fabric

~ * ~

This article was written by Katja Blum

Mixed media and jewelry are a great combination – jewelry is a perfect way to take a piece of your art with you in your everyday life, and thinking about the functional aspects and size of jewelry gives you an interesting framework for your creative ideas.

I selected this project to highlight the endless possibilities of mixed media jewelry with fabric and fiber, because you do not need any special jewelry tools or skills to make this pretty bangle. You probably have some pretty fabric scraps lying around, some rope, a few beads … no pliers, hammers and anvils necessary.
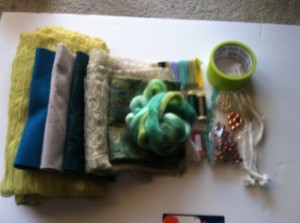
You need:

  • 3 pieces of woven or braided rope to fit around your wrist – any thickness, as long as it bends easily. Man-made is fine, but those solid plastic ropes like clothesline don’t work well, because you need to be able to pass a needle through.
  • Duct tape
  • Assorted fabrics, fibers and beads
  • Mod Podge, Fray-Stop or PVA glue to treat fraying fabric edges
  • Needle and thread
  • Thin craft wire, yarn or thread to wrap around the bangle, if desired

Jewelry made from Fiber and Fabric

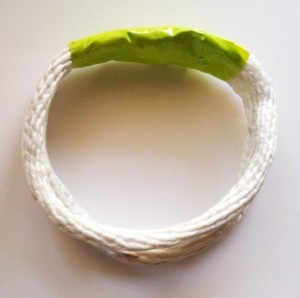
To cut the lengths of rope to size, measure the inner circumference of a bangle you like. If you don’t have one, here’s how you can measure: Hold out your hand, palms down, fingers together. Tuck your thumb and pinky under, so that they touch underneath the other fingers. Now measure around the widest part of your hand, which is probably close to your knuckles.

Don’t pull the measuring tape too tight. The bangle will have a slightly smaller inner circumference once you wrap the fabrics around. You won’t lose much though, so 1/4 to 1/2 inch (about 6-12 mm) should be enough extra length.

Cut the rope pieces to size, lay them out together and tape them with duct tape to form a closed ring. The three pieces are just connected at the bottom.

Jewelry made from Fiber and Fabric

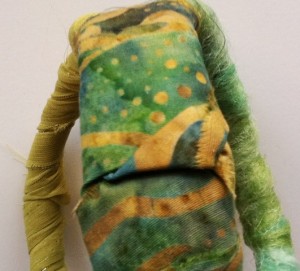
Cut long strips of fabric or use unspun, dyed spinning fiber to wrap each ring, beginning with the two outside ones, leaving the center one for last. Start wrapping at the duct-taped bottom, where the three rings separate. Don’t worry about the fabric and fiber ends. Just leave them hanging, they will be covered later.

Dab some Mod Podge or Fray-Stop on the fabric, if necessary. If you are using unspun fiber, covering all of the wrapped fiber with Mod Podge or something similar works best. Otherwise the fibers might come apart with use.

Smooth fabric like the batik cotton here works well for the center bangle. Start wrapping in the center of the duct tape at the bottom, tucking in the ends from the other bangles as you go. When you have wrapped all the way around, tuck the end of the fabric strip into one of the wraps. It will be secured with thread later.

Jewelry made from Fiber and Fabric

Jewelry made from Fiber and Fabric

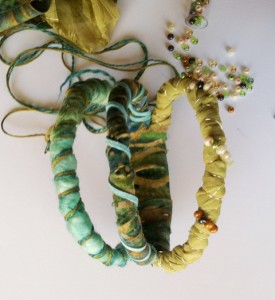
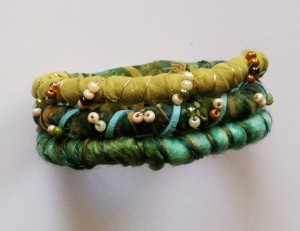
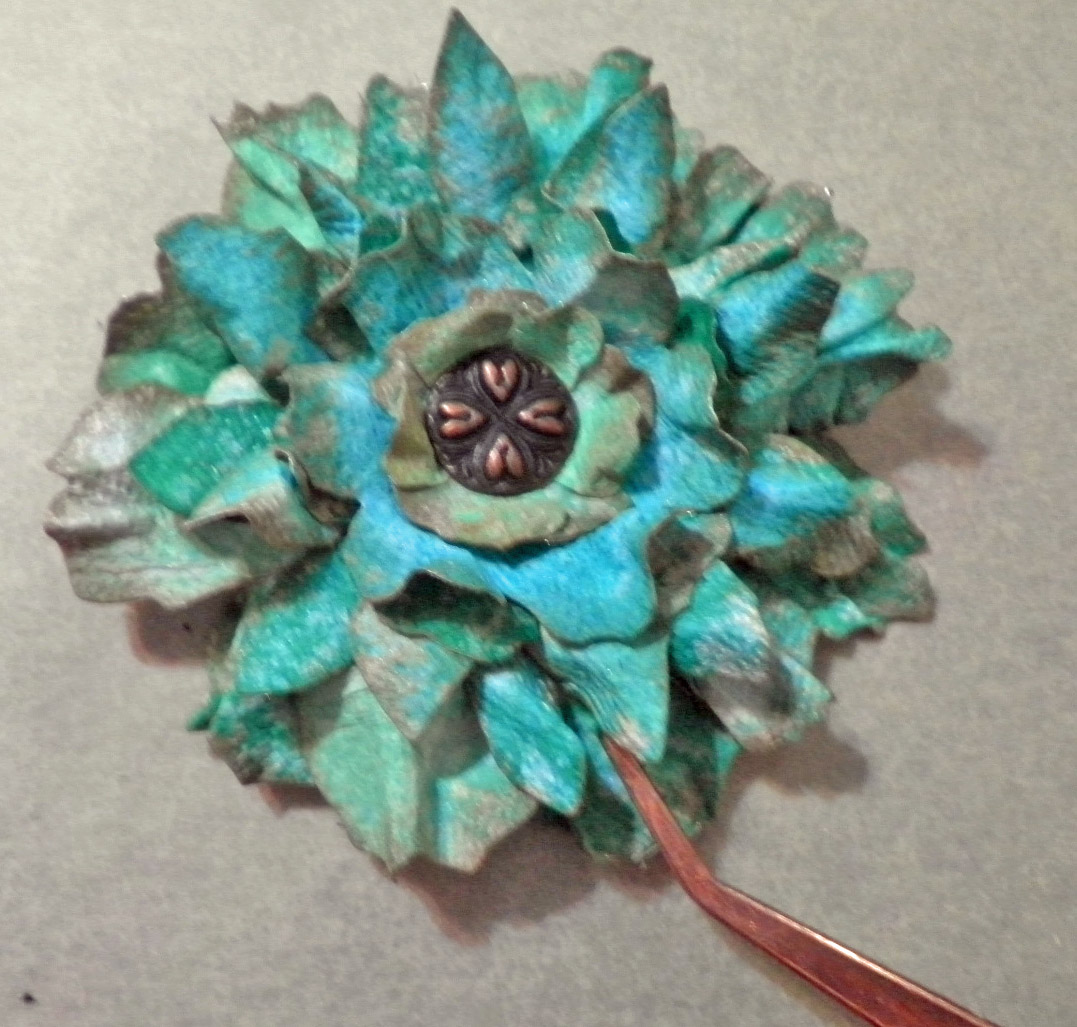
Once you have your triple bangle wrapped in pretty fabric, the real fun starts. Decorate your statement piece to your heart’s content. Wrap it with thread, yarn, cord or thin craft wire (no pliers needed). Add beads to the wraps, if you like, or sew on individual beads. Glue or sew on charms, paper flowers, ribbon rosettes…you get the idea.

I had much more elaborate plans for this piece, but once I saw the colors of the fabrics and fiber together, I loved them and didn’t want to obscure them too much. Remember to begin all wrapped decorations at the bottom and tuck them into the fabric of the center bangle. When you are done, secure the fabric covering the duct tape and the tucked-in end with a few stitches. If you want the rings of your triple bangle to sit close together on your forearm, sew them together in a few places. A little bit of spray varnish helps protect your paper or other fragile decorations.

Of course you are not limited to three rings, nor do you have to wrap them individually. A five-piece bangle wrapped together (just use the steps for the center ring in this project) would make a terrific background for larger mixed-media decorations. The bangles are fun to wear and so easy to make that you’ll have a whole collection of your personal, wearable mixed media art soon.

Jewelry made from Fiber and Fabric

~*~*~*~*~*~*~*~*~*~*~*~*~*~*~*~*~*~*~*~*~*~*~*~*~

Katja Blum is a writer and translator from Tulsa, OK. As an artist, she started with yarn, fabric and papier mache (rarely together), branching out into collage and other paper arts about ten years ago. Her latest obsession is making soft stuffies and art dolls – to the delight of her toddler. She also likes to find creative solutions for ugly or broken things around the house – to the delight of her husband.

You can see more of her work with fiber, paper and words at www.thewaywardsheep.com

~*~*~*~*~*~*~*~*~*~*~*~*~*~*~*~*~*~*~*~*~*~*~*~*~

.

.

How to Make Your Own Business Cards

This article was written by Jean Mullins

Supplies required

Computer and printer

Laminator (optional)

Coloured Card stock A4 size. This will give you approx. 10 cards depending   on the size.

Water colour paper or thin card A4 size or larger, not printer paper as this is too thin.

Glue, acrylic paint or inks, stencils, stamps etc.

Creating back of cards

Step 1.

Paint, stencil, and stamp the paper or thin cardboard.  I used Jo Sonjas paints, simply because I have a lot, I love Cad red light, Norwegian orange, French blue, white, touch of yellow, and violet, I used stencils, then stamps.

I made 2 separate backing papers so some cards have the orangey back and some the violet shades.

Making  a DIY business card

TIP: If your painted paper is lumpy and bumpy, for example if you use texture paste, buttons or similar, it will be harder to laminate, creates wrinkles, air pockets etc.

Step 2.

While your painted paper is drying, create your business card.

I used an Avery template, 10 cards to the page.Type the wording you want on your cards, name address, webpage, what you do etc.Save,and then print them out on the card stock, use a colour that will blend with the paper you have just painted. Cut each card out.

Step 3.

When the painted paper is dry, use a cut out card as a template on the back of the paper draw around it, this will give you the right size to cut for each card. Cut them out.

Tips in making your own business cards

Step 4.

Now you require one of each, using a glue stick, dab a bit of glue on each card as you stick the front to the back take care to have them back to back. Trim if required.

TIP. Use just a dab of glue and press the 2 pieces together firmly.

Tips in making your own business cards

Step 5.

The fun bit Laminating.

Get your laminator ready, turn it on to warm up.

Lay a laminating pouch on a flat surface, open it, then dab the glue stick on each card as you position it on the laminating sheet. Leave a little space between so that they each seal. (Approx. 10/11 per sheet). When the laminator is ready carefully lift and feed through.

Now cut and separate each of your beautiful, unique business cards and say wow. Trim excess laminate off each card.

For those of you who don’t have access to a laminator, office supplies or similar place will laminate them for you.

Alternatively after glueing the 2 pieces together, use a brad in opposite corners or eyelet in one corner then tie with string cord etc.

Tips in making your own business cards

Tips in making your own business cards

~*~*~*~*~*~*~*~*~*~*~*~*~*~*~*~*~*~*~*~*~*~*~*~*~

Jean Mullins (Stevenson) lives at Caboolture Queensland with 2 little dogs.

Mother and grandmother, Jean is passionate about teaching and passing her knowledge on to everyone she can. Author, pattern designer, magazine contributor for many years, Jean loves to create and play with paint, as well as tutor at U3A.

You can see more of my work at: nannasworkroom-stitcheriesandsuch.blogspot.com & www.jeaniesartyplace.blogspot.com

~*~*~*~*~*~*~*~*~*~*~*~*~*~*~*~*~*~*~*~*~*~*~*~*~

.

.

Mixed Media 3D Flowers

~ * ~

This article is written by Barbara Rankin

Barbara shows you how to make these beautiful 3D altered art flowers using simple household products.  All you will need is a roll of heavy duty aluminum foil and a roll of paper towels, along with some white gesso, acrylic paints, and flower dies or punches.  Barbara will also show you several ways to colorize and alter these beauties, and how to apply them in your art.

Spread some white gesso over the foil, lay paper towel on top and continue spreading gesso over the paper towel, ensuring the two adhere to each other well and there are no air bubbles.  You may find that you need to do this in sections before the gesso dries. Do not worry about wrinkles; they add texture.

applying gesso to paper towel and aluminum foil

Add DecoArt fluid acrylics in colors of your choice.  I used Phthalo Green-Yellow, Cerulean Blue, Titanium White Primary Yellow, Cadmium Red Hue, Primary Magenta, and Quinacridone Violet.

adding fluid acrylics to paper/aluminum foil

Spray DecoArt white mist through a damask stencil.  The white spray mist will pick up some of the color beneath it and give you a lighter shade of each color.  Perfection is not necessary because this is all going to be die cut into smaller pieces.

DecoArt white mist sprayed through damask stencil

As you can see, this disguises the separation of colors and makes it all cohesive.

photo of colored/stenciled sheet

Die cut flowers with any flower die.  I used the Tim Holtz Tattered Florals die.  You could also free-hand cut them.  You will have a nice selection of tattered floral pieces that all work well together.

die cut flowers from each colored section of paper/aluminum foil sheet

Use two sets of the flowers from the same or similar colors to make a single, fluffy flower. Before layering the petals, ink the edges with Vintage Photo distress ink. This will give some added depth and dimension.

Photo of the die cut petal shapes used to make a single flower

Layer the petals, largest to smallest. Make a hole in the center of each petal and add a decorative brad to keep them together.  Pinch and twist the petals to form a fluffy and full flower.  I used tweezers in one hand so I could grab each petal easier, while pinching them with my other hand.

Flower formed with help of tweezers

Here are all three flowers from this one sheet.

three finished flowers

Here are a couple of cards I made using two of the flowers.  I can think of many uses for these. I think they would look absolutely lovely in a mini album, scrapbook, page layout, or canvas.

two cards using two of the three flowers

two cards using two of the three flowers

~*~*~*~*~*~*~*~*~*~*~*~*~*~*~*~*~*~*~*~*~*~*~*~*~

Barbara is a mixed media artist who loves to teach.  She loves to learn new techniques and to share her knowledge with other artists.   She is a contributing artist in a book:  Make it in Minutes: Mini Albums, and has been published in several paper and online magazines.  She is currently on several design teams:  ColourArte, Sin City Stamps, Altered Pages, Gina’s DesignsLasercuts, House of Cards Monthly Challenge Blog, and Craft Hoarders Monthly Challenge Blog.  She has served as a design team member for The Robin’s Nest and Creative Paperclay®, as well as guest designer for Craftwell USA, Unruly Paper Arts, and Gina’s Designs.

She lives in the Memphis, Tennessee area with her very supportive husband of 32 years, and her two Yorkies, Chloe and Zoe.

You can see more of Barbara’s work on her blog at Black Hole Art Studio or via Facebook – Black Hole Art Studio

~*~*~*~*~*~*~*~*~*~*~*~*~*~*~*~*~*~*~*~*~*~*~*~*~

.

.

Funky Calligraphy: Adventures in Hand Lettering

This article was written by Martice Smith II

Funky Calligraphy: Adventures in Hand-Lettering


Funky Calligraphy: Adventures in Hand Lettering, Tutorial by artist Martice Smith II

My graffiti-style lettering is a fun mixture of bold, expressive calligraphy with a whimsical, urban vibe. It’s what makes my handwriting so recognizable and unique.

Sometimes, I prefer my letters to look imperfect and scribbly. It’s important to me that my spirit, at the moment, transcends into my artistry.

Today, I’ll be your guide for a quick adventure on finding your “voice” within your hand-writing.

So, where do I find inspiration? Literally, everywhere!

Look around you…the world is your oyster. Take an adventure!

I challenge you to look at your surroundings differently. Here are a few places of inspiration I like to start with:

  • graffiti murals / graffiti on trains
  • billboards
  • food packaging
  • tribal symbols and jewelry
  • kids’ writing
  • Expand your powers of observation. Photograph interesting walls and surfaces, print them out and add to a visual journal. Doors, facades, an vintage signage are my favorite things to look for!
  • Flip through architecture catalogs and fashion magazines for contemporary design inspiration.
  • Look at brand packaging. Notice how the typefaces exude various emotions for you.

Now that you’ve been inspired, let’s play!

Here are some basic supplies to get started with lettering: 


Funky Calligraphy; supplies to gather

  • Speedball’s Super Black India Ink (waterproof, free flowing, and contains a deep opaque pigment. It’s one of my favorites!)
  • skewer or toothpick
  • assortment of markers and fine point pens (include a chisel-tip marker / calligraphy pen)
  • paper

Funky Calligraphy and graffiti; step-by-step process by Martice Smith II

  1. First, grab your biggest chisel-tip marker or calligraphy pen. Write large letterforms and work randomly across the page.
  2. Next, use a pen with a smaller point. Try writing a phrase in a circular shape. Rotate the page for smoother writing. Allow the words to look like a series of marks. It’s OK to leave some words illegible. By layering letters and strokes you create interesting effects and backgrounds.
  3. Exaggerate letterforms and lines – make them your own! Vary their size by alternating your thicker, chisel-tip markers with fine point pens.
  4. Finally, draw scribbly flourishes with a toothpick or skewer dipped in India ink. (Do this part last to allow the ink to dry without being disturbed.) Set aside to dry for a few minutes. Spray varnish to seal the surface.

Your creative design potential is limitless if you think beyond traditional calligraphy methods. Take a playful approach, forget about the “rules” and allow your imagination to soar!

Think about this:

What kinds of fonts make you feel happy? Do they happen to be skinny, thick, bold or a mixture of all three?

What about fonts that help a product look timeless and fresh?

Analyze the differences of vintage style vs. a more kid-friendly look. What would they look like combined? Try it!

Remember, the key to developing your own style is to allow yourself to play and experiment.

JOIN the fun!

If you want to learn more about expressive, free-style hand lettering, be sure to sign up for Martice’s newsletter. Be the first to know about her upcoming mini-workshops, featuring in-depth handwriting techniques.

~*~*~*~*~*~*~*~*~*~*~*~*~*~*~*~*~*~*~*~*~*~*~*~*~

Mixed-Media artist, designer, and instructor Martice Smith II

Martice Smith II is creative director of Martice Smith II – Illustration & Design Studio, based in Missouri and owner of Uneek Art Boutique. She established herself as a freelance Illustrator and graphic designer after receiving her Bachelor of Arts Degree. Specializing in mixed-media illustrations, Martice’s love for fashion, typography and wildlife are infused with a combination of traditional and digital art techniques.

~*~*~*~*~*~*~*~*~*~*~*~*~*~*~*~*~*~*~*~*~*~*~*~*~

.

.