What to do with your Gelli Plate Prints

~ * ~

For those of you who have been playing with your Gelli Art mono printing plates I’m sure you have a huge collection of colourful prints. So what are we actually going to do with all of these Gelli plate prints?

using background papers for mixed media art ideas

Here are some of the projects Michelle has undertaken to put these colourful prints to use. If you don’t have a Gelli plate or a huge collection of Gelli plate prints, you can always use bought background papers or backgrounds you have made using other mixed media technique, like Credit card printing or found object painting.

Swap and Share

One of my crafting friends had admired my colourful Gelli print backgrounds. For her birthday I chose some of my favourite prints and put them into a nice folder. She was delighted with them and even made me a card from one of the prints I had given her.

using background papers for mixed media gift ideas

The prints are also fun to swap and share with friends, as each of us has a different style and colour preference, so all of the backgrounds turn out so differently.

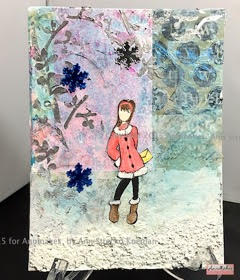
Handmade greeting cards

using background papers for mixed media art ideas

It is easy to turn your Gelli plate prints into lovely handmade greeting cards. My preference is to simply cut or tear to size, add a little ink around the edges and stamp a greeting. Then use double sided tape to stick it to the card. This is a great way to show off the colourful prints and not hide any of the details.

using background papers for mixed media art ideas

I have also used my punches to cut out shapes from the Gelli plate print. These cards were made for my Christmas cards for 2013. Firstly I punched shapes out os several sheets of gelli print paper, so I had a variety of patterns and colours available. I then arranged the pieces and checked I was happy with the overall colours and patterns. The shapes were stuck down using a glue stick. To finish off the cards are used some Christmas stickers. These were simple to add and stood out well on top of the brightly coloured background.

using background papers for mixed media art ideas

Teabag Folding

Teabag folding is a specific kind of origami. You can buy prints that are identical to make these arrangements. I decided to try using my Gelli plate prints.

Firstly I cut out 8 2 inch squares. Then folded them into the correct shape.

using background papers for mixed media art ideas

I stuck into the eight pieces carefully into the flower arrangements using PVA glue on a toothpick to get into the folds of each piece.

using background papers for mixed media art ideas

Once the flower arrangement was dry I did added it onto the card background with double sided tape.

using background papers for mixed media art ideas

These cards are not as simple as the ones above but they are worth the effort and are perfect for crafting friends who appreciate them.

Art journalling

While I am making my Gelli plate prints, I also use the excess paint from the stencils and brayer in my art journal to create a pre-painted background. It is then easy to use the colour-coordinated prints to add features in the art journal layout.

Here are a few of my favourites:
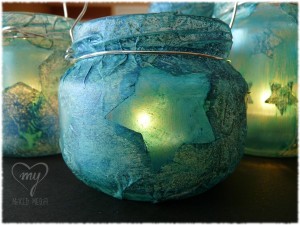
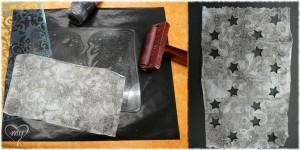
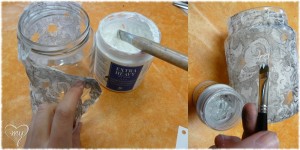
using background papers for mixed media art ideas

using background papers for mixed media art ideas

using background papers for mixed media art ideas

using background papers for mixed media art ideas

Paper ornaments

For my 2013 Christmas ornaments swap I also used a piece of Gelli plate print. You can see the full details of how these were made here at #4. Like the teabag folding it was a tricky process but I love how it turned out.

using gelli arts mono printed papers for mixed media art ideas

Personalised Envelopes and Stationery

Having these prints lying around certainly makes it handy when you need inspiration. When I needed a quick gift wrapped for a Christmas gift, I decided to turn one of my sheets into an envelope. I then sealed it with double sided tape.

using background papers for mixed media art project ideas

using background papers for mixed media art project ideas

That inspired me to make more envelopes. And want to have finished with the envelopes I still had more offcuts, so I got out of my punches and created some stationery to go with the envelopes, decorating the plain copy paper. It will make a lovely gift.

using background papers for mixed media art project ideas

using background papers for mixed media art project ideas

~*~*~*~*~*~*~*~*~*~*~*~*~*~*~*~*~*~*~*~*~*~*~*~*~

We hope this has given you a few ideas as to what to do with that BIG pile of Gelli plate prints you have been creating. Of course, this list isn’t exhaustive – if YOU have another great use for handmade background papers, we’d LOVE to hear from you – just leave a note in the comments!
.

.

Review of Janelle Nichols’ “Little Birdie” Online Class

~ * ~

This article is written by Ann Strecko Koeman

A while ago I got the opportunity to review Janelle Nichol’s Mixed Media class: Little Birdie. The class is available at “Skillshare”.  Being an avid maker of all things, and a lover of learning new techniques I was very much looking forward to testing out this new to me format. I can honestly say that I was pleased.

Ann’s project

For one thing, going on the Skillshare website was easy.  Second,  finding the class by Janelle was simple.  All that was required of me were a few clicks on the keyboard. Easy peasy! The hard part came when I began to doubt my own abilities to create something as pretty as the teacher herself had made. However, it did not take long for the soothing voice of the teacher to ease my concerns.

Janelle takes the time to explain all the steps involved in making the project. She gives a lot of information and goes into quite a lot of detail on how to accomplish each step. My favourite aspect of taking the class was the ability it gave me to stop, pause, go back to any part of this video class.  As my own life got quite busy all of a sudden. I needed to take a long break from completing the class.  However, when I returned I was able to just replay the video and begin anew.

Ann’s 2nd project

I enjoyed taking a class in this format because of the flexibility it allowed. I also appreciated the extensive notes and lists that accompany the class. It was a pleasure for me to create two projects over on my Youtube channel Annmakes that were due in part to the influence I got from taking Janelle’s class. The links to the two examples I made are here:


You can view the introduction to the Little Birdie class on Skillshare here.

~*~*~*~*~*~*~*~*~*~*~*~*~*~*~*~*~*~*~*~*~*~*~*~*~

Ann loves to collect and organize as many tools and supplies as possible because she is always making things.  Incredibly she finds a use for most of her collections.  She enjoys making Mixed Media Art because it allows her to use all her skills and collections.

~*~*~*~*~*~*~*~*~*~*~*~*~*~*~*~*~*~*~*~*~*~*~*~*~

Disclosure: Access to this course was supplied by Janelle Nichols for the purpose of review. All opinions are that of the MixedMediaArt team. Some links on this page may be affiliate links and any purchases help to support the ongoing work by MixedMediaArt. 
.

.

DIY Candle Holder

~ * ~

This article is written by Sandra Parés

Today I am going to show you how to make a candle holder with a magic light to illuminate our summer nights.

Candle Holder

The supplies I will use are the following:

  • An open top container glass (to make these candle holders usually I use recycled glass jars)
  • white tissue paper
  • the big shot and a star die
  • 8”x10” Gelli Plate
  • a brayer
  • black acrylic paint
  • a stencil
  • extra heavy gel medium (gloss)
  • 2 paintbrushes
  • Facetten-Lack metallic platin Vica Deco
  • a makeup brush
  • Primary Elements of LuminArte
  • hairspray
  • wire and a candle

First of all we will start using the Gelli Plate: we will use the brayer to put the black paint over the stencil, then we will press the stencil over the gelli plate. With this step we can print the mark of the stencil over the gelli plate. Then we will take a piece of tissue paper, it must be large enough to surround our glass jar. And we put the tissue paper over the gelli plate to print the texture. With this step, the mark of the stencil will print in our tissue paper.

And with the Big Shot and the star die we will open a few holes in our piece of tissue paper.

Candle Holder

Then we will paste with extra heavy gel medium the tissue paper around our glass jar and we will leave it to dry. Then we will paint the holes with Facetten-Lack to give a touch translucent at the glass. For this step, also you can use any paint or paste that allows you to do this translucent effect.

Candle Holder

Once dried we can add the color. I will paint with the Primary Elements of LuminArte, I will use the pigment directly. First of all we have to spray the entire glass jar with hairspray, you will see how the jar is wet. Taking advantage of this dampness, we will catch the Primary Elements pigments (the color or colors that you want) with a makeup brush and we will paint with them making circles. When we run out of pigment or hairspray dries, we will go back to add more product to get the whole jar painted.

Finally, if we want to hang it somewhere, we only need to put some wire around the jar. And don’t forget to put the candle inside!

Candle Holder

You will see that the result will be beautiful and shining: a candle holder with a magic light for our most special nights. The first time I used these candle holders was at my craft stop in the “Enchanted Night”, the shopping night from my city, and they produced an amazing shine!

Candle Holder

~*~*~*~*~*~*~*~*~*~*~*~*~*~*~*~*~*~*~*~*~*~*~*~*~

Sandra Parés loves working with mixed media! The colors and textures leave her amazed and she enjoys creating and getting their hands dirty with paint and gesso! On her site My mixed media you can find a mixed media online store, art and craft products, mixed media workshops in Spanish, tutorials, ideas and mixed media techniques.

~*~*~*~*~*~*~*~*~*~*~*~*~*~*~*~*~*~*~*~*~*~*~*~*~

.

.

Making Unique Photo Frames

~ * ~

This article was written by Cecilia Sanchez

I have made a friendly and funny photo frame, thinking of putting pictures of my naughty children.  It’s pretty simple. They like to play with bottle caps, and so I wanted to include them in the frame.

Photo Frames

List of materials:

A wooden frame 
Bottle caps 
marbles 
metal washers 
glue 
stencil (Stencil girl products)
 gesso 
acrylic paint 
paper towels 
mod podge 
crakle paint 
Zig Painty FX

First, glue the metal elements or whatever we want. 
Then, cover with a coat of gesso.

I used a stencil of electronic circuits with gesso to give more texture.

Photo Frames

I like to use the paper towels used, and stained with paint.

I have fixed with Mod Podge.

A layer of acrylic paint.

I remove some paint with a baby wipe.

Photo Frames

Finally, a layer of Distress Crackle paint, gives an interesting effect.

Photo Frames

~*~*~*~*~*~*~*~*~*~*~*~*~*~*~*~*~*~*~*~*~*~*~*~*~

My name is Cecilia Sanchez (CeciScrap) and I live in Málaga, Spain. I am married and we have three gorgeous sons. They inspire me every day with their crazy ideas.

Since my childhood I liked the photography, drawing, collage and make photo albums with cuts and travel souvenirs. I also love crafts in general. In 2006, a few months after birth my twins, I discovered scrapbooking, digital first and then the traditional. I love to do 30X30 pages, cards and mini albums, and for a while now I am fascinated with the Art Journal and Mixed Media, and I do not imagine scrapbooking without getting my hands dirty.
I am inspired by everyday things, feelings … The art journal is a real diary for me, because sometimes I need to express feelings with colors and shapes.

I love learning and discovering new techniques and materials.
I am part of the European design team of KURETAKE, and I am also designer for a monthly blog challenge Sweet Card Club. I contribute with some blogs and digital magazines and organized Scrapbooking workshops in Malaga.

You can see more of me at  www.facebook.com/ceciscrap

~*~*~*~*~*~*~*~*~*~*~*~*~*~*~*~*~*~*~*~*~*~*~*~*~

.

.