For the Love of Kraft Paper

~ * ~

This article was written by Melanie Statnick

Creating artwork on Kraft paper

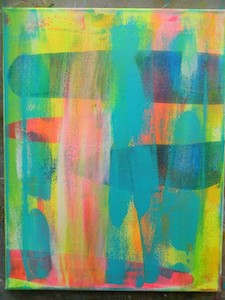
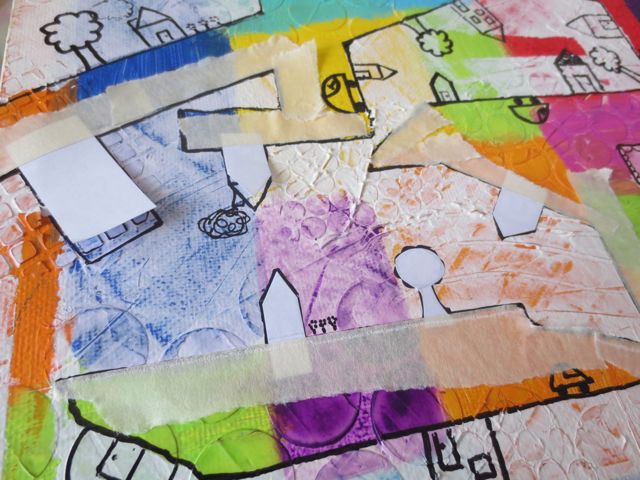
When I first saw photos on blogs from artists using Kraft paper for artwork and journaling pages I had to play with more of it myself. There are 1000 of great project you can use Kraft paper for. It’s very “Crafty”. From paper flowers, banners, cards, to table clothes and runners. The list goes on.

Creating artwork on Kraft paper{alternative description

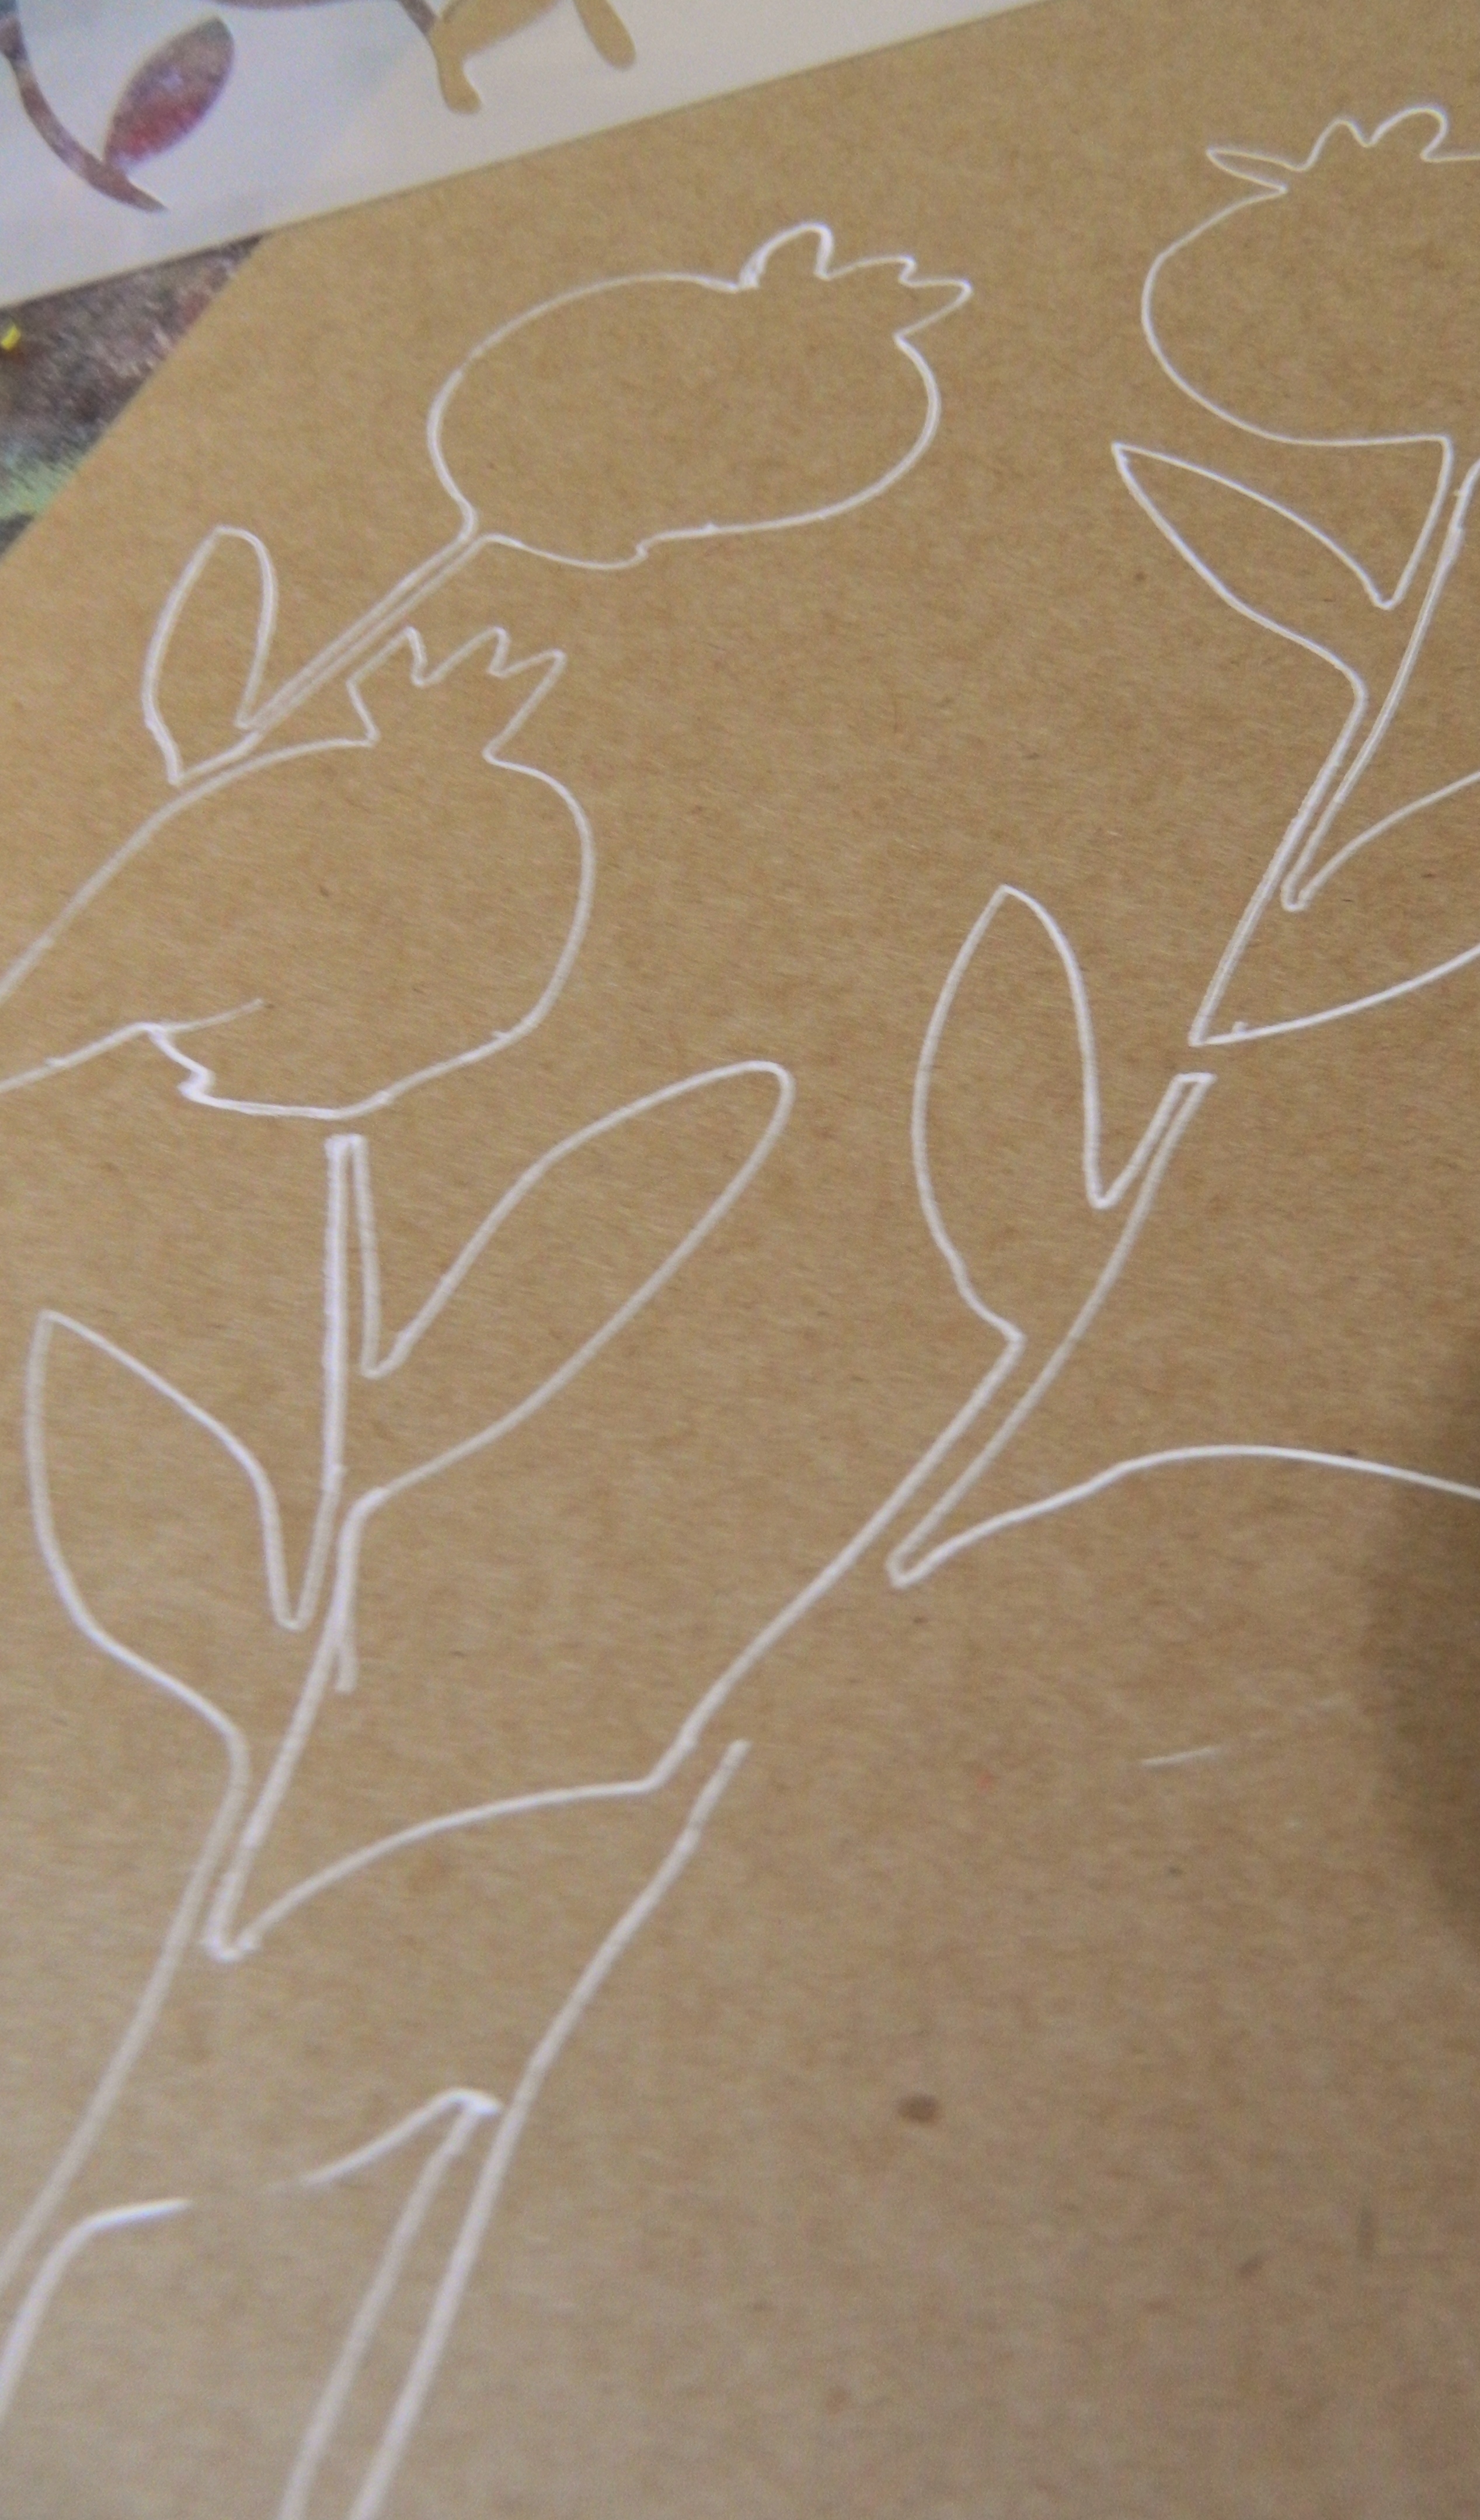
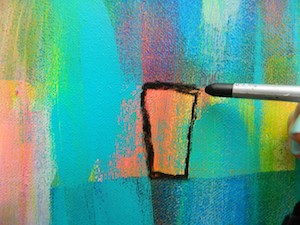
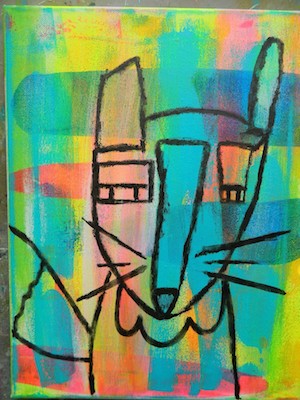
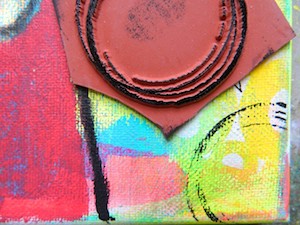
A mini project I created to later place on a canvas, was taking one my favorite stencils and outlining it using white gel pen or you can use a white chalk pencil. This can be a very bold first move if you are nervous about the permanence of the pen. I skipped using a pencil because I’m not worried about making a mistake here. I will be adding acrylic paint directly to the paper and I felt that the paint brush line would “cover” my mistakes. (Never be afraid to make mistakes, it is how we All learn)

Creating artwork on Kraft paper{alternative description

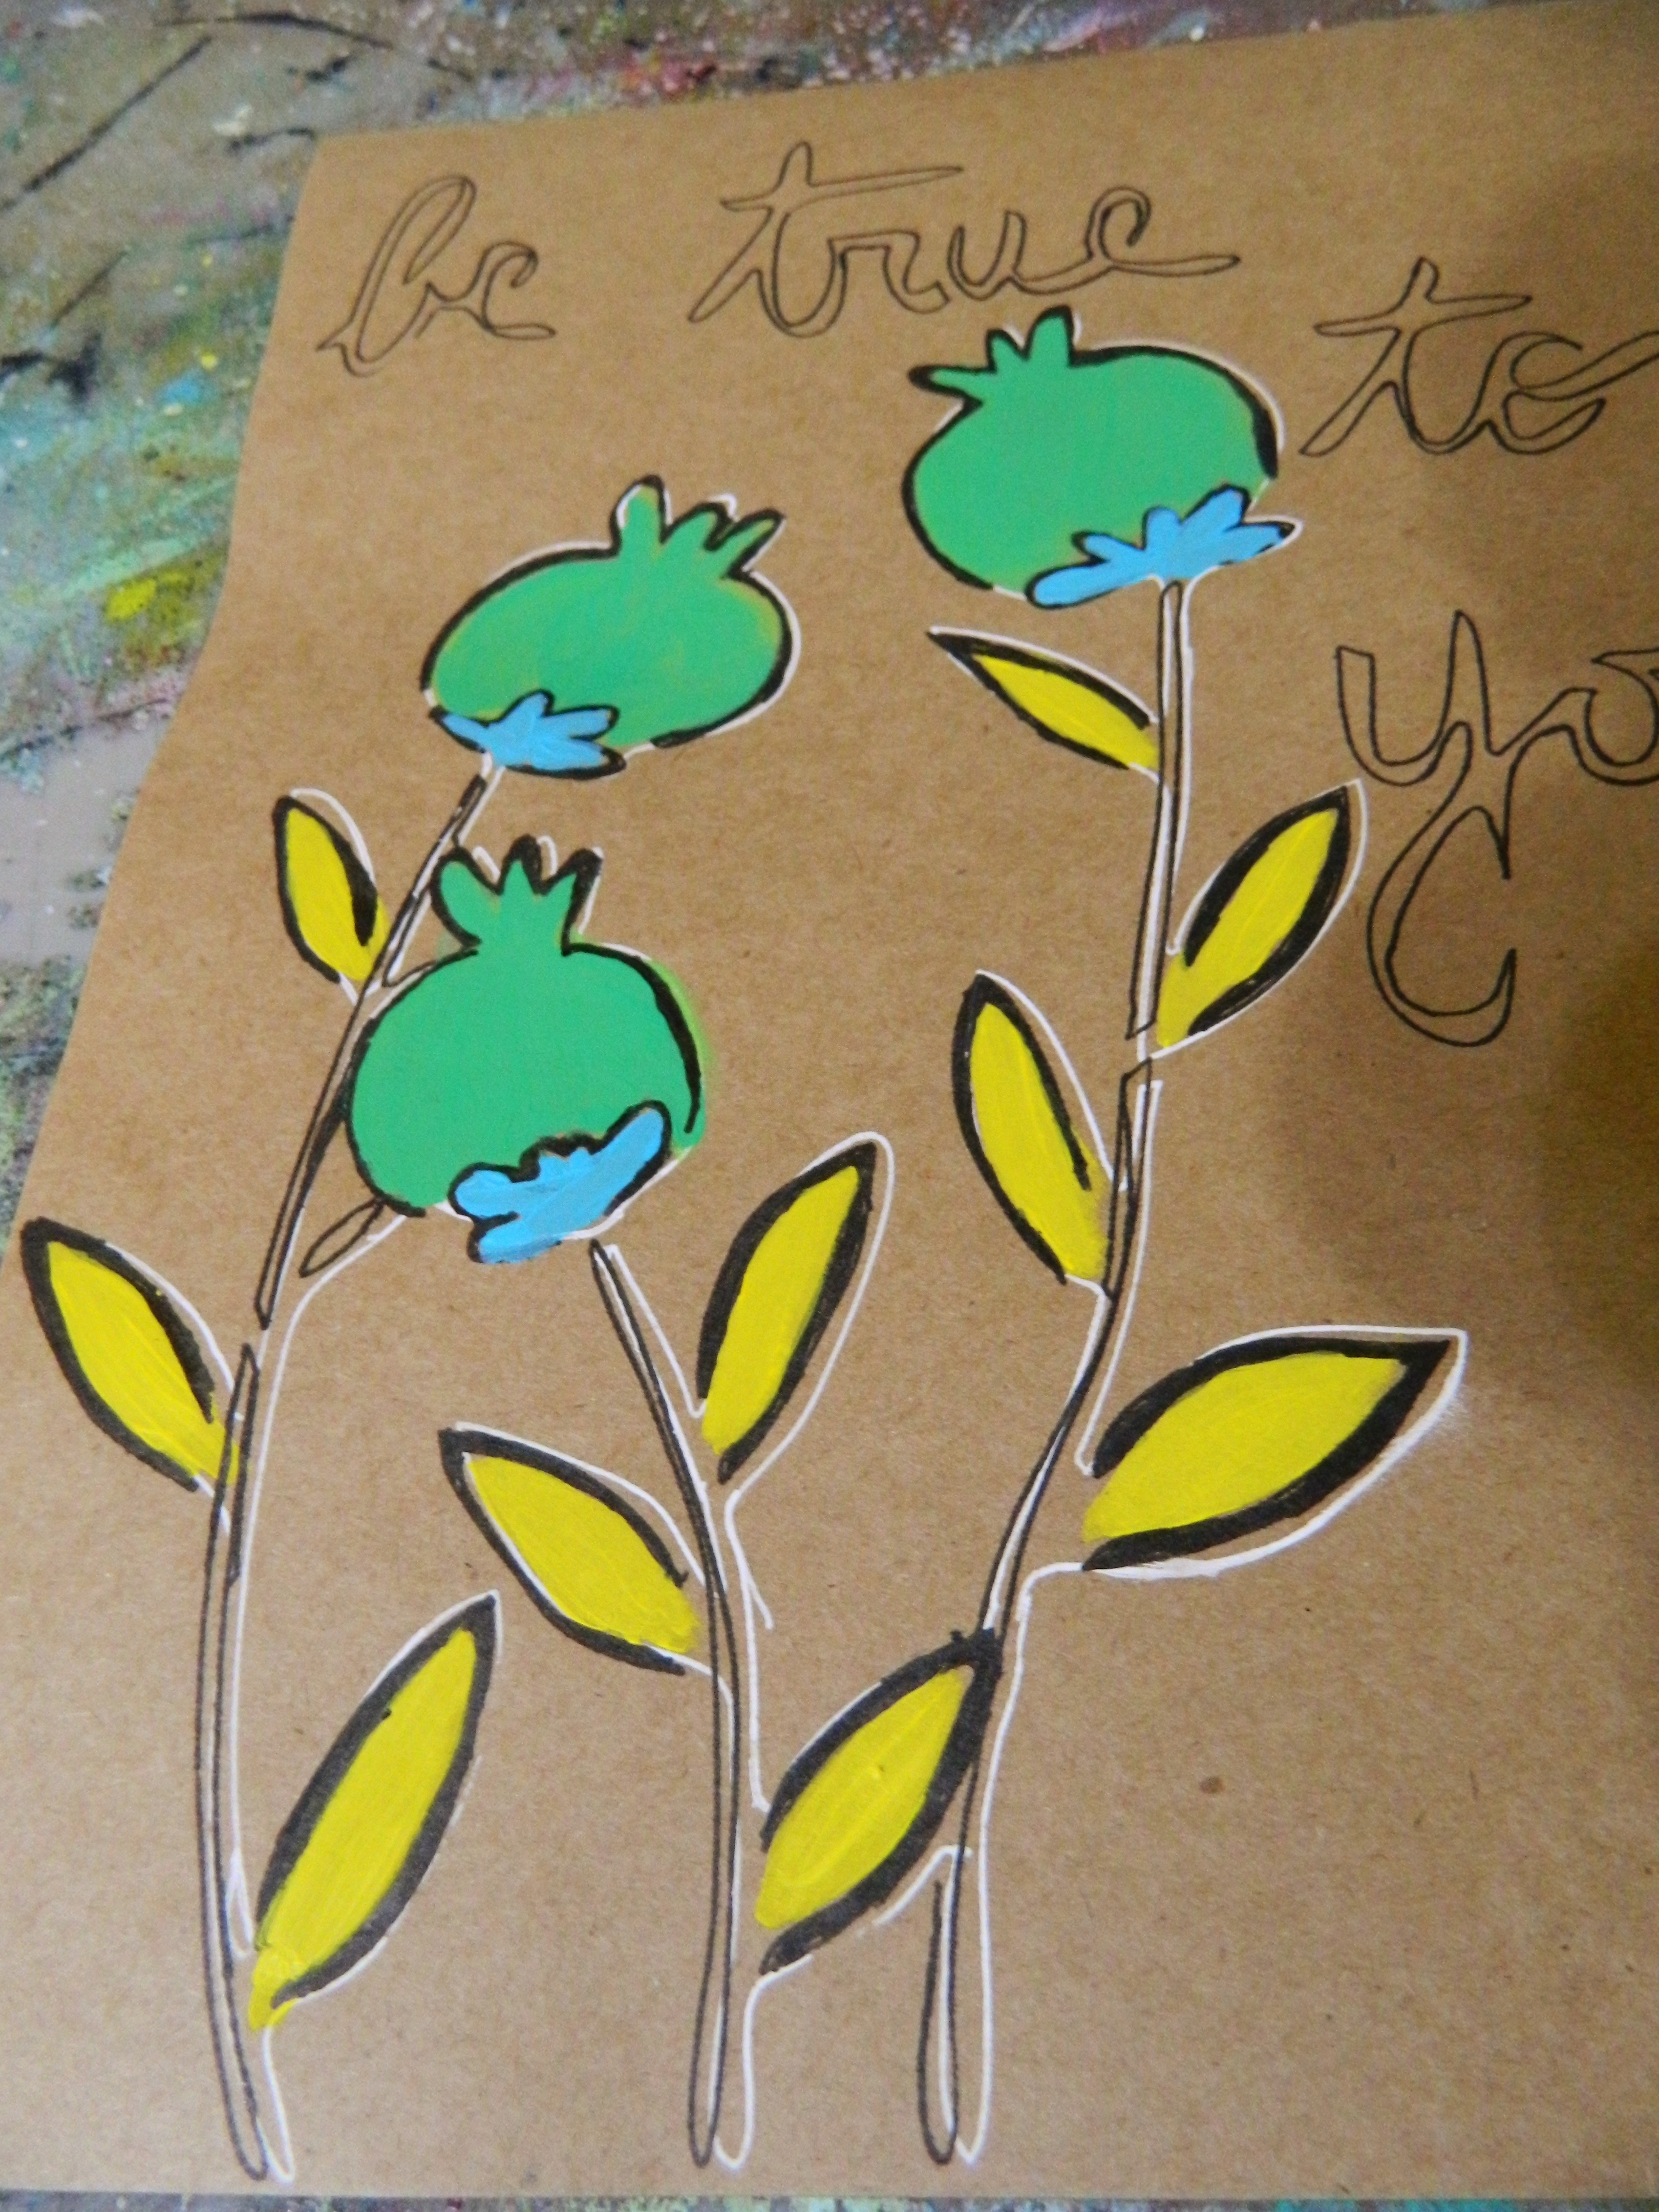
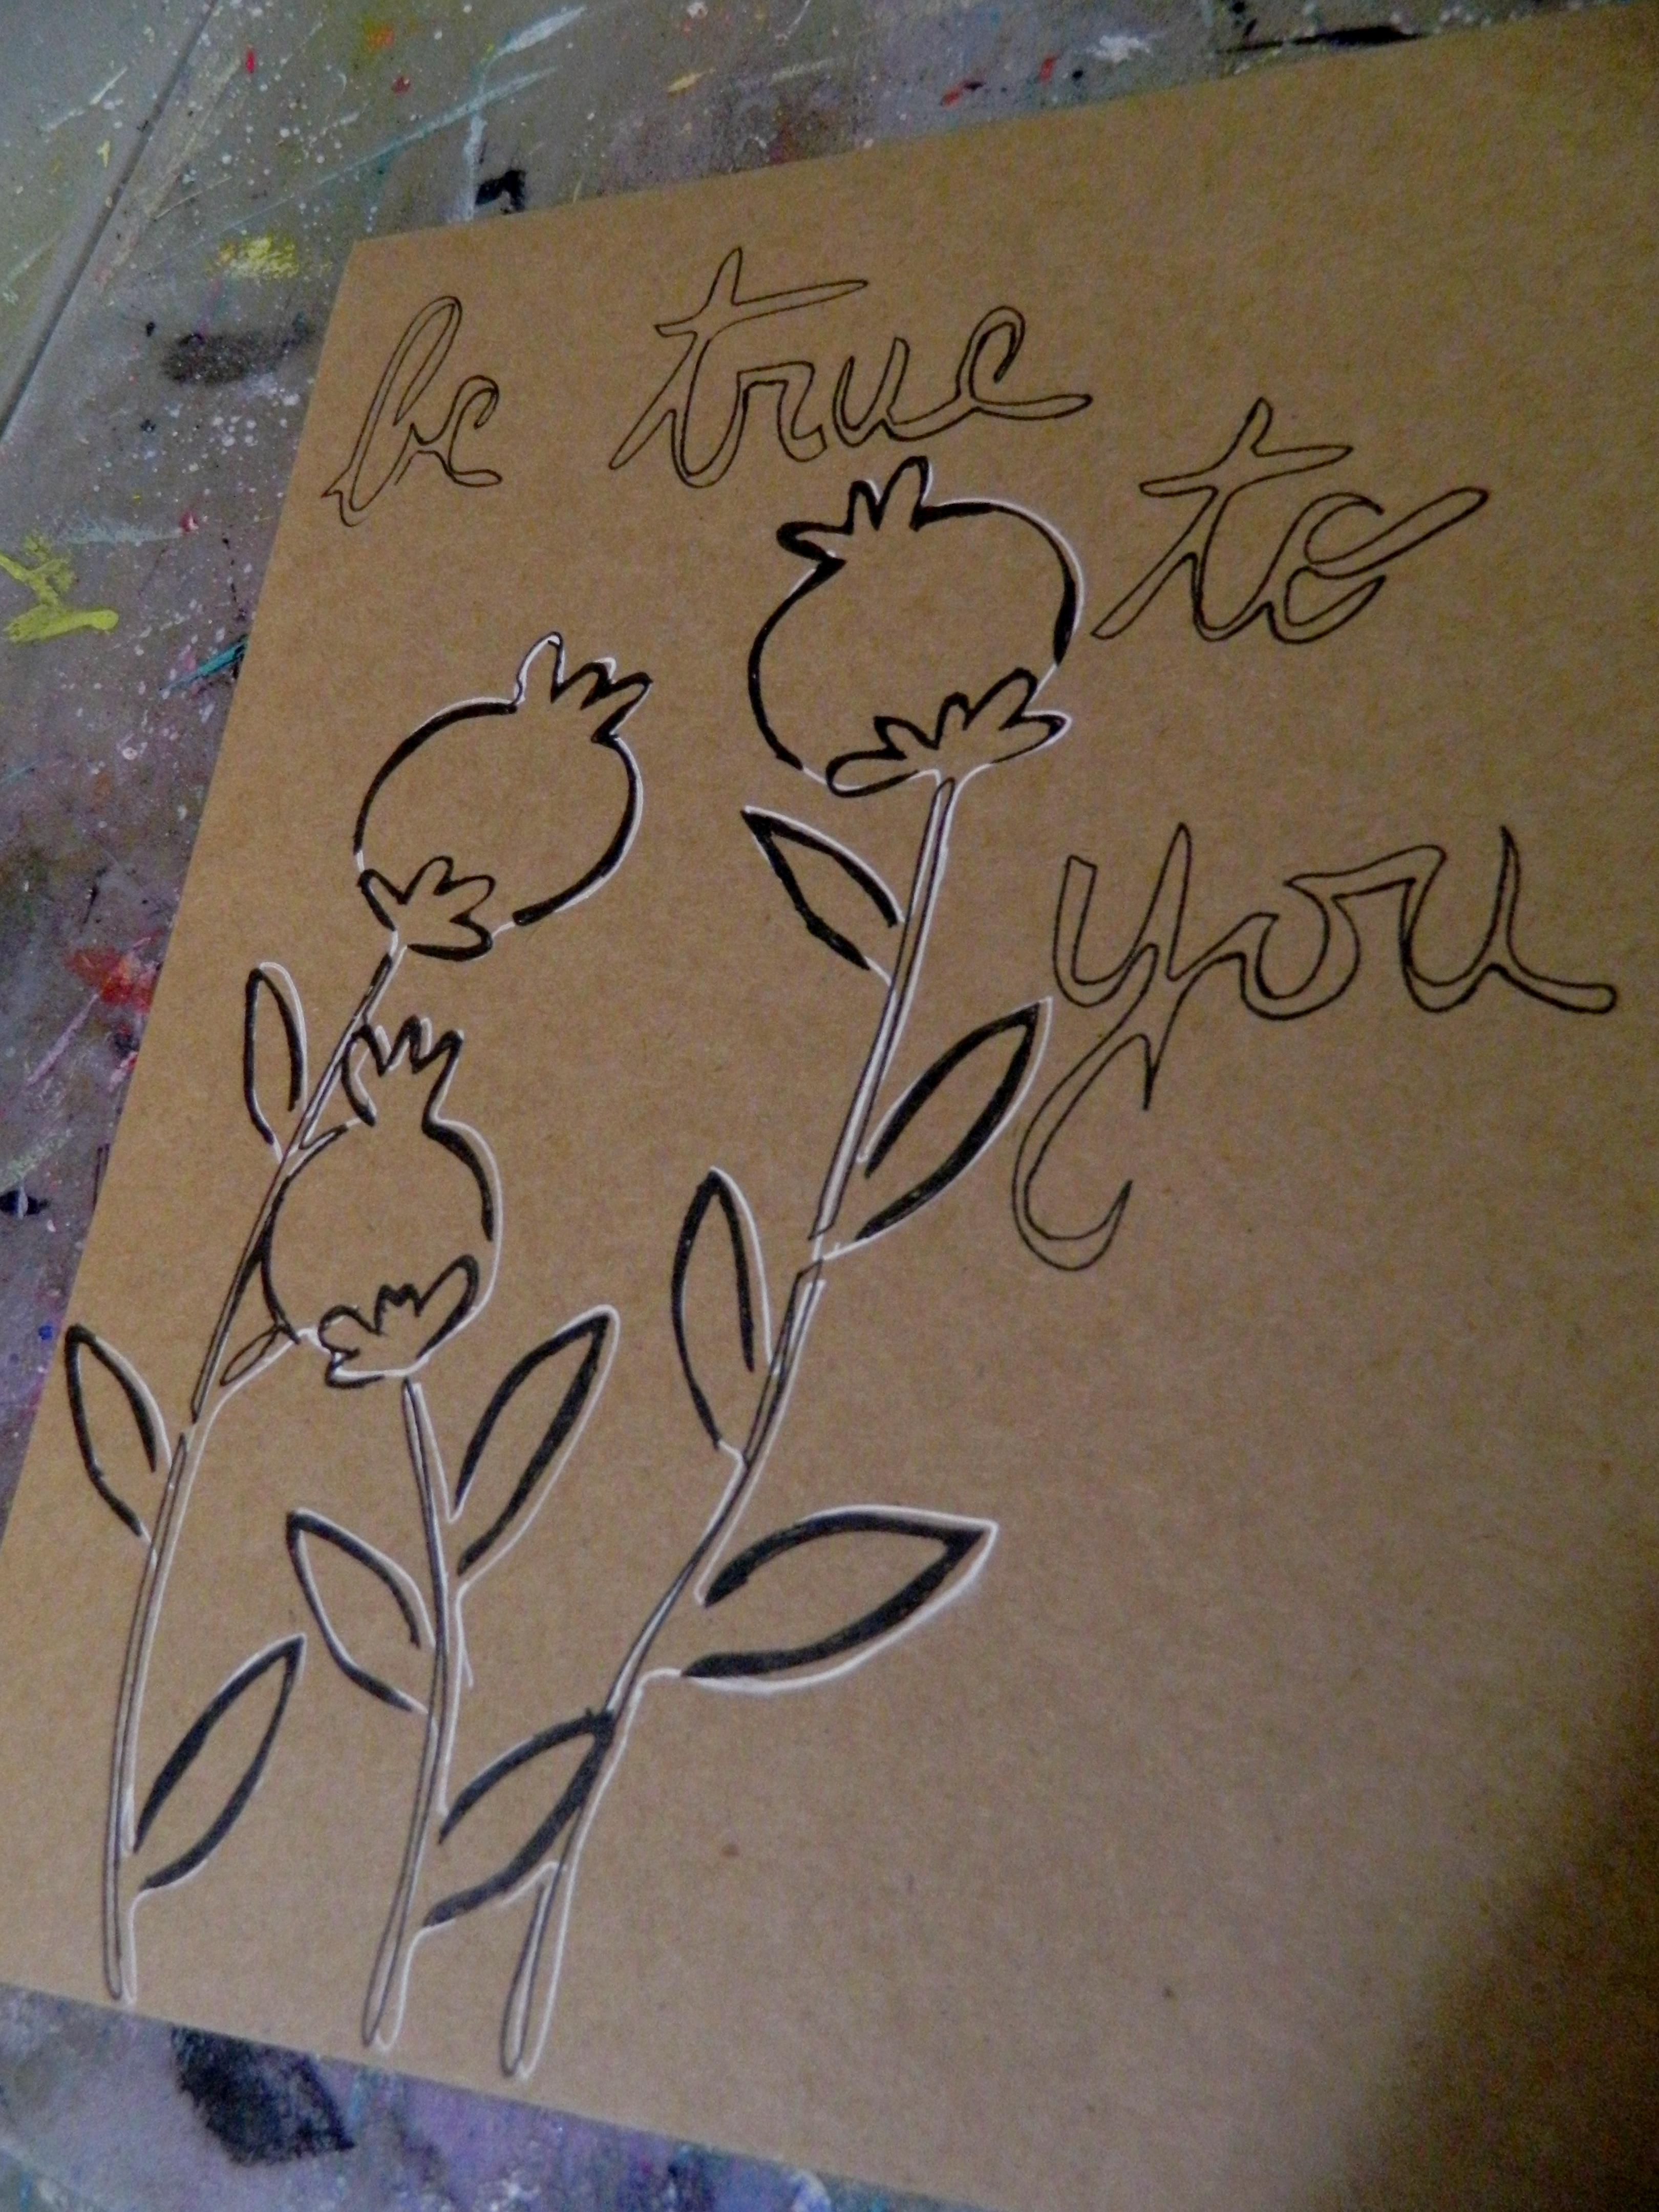
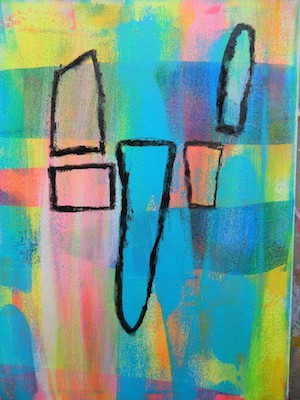
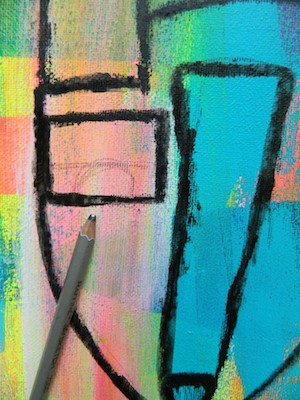
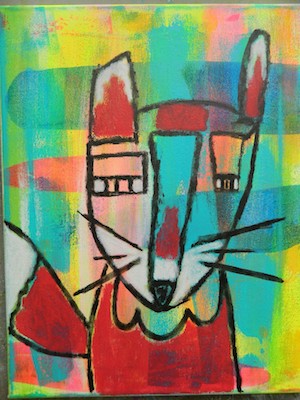
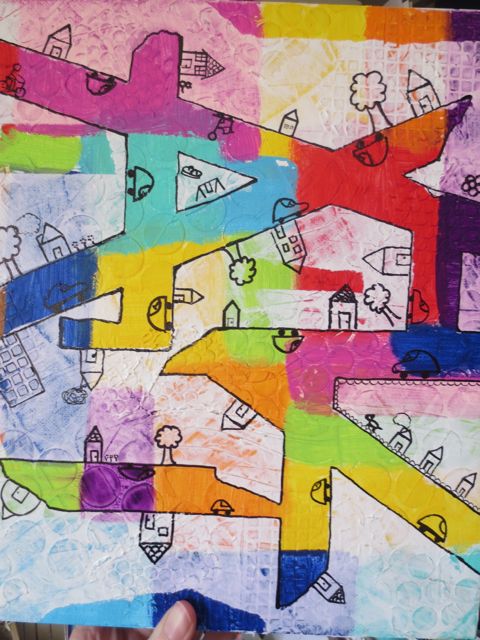
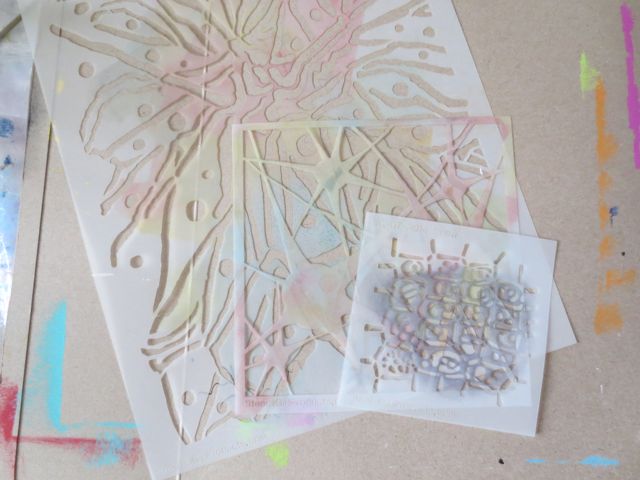
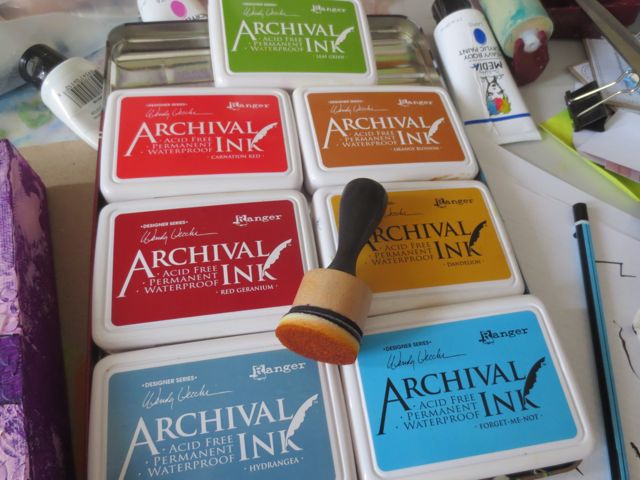
This stencil has two pieces to it. The outer edge of the poppy pod that creates the general shape and the inner piece of the pod that adds the detail. It’s so versatile. You can use one or the other or both. I layered this piece again with the inner stencil part using a Pitt Pen in bold black. I painted this with acrylic paint and added the words that also come with this stencil.  I used layers with mostly a dry brush because I found that too much wetting of the paper can cause buckling. So I used clear gesso as a sealer/primer on pieces after this one.

Creating artwork on Kraft paper{alternative description

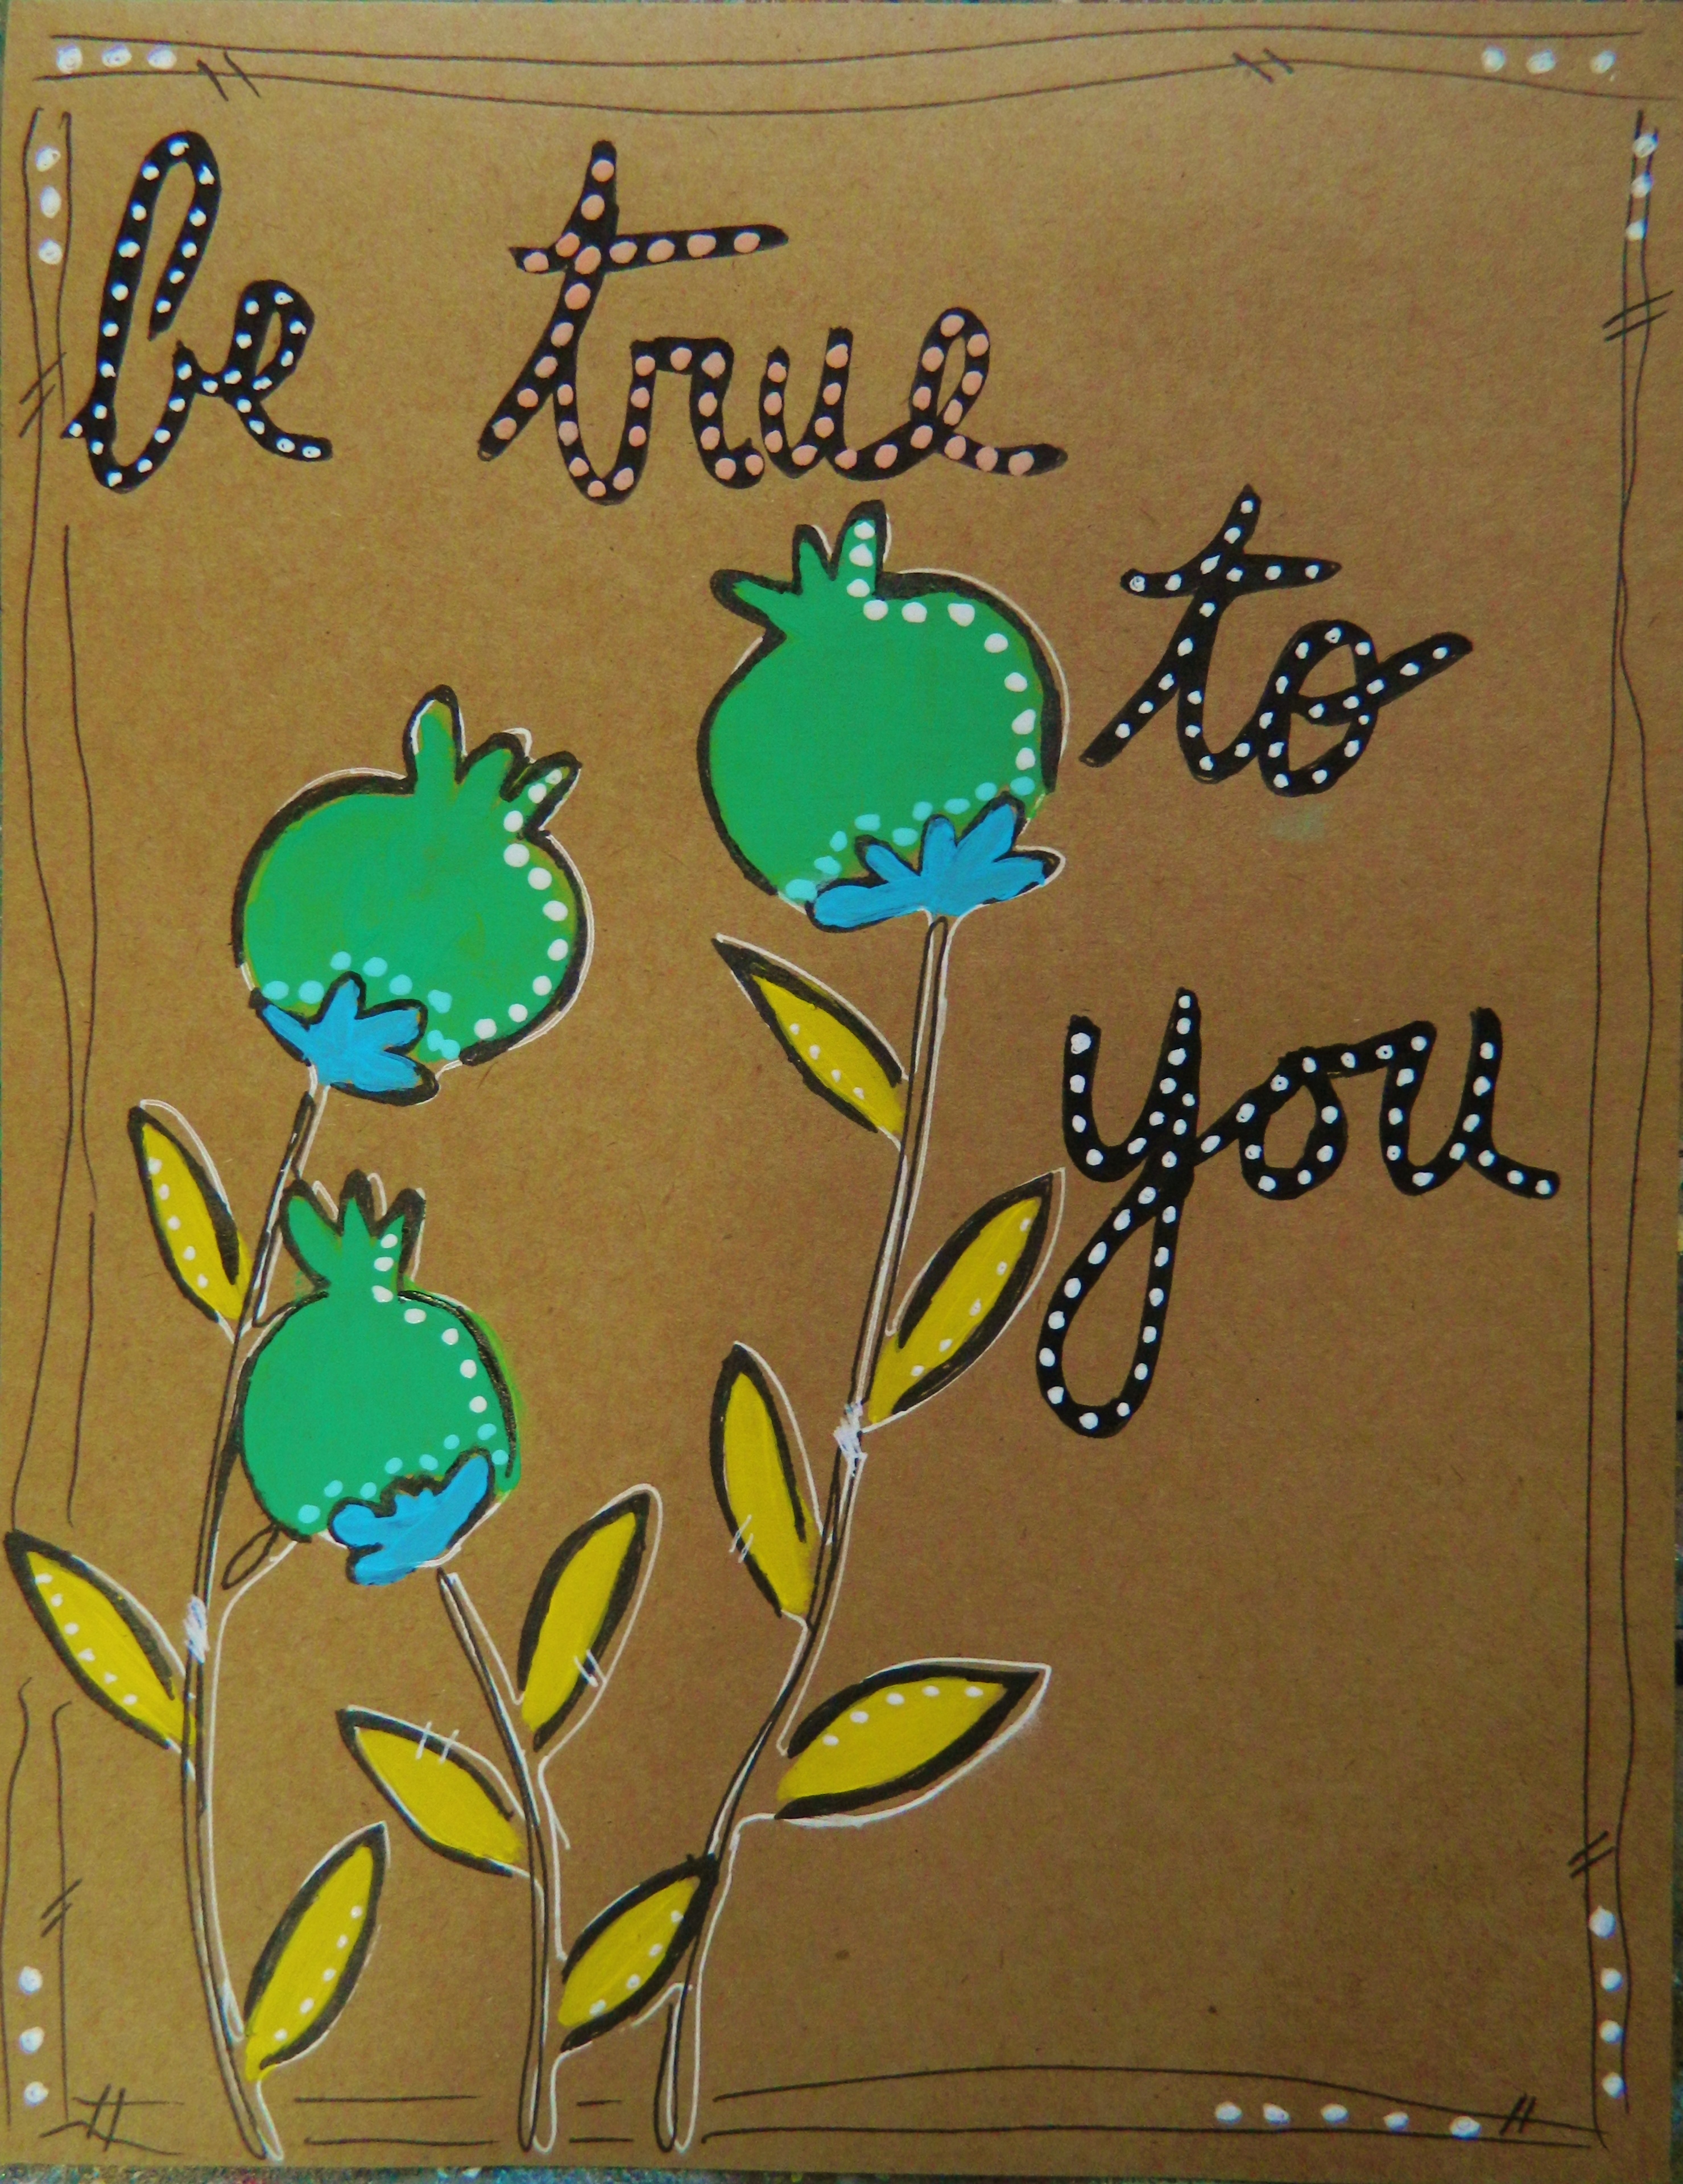
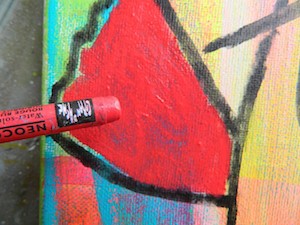
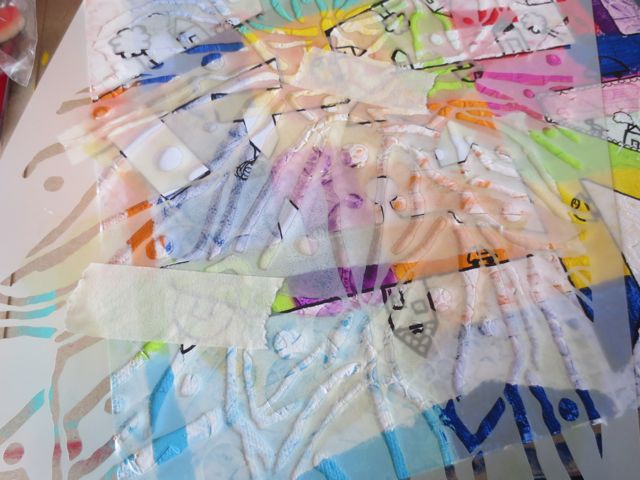
I used the puffy gel pens over this in small dots and circles and sharpened the edges with the Pitt marker.

Creating artwork on Kraft paper{alternative description

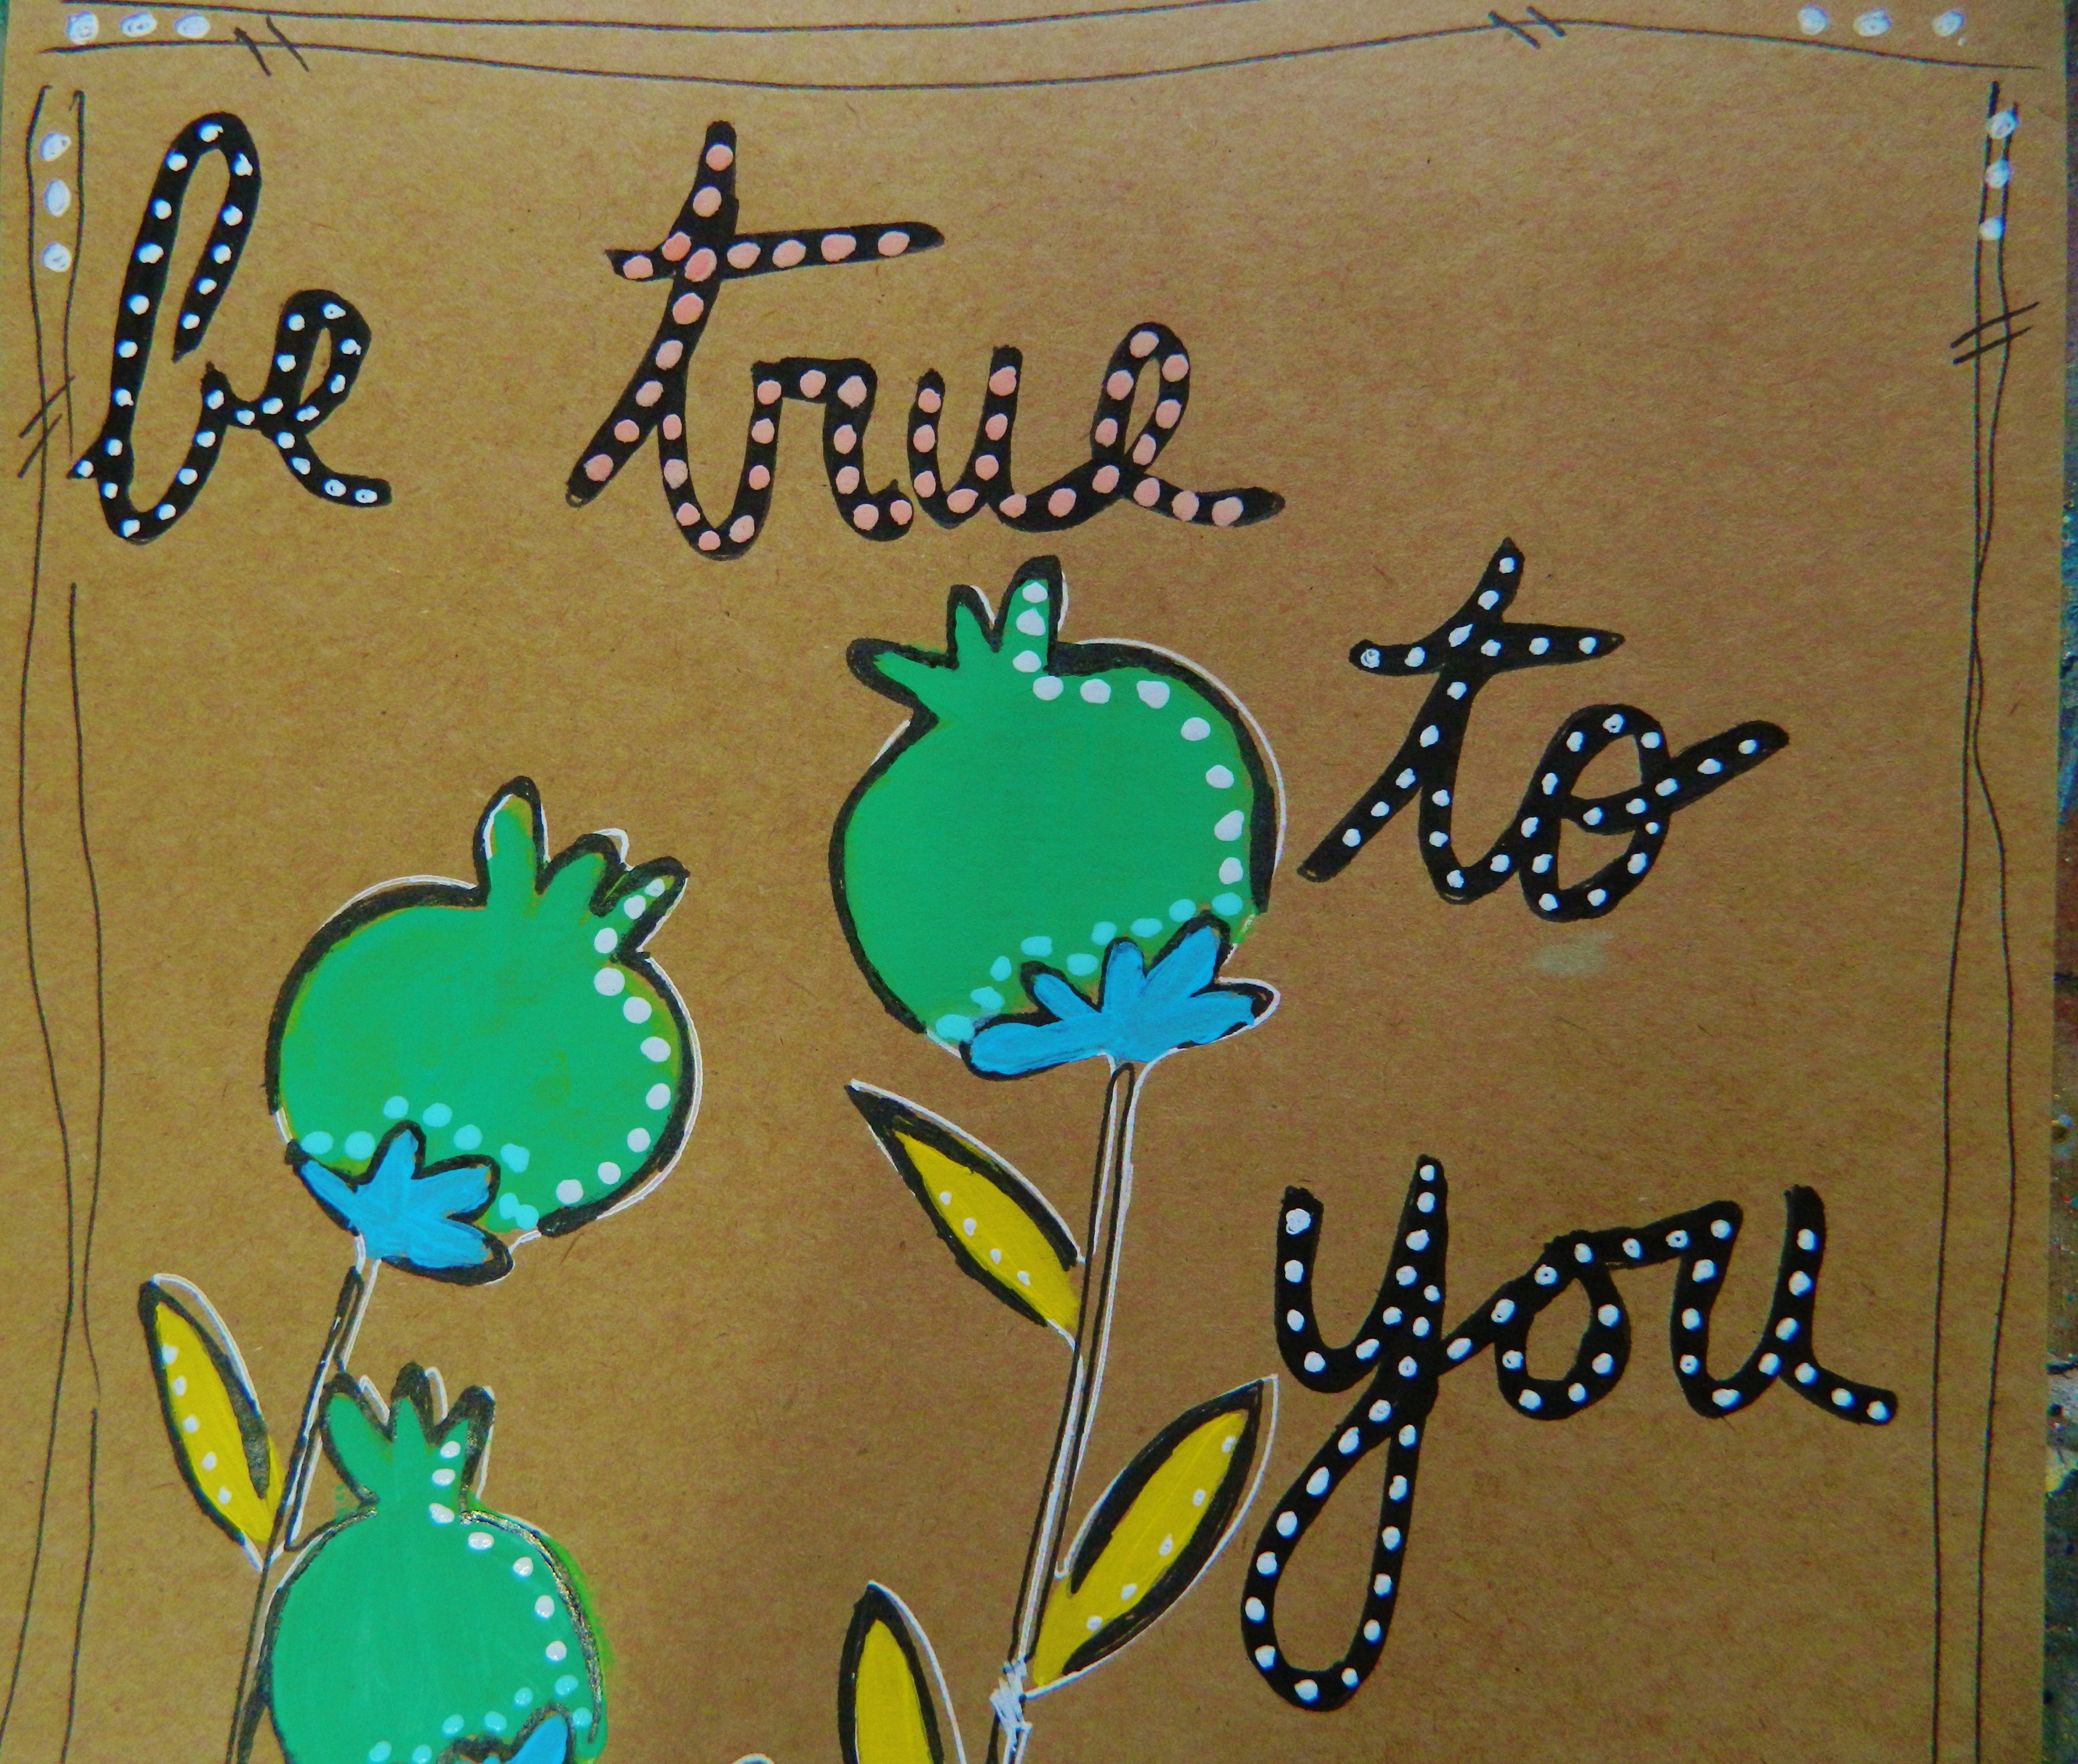
I found this to be a delightful and easy little project. So many of us have busy days filled with work ,family and unexpected issues, that we don’t often have time to create large master piece s. This is just one of many things you can create as a journal page or as one piece.

~*~*~*~*~*~*~*~*~*~*~*~*~*~*~*~*~*~*~*~*~*~*~*~*~

Author bio: Artist Melanie Statnick is a Published Artist/Writer out of North Carolina who writes and creates art daily from her private studio. Melanie is also the host of her own program via video and local PBS named The Brush & Pen  a NCC production. Statnick’s artwork can be found in art galleries extensively in NC with international private collections.

~*~*~*~*~*~*~*~*~*~*~*~*~*~*~*~*~*~*~*~*~*~*~*~*~

.

.

Intuitive painting

~ * ~

This article is written by Melanie Statnick

Intuitive painting is painting by how you feel. The process is free style and uses your creative instincts to guide you through your painting with minimal instructions. The intuitive approach to painting allows for what I call happy mistakes. There is room for error that you can turn into a whimsy painting with effortless ease.  The step by Step instruction will help you with the bulk of the workshop, but there are times when you have to go with your gut.  In this workshop you will build layers of paint using different tools to create different shapes in your background. Using the shapes in the layered paint you’ll begin to see a whimsy Character. I’ll teach you how to bring it out and then layer and paint again, to create a fun, whimsy one of kind piece of art.

Mixed Media inspired fox painting

Start with a light paint colors first and apply a generous amount of paint directly to your 11x 14 canvas. Using your flat brush create bottom to top motion to spread the paint to your vertical surface. Use the same motion when you apply your other lighter colored paints like yellow, and pink. Rinse brush between colors and dry using your heat tool between layers. After you have applied at least three different colors of paint to your canvas turn your canvas horizontal. Apply a pea size amount of Teal directly to your canvas. Using your Brayer roller, roll over the paint in a side to side motion. The paint will spread in an uneven and grungy look. This will create a different shape than your flat brush.

Melanie and her Mixed Media inspired fox painting

Keep your canvas in the horizontal position. Apply neon blue directly onto the canvas, using the large edge of the squeegee pull the paint in a bottom to top of canvas motion. Repeat this step with the dark yellow. Don’t forget to dry in between layers.

Melanie and her Mixed Media inspired fox painting

Melanie and her Mixed Media inspired fox painting

Your canvas should look something like this. You have created a painted layered background. Place canvas in vertical posing and using your flat brush and some of your lighter paint colors apply them to the spots on your canvas that are unpainted. Dry.

The next step is finding your character by intuitively looking for the shapes your paint strokes created. Wet your water soluble graphite pencil in 8B (very dark) and find your first shape by outlining it with the wet pencil. Take your time here to relax and become familiar with your piece. The shapes will start to pop out at you. Here I have found a nose.

Melanie and her Mixed Media inspired fox painting

Melanie and her Mixed Media inspired fox painting

I have found a nose, eyes and ears. I do not see the shape of the head or body yet. This may or may not appear to you. If this does not appear to you, you’ll have to free hand draw the head and body shape. This sounds intimidating but it’s not. If you feel more comfortable use a 2HB pencil to lightly free hand. Draw in the head and or body shape. There is no need to erase these lines the graphite pencil when wet will go over this line. I will draw in a tail, whiskers, and collar on my character. These are details that you should add in while you’re creating your head and body shape should you not already see them.  This step allows for creative freedom in owning your piece.  Be sure to dry the lines and shapes before the next step. This graphite will run and move around should you re wet it on your surface. Beware of this is the next step.

Melanie and her Mixed Media inspired fox painting

Melanie and her Mixed Media inspired fox painting

Melanie and her Mixed Media inspired fox painting

The character we have created will most likely not have traditional coloring should you be creating an animal. The next step is to paint in some of the areas using your Caran d’ache water soluble pastels.  This step is also intuitive as you go along. Here I have chosen to fill in the tail, body and ears. I have painted in only parts of the nose and face.  Wet the tip of the pastel like you did with the graphite pencil, and apply pastel directly to canvas in desired shapes.  If you are unfamiliar of what the color will look like once wet, use a scrap paper to test before you apply to areas of your canvas. Most are true to color.

Melanie and her Mixed Media inspired fox painting

Once you have completed your animal/character the next step is to bring the painting together. Using a choice stencil we will randomly place the design around the canvas. Apply white paint using a makeup wedge or stencil brush. Pour a pea size amount of paint onto your palette. Place the stencil in the desired area of your canvas background, carefully avoiding your character. Use your hand to hold stencil still while you apply the paint over the stencil. Repeat this step using other desired stencils until you reach the look you like. This is another creative and intuitive process.

Melanie and her Mixed Media inspired fox painting

Melanie and her Mixed Media inspired fox painting

Your piece should look similar in process like the picture shown above. Now we’ll apply the cling mount/rubber stamps to the piece. This is similar in process to the way we did the stenciling. The canvas has a natural bow in the center. When you place your stamp inked in the desired spot you will need to place your free hand under the canvas were you about to stamp for support. This will ensure a more full images of the complete stamp. I prefer a more lose grunge look of a half stamp or just using the corner of your stamp. If this is our preference also, then proceed stamping around your character/animal.

Melanie and her Mixed Media inspired fox painting

This is your final piece. I encourage painting the sides of your canvas. This makes the appearance on the wall more pleasant. The black paint is suggested.

~*~*~*~*~*~*~*~*~*~*~*~*~*~*~*~*~*~*~*~*~*~*~*~*~

Published Writer/Artist Melanie Statnick was raised in Ontario Canada. For over 12 years Melanie has called eastern North Carolina her home. Melanie continues as a self-taught artist and teacher of visual arts and an article writer for Mixed Media Art co Melanie’s work can be found extensively throughout North Carolina with private collections abroad.

Melanie’s successes include written publication of articles in Interactive Artists Magazine, Publication in Somerset Studio magazine, Altered Arts magazine, and 2013 edition of Wilson Woman Summer issue.  Melanie’s awards are 1st place in viewer’s choice in Washington NC and 2nd place magazine cover choice with Altered Arts magazine. In 2015 you can find her work in Dawn DeVries Sokol book “A World of Artists Journal Pages”.

You can follow Statnick on her website at: www.melaniestatnickart.com

~*~*~*~*~*~*~*~*~*~*~*~*~*~*~*~*~*~*~*~*~*~*~*~*~ [center]
.

.

“Share the Moments of Joy” through Mixed Media Painting

~ * ~

This article is written by Marilyn Harris Mills

Creating mixed media feeds my soul. When I need to immerse myself into creativity and inspiration, I reach out to my supplies that are beckoning me to discover fresh ideas of using them.

I’m a Golden lover!  I use the Golden line of products exclusively, whether it be their fluid, open or heavy bodied acrylics or their abundant choice of mediums.  There is nothing better than to leave my studio gummed up with molding paste and dried paint!

See Marilyn’s video on her mixed media painting process

This project I’ve created for you is about using various supplies to create a small work of art.  As artists, we tend to overload on our addiction for art supplies.  Consequently we don’t always take the time to co-mingle the supplies working them in tandem with each other to create something that they lead us to discover.  In this project I’ve reached for and used fluid acrylics, molding paste, a rubber stamp, twinkling H2O’s, washi tape, dye ink sprays and pads, and embellishments such as  flowers, buttons & wooden butterflies.  What didn’t I use?!!  These products are my favourites…ones I reach for time and again.  Using embellishments I’ve collected over the years, it is fun to combine them into an art piece.


I create based on my intuition….my inner voice tells me the journey to take while I reach for my supplies during the process. I have no pre-conceived notions of where I will end up.  I choose the colours of my paints & the mediums first….then the supplies that will add the meaning to the project; in this project I chose a rubber stamp ….next I simply reach for “do-dads” as I call them (embellishments)  to enhance the project. The final step is to bring harmony to the project.  In this particular piece, I used an old toothbrush to splatter white paint over everything….creating harmony and cohesiveness in the project is an important step I believe and one that is often overlooked.

Each project is as they say “a labour of love”…..but it’s not labour, it’s simply my inner muse, my soul coming out to play….the process is the love part.  An opportunity to express with art what I cannot say with words. With this project, I’m sharing with you the moments of joy this creation offered to me.

~*~*~*~*~*~*~*~*~*~*~*~*~*~*~*~*~*~*~*~*~*~*~*~*~

A bit about Marilyn Harris Mills:

I’m passionate, creative and eccentric, at least that’s what my girlfriends tell me! I’m a professional published artist, designer and teacher living in Ottawa Canada.  I journey through life with my dogs Lucy and Mozart. Practicing yoga, journaling, meditating and walks in the forest nourish and excite me. I did try knitting once but gave that up…couldn’t remember to count the stitches. In my free time, I practice Zentangles and Mandalas. I also love creating mixed media art – it feeds my soul.  I volunteer, teaching art to teenage girls at a treatment centre.  It is the most rewarding endeavour of my life. One of my favourite quotes is “I work in whatever medium likes me at the moment!” (Marc Chagall)

~*~*~*~*~*~*~*~*~*~*~*~*~*~*~*~*~*~*~*~*~*~*~*~*~

.

.

Dina Wakely Paints – Michelle Style!

~ * ~

This article is written by Michelle G. Brown

I had so much fun reviewing the Dina Wakely Paints and you can read the article here: Painting with Dina Wakely Paints

mixed media artist Michelle G. Brown

Now here is the detailed tutorial for painting with these paints, Michelle style.

Painting Michelle Style

Materials and tools

10” x 12” canvas

Dina Wakely Paints

Gesso

Impasto Medium

Sequence Scrap

Masking tape

Stencil Girl Stencils

Scrap paper

Removable Adhesive

Black Markers i.e. Golden Black pen Montana Marker with Golden Fluid Acrylic

Archival Inks – Wendy Vechi Range

Mini ink blending tool

Mixed Media Painting Process

1. Gather up your blank canvas or art journal

mixed media paints by Ranger

2. Prime with Gesso and leave to dry

mixed media paints by Ranger

3. Add texture with Impasto medium and Sequence Scrap

mixed media paints by Ranger

4. Leave overnight to dry

mixed media paints by Ranger

5. Add colour with the acrylic paints. I took a fancy to painting squares and rectangles

mixed media paints by Ranger

mixed media paints by Ranger

Continue to build up colours

mixed media paints by Ranger

mixed media paints by Ranger

Leave to fully dry

6. Use the Masking tape to add masked lines to the painted canvas. Here I added angles and torn ends and edges to add interest

mixed media paints by Ranger

7. Add a layer of Gesso,applied with an old credit card

mixed media paints by Ranger

8. While gesso is still wet, carefully remove the masking tape. Take care with this step; it can get a bit messy!

mixed media paints by Ranger

9. Using your range of black markers, outline “roads” and add other features.

mixed media paints by Ranger

Take care with your “good” markers; the gesso seems to ruin some of them! My favourite (xxx0 was the best but I also needed a thinner line.

Also, if you want to do lots of doodling, I’d suggest (next time) to use less impasto medium! While I loved the effect, I was annoyed with the bumpy surface while trying to draw straight lines!

10. Now to fill in the areas between the roads. Each sea was masked sperately, using masking tape and scrap paper with removable adhesive to help hold them in place.

(Again, next time, I may use bigger or less doodles; there was LOTS of masking here!!)

mixed media paints by Ranger

11. Gather your stencils – here I used the August Stencil Club stencils

mixed media paints by Ranger

12. Then I stencilled with the Archival inks, using two shades to add more depth. I tried to use similar colours to those of the painted background, underneath the gesso.

mixed media paints by Ranger

13. Put the stencil in place and add a little masking tape to hold it.

mixed media paints by Ranger

14. Add ink

mixed media paints by Ranger

15. Remove Stencil

mixed media paints by Ranger

16. Remove the masks and admire your work.

mixed media paints by Ranger

17. Repeat steps 10 to 16 for each area you have. For this size of canvas, I found three different stencil designs was a good number to ensure consistency of pattern but not having too much repetition or the same pattern “touching”.

18. Add a few finishing touches and admire your work. I feel this one still needs some words, but the right ones haven’t come to me yet!

mixed media artist Michelle G. Brown

And a few close ups

mixed media artist Michelle G. Brown

mixed media artist Michelle G. Brown

I hope you have enjoyed following along as much as I enjoyed created this piece!

You are welcome to leave a comment below, especially if you’ve made it to the end!!

Happy creating!

~*~*~*~*~*~*~*~*~*~*~*~*~*~*~*~*~*~*~*~*~*~*~*~*~

Michelle G. Brown is passionate about mixed media art and enjoys sharing her knowledge and techniques with you to allow you to express your own creativity. Michelle understands that many of us have an inner need to create. By learning a few basic techniques the amazing world of mixed media art is accessible to everyone!

Michelle lives with her husband and two boys in Melbourne, Australia.

~*~*~*~*~*~*~*~*~*~*~*~*~*~*~*~*~*~*~*~*~*~*~*~*~

Disclosure: These paints were bought with our own money.  All opinions are that of the MixedMediaArt team. Some links on this page may be affiliate links and any purchases help to support the ongoing work by MixedMediaArt.
.

.