Focal Points in Mixed Media Art

~*~

This article was written by Madeline Faiella

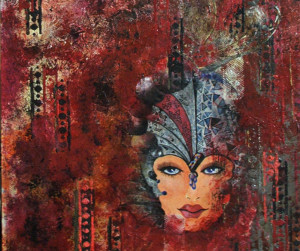
Emergence

We talked about telling a story with mixed media art and now let’s talk about adding texture.

Emergence

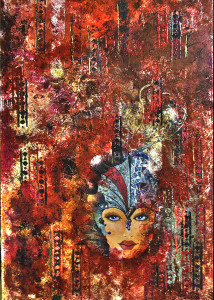
I chose this piece to explain the process because it’s easy to see what I did.  This piece is 3 feet tall and 2 feet wide but try it on a smaller surface if you like.  The surface I used is actually a court room board that an attorney let me have to which I added a base of white paint and gesso.  It’s great when you can re-use something.

The face in this piece is done on paper, painted with acrylic and attached to the base with gesso.  I applied gesso and molding paste in layers across the base surface and around the face in light, graduated layers using a wooden stick.  It’s vital that the edges of the face “live” within the background so lighter layers are better.  Sometimes I add color to the gesso and/or molding paste but in this case I started with clear and let it dry thoroughly.  When applying many layers, drying is very important.  This piece took a while to complete because the humidity here in South Florida can make it very difficult for drying even with the air conditioner on.  Leave your piece to dry overnight between layering to ensure that it’s very dry.

Layer after layer I created my piece with careful planning yet enough spontaneity to keep it free.  I used a trowel and molding paste colored to my desired color and ran it over stencils, burlap and other means of textural items.  Keeping the colors in mind, step back from your work each time you add another layer or item.  Build layer by layer.  The bags that hold oranges make a great textural tool.  Be creative and see what’s around your studio.

Try new things, keep it layered and have fun.  Happy arting.

~*~*~*~*~*~*~*~*~*~*~*~*~*~*~*~*~*~*~*~*~*~*~*~*~

Madeline Faiella is the owner of Madeline Faiella Designs, LLC.  She is a “tradigital” artist.  She works traditionally and digitally in Photoshop and Adobe Illustrator.  Her work is featured on home décor, electronic devices, stationary, fabric and more.  Her arsenal of tools is broad and her work varied.  She is licensed, published, appeared on TV and radio and has written continuing columns for the art and creative community.  She has a line of non-toxic acrylic paint “Art Jacket” with Earth Safe Finishes.  Her art education hails from The School of Visual Arts in Manhattan and the many years she absorbed cultural enlightenment globe-trotting during a 23 year singing career.  She’s been drawing, sewing and making since she was a child. See more of her work at www.madelinefaiella.com

~*~*~*~*~*~*~*~*~*~*~*~*~*~*~*~*~*~*~*~*~*~*~*~*~

.

.
What if Scrapbooking is dead? Other uses for Tools and Supplies

~ * ~

This article is written by  Ann Strecko Koeman

While I attended the last Craft and Hobby Association Conference and Trade Show in Anaheim, California in the United States, I often heard the following phrase:  “Scrapbooking is dead.”  Now, I also heard several people bemoan that statement and even express complete denial, while others nodded in agreement and expressed their own agreement.

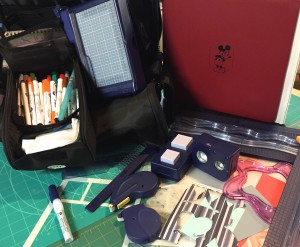
Crop bag with Scrapbooking tools and supplies now used as Mixed Media tool kit

Although I do believe that the commercial and retail aspects of selling scrapbooking supplies has reached its peak and is quickly declining as so many fads do, I don’t believe it will completely disappear.  After all the concept of collecting and cataloguing memories in paper form has been around since the invention of paper, it also continues to be essential to our existence and to the history of our future generations.  Although the accumulation and collection of memories is done differently these days and appears to be the wave of the future.  We take a lot more digital images now and record a lot more of our experiences, we just do it differently.

So what are we to do with all of those tools and supplies we have invested in over the decades?  I say, keep them and use them.  If however you have chosen to completely give up on anything handmade then please send your unwanted tools to another loving home.  But if you are reading this, I gather that you still have a love for the handmade process.  Mixed Media artists now is the time to take advantage of all those clearance sales and cast offs of unwanted scrapbooking tools.  Just because a tool or supply is marketed to be sold in one market does not mean it cannot be used in another.  Over the years I have collected a variety of skills and thus a vast collection of tools including an overpriced collection of intended for scrapbooking tools.  I am keeping my best tools for my Mixed Media work.  As a Mixed media artist any supply is game and any tool is game.  I will use my straight edge 12 inch trimmers, my punches, and even my page layout guides in my art.  I still need to cut things, make shapes, and those plastic page layout guides, well they make great stencils!

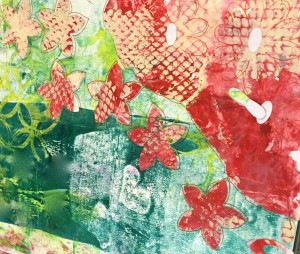
Mixed Media Art background made with the help of Scrapbook doodles templates and punches

As for all those 12 x 12 papers I have collected, they are great in mixed media making, especially in making my own books.   so are those stickers they make great masks.  All those embellishments are just that, embellishments.  I am also hanging on to my old scrapbooking supplies and tools because I am way behind in my memory album keeping.  For example I have yet to finish my now 18 year old son’s baby album!  In the mean time I am having fun collecting more of my neighbours unwanted  out of date scrapbook papers, and buying out lots of discontinued embossing folders at low prices.  Scrapbooking may be a dying fad but Mixed media art making is very much alive.

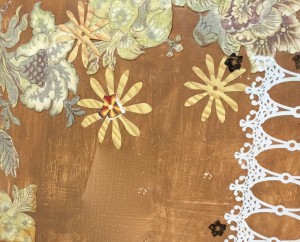
Art journal page with layer of scrapbook paper fussy cut images and die cuts

~*~*~*~*~*~*~*~*~*~*~*~*~*~*~*~*~*~*~*~*~*~*~*~*~

Ann loves to collect and organize as many tools and supplies as possible because she is always making things.  Incredibly she finds a use for most of her collections.  She enjoys making Mixed Media Art because it allows her to use all her skills and collections.

~*~*~*~*~*~*~*~*~*~*~*~*~*~*~*~*~*~*~*~*~*~*~*~*~

.

.
Story Telling through Mixed Media

~*~

This article was written by Madeline Faiella

Hero’s Return

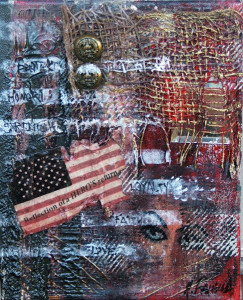
Mixed Media Art is a great way to tell a story with your art.  It can be a color theme that is beautifully put together or similar objects that tell their tale.  Mixed Media Art is a great venue for storytelling and I have a piece that I was inspired to do that tells a story.  It is called “A Hero’s Return”.

textured artwork using the irresistible Neon Pico Embellisher.

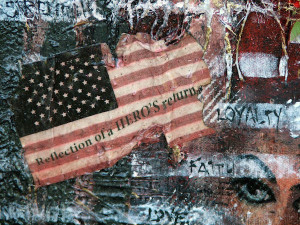
In this piece you a bit of mystery and strength in that the eyes are in the background and one can only imaging the many people who have lived and still live behind those eyes waiting and wondering about their loved ones.

There is layered texture and the color theme is strong.  The American Flag is paper that was put in water to age so it hassome life.  The soldier’s buttonsare “stand-out” elements that gives some call to your attention.  The burlap placed over the mirror allows you to see yourself and it causes you to think.  It is the reflection of yourself in the work.  The burlap adds that element of roughness and also stands to keep that reflection of you less clear; again, causing your mind and “eyes” to move (think) and look around the piece.  Keep the viewer’s attention. The color red is a great theme for a strong piece.

When creating your Mixed Media Art, ask yourself what is the story you want to tell.  It can be deep and intense or playful, fun and whimsical – or simply a work in colors.  No matter what story you are telling remember 3 things: 1) have a story to tell; 2) be sure your color theme is a good one; and 3) have fun while creating!!!

~*~*~*~*~*~*~*~*~*~*~*~*~*~*~*~*~*~*~*~*~*~*~*~*~

Author bio:Madeline Faiella is the owner of Madeline Faiella Designs, LLC.  She is a “tradigital” artist.  She works traditionally and digitally in Photoshop and Adobe Illustrator.  She is licensed and her work is featured on home décor, electronic devices, stationary, fabric and more.  Her arsenal of tools is large and broad and work is varied.  She is licensed, published, appeared on TV and radio and has written continuing columns for newsletters.  She also has a line of non-toxic acrylic paint “Art Jacket”   Her art education hails from The School of Visual Arts in Manhattan and the many years she absorbed global cultures during a 23 year singing career.  She’s been drawing, sewing and making since she was a child. Madeline sometimes exhibits at local galleries and she sells directly to a group of collectors of her fine art and jewelry. See more her work at www.madelinefaiella.com

~*~*~*~*~*~*~*~*~*~*~*~*~*~*~*~*~*~*~*~*~*~*~*~*~

.

.
Glorious Glue

~ * ~

This article is written by Ann Strecko Koeman

Glue, glorious glue!  Where would we mixed media artists be without this essential medium ? Personally,  it is of great importance to me. Ever since I was allowed to use paste from a young age I have learned to love and hate the gooey sticky stuff. As a child I used that yellowy syrup sticky liquid, looking like clear honey or diluted maple syrup, but  it did not smell yummy. It came in a little clear bottle with a red rubber nipple top that one had to either create a slit into unless the brand you bought came pre slit.

That stuff was messy and wet, but it worked for my construction paper crafting. With my mom I was allowed to use contact cement glue to paste clippings into our scrapbook.  After all it was the ’70’s! We did not know or care about acid free and archival quality.  We were lucky if our parents actually  bought real glue instead of having to always make due with a homemade paste version.

Over the decades I have learned different types of arts and crafts that all use a variety of adhesives. Some smellier than others, and some more convenient than others. I also learned that glues could be used as more than an adhesive when it comes to art making.  In this article I will share with you a few of my unusual glue uses that involve hot glues, moulds, and plain old white school glue.

Making embellishments

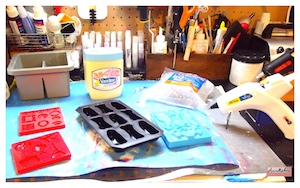
Recently I purposely started playing around with my hot glue gun. I had noticed that whenever hot glue drips ,drizzles and is left to dry on a hard non porous surface such as tile or a silicon mat,it  tends to lift off easily when it is completely cool. So I started playing with making some stars out of glue on my work table. I liked what I saw, and proceeded to do a little research on the internet.

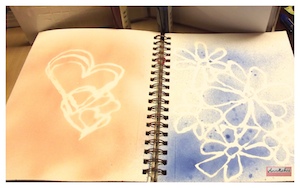
Well, other people had the same idea and they took it a little further and they were making stencils, stamps, and embellishments.  So, armed with my twenty year old little low temp glue gun I started to make some patterns with the glue, let it dry and cool completely and I had made some very funky stencils. These are so much fun to make, easy and inexpensive. I had never had any creative use for my glue gun,  it was just a tool, a means to get things to stick together, but now a whole new world had opened up.

Making embellishments

I have since purchased a better quality glue gun that has a precision tip, is dual temperature and can be used without its long electric cord for short periods of time. I started playing with different types and colours of glue sticks. I even invested in some specially made hot glue/resin making moulds.

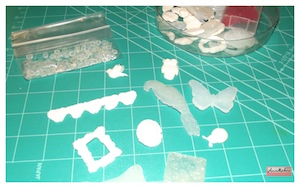
There are even glue like sticks that contain resin that can be melted in your glue gun and shot into these moulds to make super cute embellishments. These embellishments can then be altered with inks, paints, and mica powders to get any colour or look you desire.  It is an economical way to make a large collection of embellishments that can be used in a multitude of projects.

Making stencils and stamps

I  also tried playing with regular white school glue and made a few discoveries. For one, white glue is a wonderful medium to use to obtain a crackled paint effect on just about any surface.  You just need to paint a coat of paint (Acrylic) let it dry slightly, coat that with glue, let that become tacky, and give it another coat of paint. Drying times will vary between glues and paints, so some experimenting is required. However, the effects are so interesting.

Another thing I have learned to do with white glue, cardboard, and aluminum foil is make faux metal embellishments. By drawing a design onto a piece of cardboard with glue, letting the glue dry, then covering the glue design with aluminum foil. Finally, I use inks to colour the foil to make it look like aged metal. The possibilities  are endless.

I am really pleased  with my experiments and  I am happy to share these ideas. Who knew something so plain as glue could be used co creatively? I hope that you get to play and make some discoveries of your own. A few words of caution though:  always work with glues in a properly ventilated area, and don’t stick your fingers together! Please, don’t ask how I know.

~*~*~*~*~*~*~*~*~*~*~*~*~*~*~*~*~*~*~*~*~*~*~*~*

Ann is a Mixed Media Artist, Designer, Instructor, and writer working and living in the country side of Canada’s capital. Where she often finds herself in “sticky “ situations and wishes she had invested in glue stock!

~*~*~*~*~*~*~*~*~*~*~*~*~*~*~*~*~*~*~*~*~*~*~*~*

.

.