Packing Tape Postcard

~ * ~

This article was written by Martice Smith II

Create an image transfer from packing tape to design a custom postcard

Learn a quick and simple way to create image transfers made from packing tape. Layer bold graphics and found imagery, combined with stylized handwriting, to create a dynamic piece of correspondence. In the end, you’ll have a stunning postcard- worthy of being framed!

Gather supplies of your choice

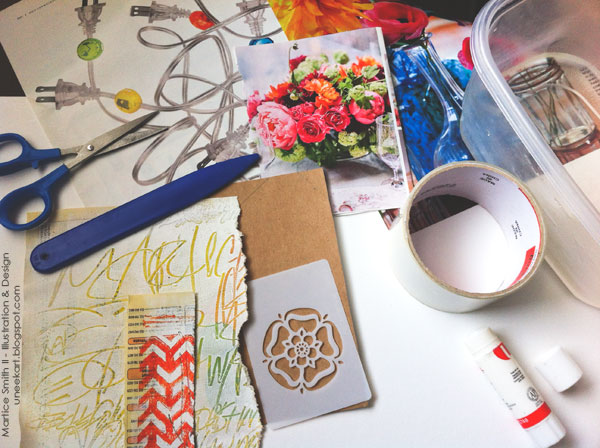
Gather supplies of your choice.

You’ll also need:

  • a bowl of water
  • bone folder
  • scissors
  • magazine pages and paper ephemera (Grab up some of your favorite, textured papers, too!)
  • 4×6 inch cardstock paper (elements will be layered onto this)

How to Make a Packing Tape Postcard

Prepare the image transfer

Cut strips of packing tape, slightly larger than the size of your image.

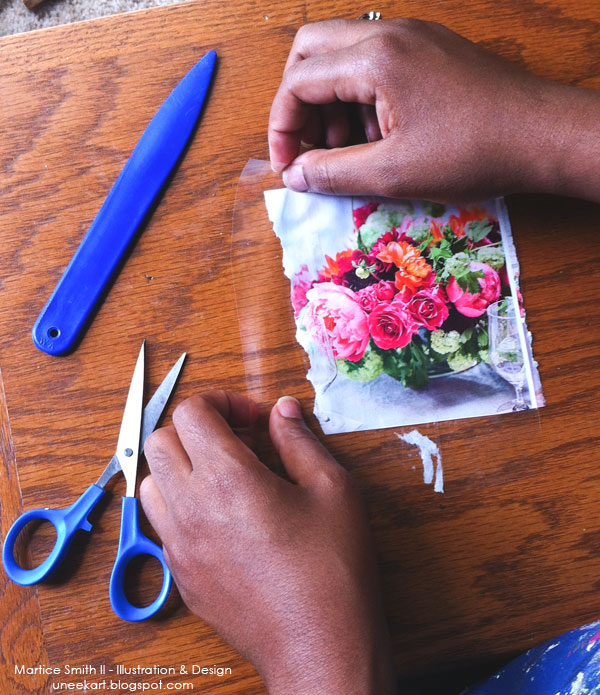
1. Cut strips of packing tape to the size of your image.

Carefully, lay the tape across the magazine image, starting at one end and slowly working your way across. Use manageable strips of tape for this step.

TIP: Images (photos or text) with white or light-colored backgrounds will show up transparent in the final tape transfer. This is a great way to add interesting dimension by layering multiple graphics, text, or paper.

Burnish with a bone folder.

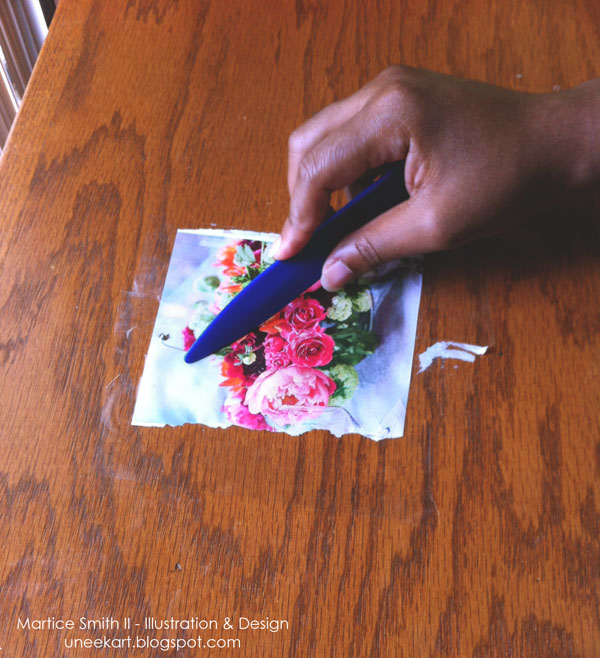
2. Burnish with a bone folder.

From the center out, use the bone folder to remove any bubbles or creases. You do not need to apply heavy pressure when burnishing. Simply rub the tool across one way and repeat going another direction.

TIP: Lay the tape down on a clean plastic, wooden, or any non-porous surface to prevent tape from picking up fibers and dust particles.

(If there are bubbles left unburnished, they will appear as a clear spot on the image.) You may or may not want this effect- sometimes it can leave an interesting, distressed effect to your transfer. You might like it after all!

Trim around your image and place into bowl of water.

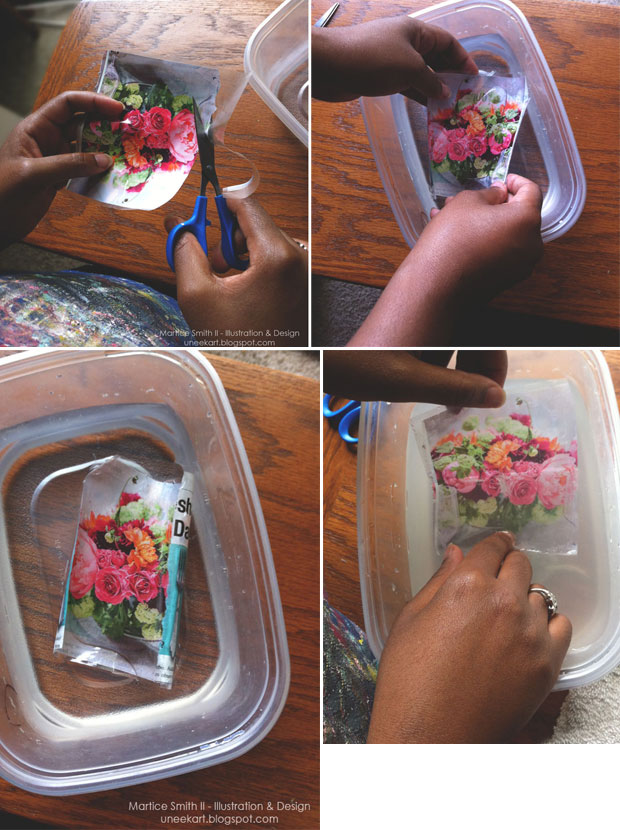
3. Trim around your image and place into bowl of water.

4. Rub away the paper backing with your thumbs.

The paper will start to roll up. This indicates that you can start rubbing the paper off.

TIP: For a clean, crisp image, make sure you do not scratch the surface of the tape while rubbing off the paper. If you want an old, worn-out look, gently scratch the tape’s surface with your fingernail. If you want wrinkles, take the entire piece and ball it up, in your hand; unfold and smooth out.

If you’re heavy-handed like me, you will appreciate this technique because this it allows you to rub quite vigorously without tearing the tape.

Remove the paper and let dry

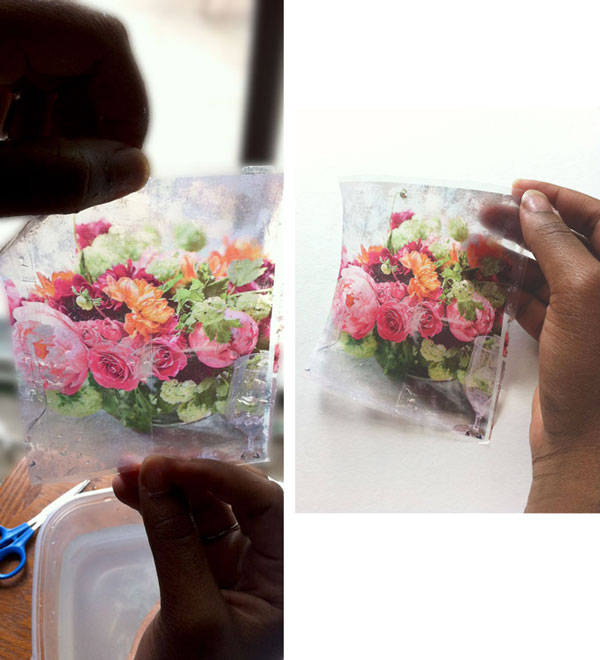
5. Remove the paper and let dry on non-porous surface. 

As the tape dries, it will become sticky again. After the tape dries, paper fibers may reappear. If so, re-moisten the paper and gently, rub them off.

These pictures show how a tape transfer looks when held near a window. Take a close look at the expressive textures! Next, I show how the transfer looks when placed on top of a white background. (Did you notice how some details from the magazine image reappears when placed on a white background?)

6. Discard paper fibers from bowl.

Flush paper pulp down the toilet- not the sink!

Of course, you can also save this paper pulp to create your own handmade paper.

Now we are ready to create our Package Tape Postcard!

Create a Package Tape Postcard

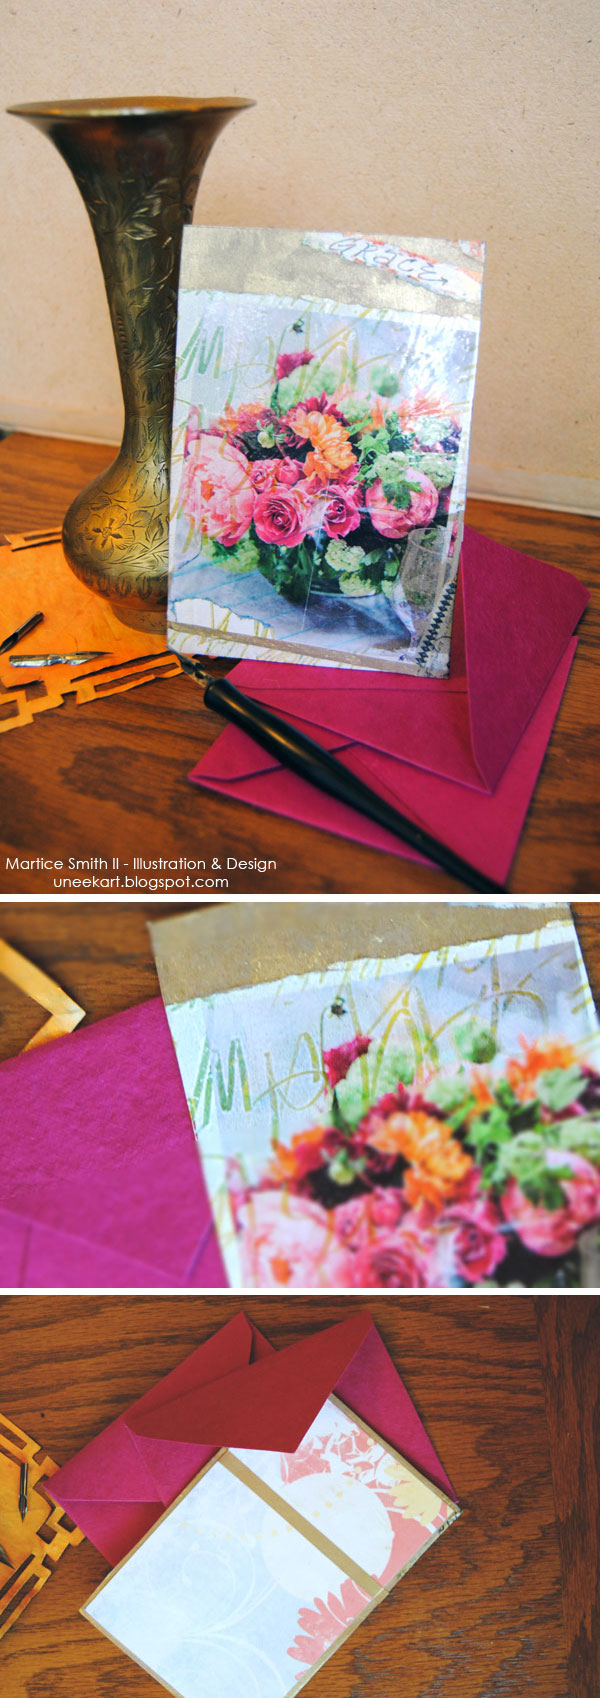
Here is the approach I took to create this postcard:

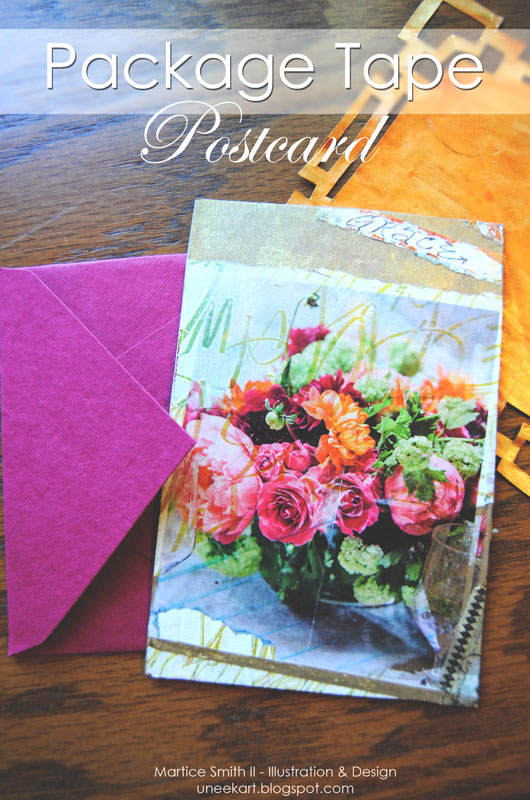
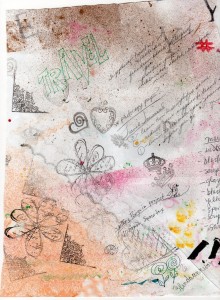
This postcard looks elegant and modern but with a slight, urban twist. I gathered some of my paper scraps from previous projects to combine with my image transfer.

To reinforce the look of the ‘handmade’, I decided to tear the paper with my hands. This creates the deckled edges.

Pushing this idea forward, I also decided to add a twist by incorporating my stylized handwriting. (I simply used the end of a paintbrush to scratch into wet, acrylic paint, on paper that had a layer of paint already on it.) Look closely to see the subtle shift in colors!

Continue adding collage elements but keep in mind that ‘less is more’. You don’t want to create an overwhelming design on your postcard. Layering is key; build up layers to add drama.

TIP: If your packing tape isn’t sticking, use a glue stick, decoupage medium, or add more tape on top to keep it in place.

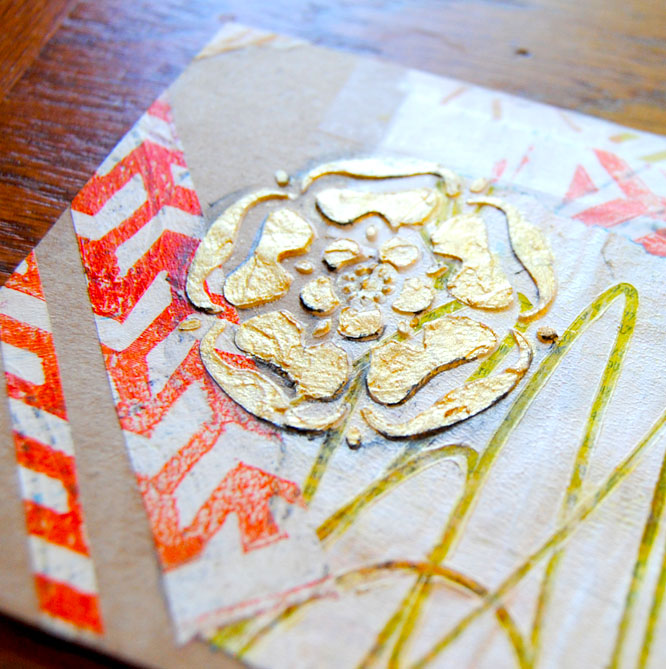
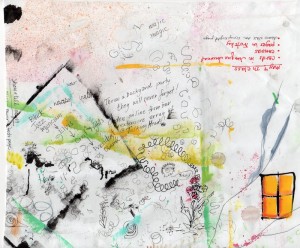
Think about overall composition. My focal image is the bouquet of flowers. Everything else was secondary, or in other words, complementary to that image.

The image transfer (of the flowers) was placed on top of the stylized, handwriting layer. For exciting pops of color, I used fluorescent orange paint!

Next, a small piece of diamond patterned washi tape was added.

Finally, gold leaf was painted on to create a more elegant look.

For the reverse side, I cut out and glued some scrapbook papers onto the brown kraft paper, leaving a 1/4 inch border on all sides.

As you can see, I repeated the diagonal lines from the front side to create a divider for the text and address areas.

Create a Package Tape Postcard; variation

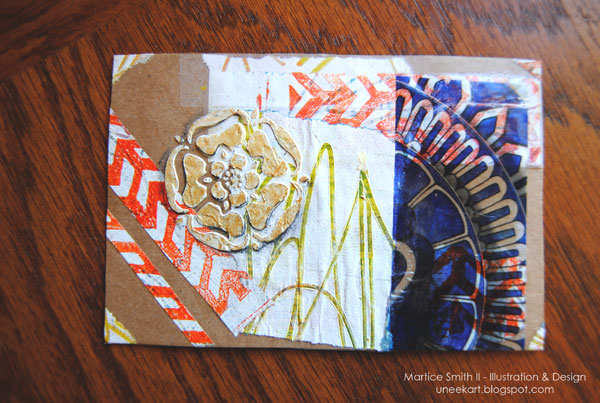
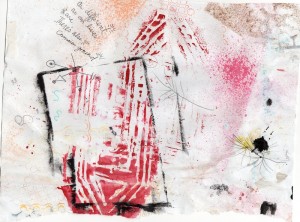
Here’s another postcard I created with this same image transfer technique.

I chose to go with a bold and, somewhat, abstract look. I found a beautiful image of decorative chinaware in a home decor magazine. The geometric patterns combined with organic shapes are interesting and has great sense of energy.

Create a Package Tape Postcard

This packing tape postcard features:

  • my hand-carved, chevron stamp
  • Modeling paste
  • “Grace” stencil from Artistcellar’s new Pocket Stencils, “Mini Virtues” set

Spray or brush on a varnish to seal and protect the surface. Write your message on the back, apply a postage stamp and pop it in the mail!

~*~*~*~*~*~*~*~*~*~*~*~*~*~*~*~*~*~*~*~*~*~*~*~*~

Mixed-media illustrator and designer Martice Smith II

Martice Smith II is creative director of Martice Smith II – Illustration & Design Studio, based in Kansas City, Missouri and owner of Uneek Art Boutique. She established herself as a freelance Illustrator and graphic designer after receiving her Bachelor of Arts Degree. Her stunning illustrations reveals her love for fashion, typography and wildlife- using a combination of analog and digital techniques.

Martice also contributes as an article writer for the Creating Mixed Media Art website.

You can see more of her work via her Facebook page or her blog. She invites you to join her monthly newsletter, Uneek Art Letter, for art biz tips, advice and free digital goodies!

~*~*~*~*~*~*~*~*~*~*~*~*~*~*~*~*~*~*~*~*~*~*~*~*~

.

.

Stencilling onto a Mixed Media Canvas

Michelle Brown is back in the Mixed Media Art Studio for the New Year and is having fun painting and stencilling mixed media canvases.

Ready to stencil with sequin scrap

Now that the base layers are complete, it’s time to add some stenciling and other interesting features. Michelle runs through her thinking process for adding this layer, covering colors, placement of stenciling and the key to getting it right!

~ * ~

Resources:

  • Paints – Dylusions and Dina Wakely
  • Paint Brushes – Dina Wakely
  • Sequence scrap – medium circles, small circles and squares
  • Stencil – designed by Rebekah Meier, The Crafters Workshop TCW495S
  • Canvas – 10″x 16″ Xpress Graphx

stencilling with acrylic paints~ * ~

We’d love to hear from you – please leave a comment and tell us how YOU like to add stencilling to your mixed media canvases and other art work. What works for you? What are your biggest challenges? What are some of the mistakes you take care to avoid?

Happy creating,
Michelle


Mixed Media Art Backgrounds

This article is written by Linda Giese

For the past year I’ve been putting papers over my plastic covered workspace. It began when I found a roll of thermofax for a dollar at a thrift store.  I put it on my workspace and soon it filled up with random stamps, paint splatters, doodles and notes.  I tore off another sheet and saved the first for collage fodder. I progressed to large sheets of newsprint that came as packing material in boxes.  A friend even gave me old architectural plans she was going to throw away.

Backgrounds

This is an easy way of making original collage papers to make your art unlike anyone else, and it won’t even take extra time!  Now I glory in messing up my surface papers with ideas and oversprays.  Since I teach at my dining room table, there are class notes and ideas for what my students want to learn next.  I test out new stamps and “stamp off” ones I’m using.  There are scribbles trying to get a pen to write or see what color it is.  Sometimes there is even a random fruit label!

Backgrounds

I’m not likely to run out of clean papers to mess up, but thought of an idea if I did.  I’d take sheets of junk mail with clean backs and tape them together.  Or as I’ve done, use sheets of scrapbook paper I don’t like that perhaps came in a stack of paper.  If you take a class, perhaps you can mess up newspapers under your work there too!  Good luck and happy splatters!

Backgrounds

Materials I used for my canvas:
Underpainting is blended background of Americana orchid, butter and baby blue
I applied the torn collage papers with Americana DecouPage as well as the Dover clip art woman image
I used the above paints plus Americana cad red, bright yellow(to make the flesh color) and true blue for shading

Backgrounds

Backgrounds

~*~*~*~*~*~*~*~*~*~*~*~*~*~*~*~*~*~*~*~*~*~*~*~*~*~*~*~*~*~*

Linda Giese encourages comments, questions, and sharing your art journey at linda.giese@yahoo.com

She teaches classes privately and at a local scrapbook store, The Stamp Addict

~*~*~*~*~*~*~*~*~*~*~*~*~*~*~*~*~*~*~*~*~*~*~*~*~*~*~*~*~*~*

.

.

Gelato Resistance Technique

~ * ~

This article is written by Michelle G. Brown

Know what it’s like to wake up early with a BRILLIANT idea in your head?!? That happened to me this week and I couldn’t wait to combine this gorgeous Kaisercraft butterfly stencil with the Goosebumps and Gelatos! The results was this bright card  – perfect for my nieces birthday!

Gelatos work well with this resistance technique with goosebumps

~ * ~

Materials

.

Michelle G Brown creates this bright butterfly birthday card

* Shipping tags

Kaisercraft Template – Flutter

* Goosebumps by Imagine Crafts 

* Gelatos – Tropical Set by Faber-Castell

 Plus

  • plastic cereal box sheet
  • masking tape
  • water container

And card making stuff, as desired

~ * ~

Gelato Resistance Technique

Gather materials and add the tags onto the plastic sheet, using masking tape to secure the stencil (it’s easier than trying to hold it still with one hand and apply the Goosebumps with the other – trust me on this one!)

Michelle G Brown creates this Gelato Resistance Technique

Daub the Goosebumps medium on the stencil. Once you get to the end, go back to the start and repeat to add a second layer. Take care not to add too much or the stencil will bleed.

Michelle G Brown creates this resistance background

Set tags aside to dry. Wipe your stencil clean with a baby wipe or kitchen towel and a little water. The goosebumps will clean off your stencil if you wipe it STRAIGHT AWAY!

The Goosebumps medium also comes in “Shimmer” which has silver glitter in the mixture.

Michelle G Brown creates this background with shimmer goosebumps

Grab your Gelatos – I used the Tropical set. You can use a combination that inspires you!

Color in with the Gelatos. This is the fun part!

Michelle G Brown creates a Gelato resistance background

Then use water to activate the Gelatos. I use my finger and start with the lighter colours, cleaning off my finger between colours. Use kitchen towel to rub over your butterflies and clean them up a bit.

Michelle G Brown creates a Gelato resistance backgrounds

Some clean off better than others, depending on the amount of goosebumps applied – I love this effect!

Michelle Brown creates a Gelato resistance background

Now your tags are ready to turn into whatever you choose – a card, bookmark or gift tag!

~ * ~


Butterfly Birthday Card

Gather your card making stuff. Here I’ve used black card with silver ink and a few other embellishments to complete the card.

Michelle G Brown makes a handmade greeting card

Using shipping tags makes it easy to add fibres into the top hole. I’ve also added a bit of bling.

Handmade greeting card

~ * ~

Gelato Resistance Trials

After I finished my first card with Goosebumps I realised I had other mediums that could also produce a resist with the Gelatos. So for the sake of completeness, I trialled a total of four mediums:

1. Goosebumps

2. Clear embossing powder

3. Crayon (using pink because I couldn’t find my white one)

4. Gesso

Each mini tag got a butterfly in each of the mediums

shipping tag trials

Then I applies the same Tropical Gelatos as above, using the same process.


Here are the final results:

1. Goosebumps – quick an easy and produces a soft resist

2. Clear Embossing Powder – produces a clear, shiny image. Applying the heat to melt the embossing powder has made the small tag a bit wavy

3. Crayon – quick and easy; not a solid image but a different look

Michelle G Brown is super creative

4. Gesso – nice white image

Gesso with stencil for mixed media resistance technique

Each medium produces a slightly different effect, so feel free to choose whichever medium you have on-hand. It’s great to have so many options when it comes to creating fun backgrounds for your mixed media art project.

Happy creating!

~*~*~*~*~*~*~*~*~*~*~*~*~*~*~*~*~*~*~*~*~*~*~*~*~

Michelle G. Brown is passionate about mixed media art and enjoys sharing her knowledge and techniques with you to allow you to express your own creativity. Michelle understands that many of us have an inner need to create. By learning a few basic techniques the amazing world of mixed media art is accessible to everyone!

Michelle lives with her husband and two boys in Melbourne, Australia.

~*~*~*~*~*~*~*~*~*~*~*~*~*~*~*~*~*~*~*~*~*~*~*~*~

Disclosure: Some of  these products have been provided by Imagine Crafts and Kaisercraft  for the purpose of review. All opinions are that of the MixedMediaArt team. The links on this page are affiliate links and any purchases help to support the ongoing work by MixedMediaArt.